| Last Modified: 08-23-2025 | 6.11:8.1.0 | Doc ID: RM100000002RP0F |
| Model Year Start: 2025 | Model: GR Corolla | Prod Date Range: [09/2024 - ] |
| Title: DOOR / HATCH: FUEL LID LOCK CONTROL CABLE ASSEMBLY (for Hatchback): INSTALLATION; 2025 - 2026 MY Corolla Corolla Hatchback Corolla HV GR Corolla [09/2024 - ] | ||
INSTALLATION
PROCEDURE
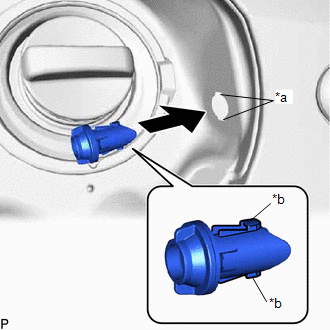
1. INSTALL FUEL FILLER OPENING LID LOCK RETAINER (except GR)
|
(a) Align the guides (B) with the cutouts and then insert a new fuel filler opening lid lock retainer as shown in the illustration. |
|
|
(b) Engage the 2 claws to install the fuel filler opening lid lock retainer. |
|
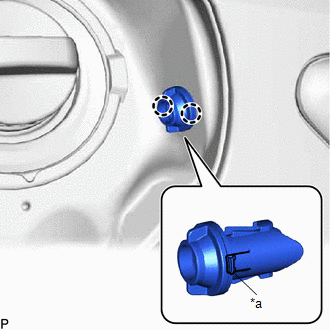
2. INSTALL FUEL LID LOCK CONTROL CABLE SUB-ASSEMBLY (except GR)
(a) Engage each clamp.
(b) Engage the 2 claws to install the fuel lid lock control cable sub-assembly as shown in the illustration.

|
Install in this Direction |
(c) Return the floor carpet to its original position.
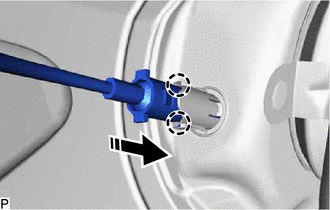
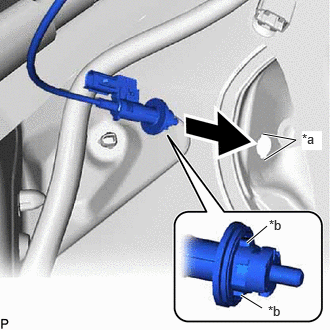
3. INSTALL FUEL LID LOCK CONTROL CABLE SUB-ASSEMBLY (for GR)
(a) Engage each clamp.
|
(b) Align the guides (B) with the cutouts and then insert fuel lid lock control cable sub-assembly as shown in the illustration. |
|
(c) Engage the 2 claws to install the fuel lid lock control cable sub-assembly as shown in the illustration.
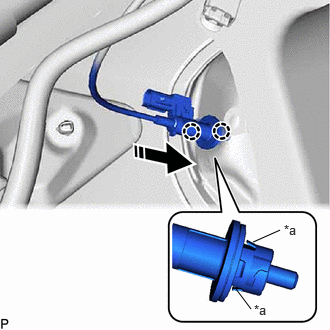
|
*a |
Claw |
|
|
Install in this Direction |
|
(d) Connect the connector. |
|

(e) Return the floor carpet to its original position.
4. INSTALL FUEL FILLER OPENING LID LOCK RETAINER (for GR)
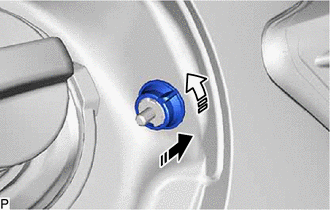
(a) Install the fuel filler opening lid lock retainer as indicated by the arrows, the order shown in the illustration.
|
|
Install in this Direction (1) |

|
Turn in this Direction (2) |
5. INSTALL FUEL LID LOCK OPEN LEVER SUB-ASSEMBLY
(a) Connect the fuel lid lock control cable sub-assembly to the fuel lid lock open lever sub-assembly.
|
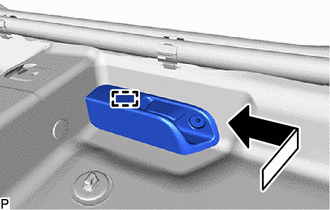
(b) Engage the guide as shown in the illustration. |
|
(c) Install the fuel lid lock open lever sub-assembly with the screw.
Torque:
5.5 N·m {56 kgf·cm, 49 in·lbf}
6. INSTALL CENTER PILLAR LOWER GARNISH LH
Click here
![2023 - 2026 MY Corolla Corolla Hatchback Corolla HV GR Corolla [11/2022 - ]; INTERIOR PANELS / TRIM: ROOF HEADLINING (for Hatchback): INSTALLATION+](/t3Portal/stylegraphics/info.gif)
7. CONNECT FRONT SEAT OUTER BELT ASSEMBLY LH
Click here
8. INSTALL LAP BELT OUTER ANCHOR COVER
Click here
9. INSTALL FRONT DOOR OPENING TRIM WEATHERSTRIP LH
Click here
10. INSTALL COWL SIDE TRIM SUB-ASSEMBLY LH
Click here
11. INSTALL FRONT DOOR SCUFF PLATE LH
Click here
12. INSTALL DECK TRIM SIDE PANEL ASSEMBLY LH
Click here
13. INSTALL CENTER FLOOR CROSSMEMBER BRACE SUB-ASSEMBLY (for GR)
Click here
14. INSTALL DECK TRIM SIDE LOWER BOARD LH (w/ Spare Tire)
Click here
15. INSTALL REAR SEAT SIDE GARNISH LH
Click here
16. INSTALL REAR PILLAR COVER LH (w/o Rear Seat Assembly)
Click here
17. INSTALL SIDE TRIM COVER LH (w/o Rear Seat Assembly)
Click here
18. INSTALL REAR NO. 1 FLOOR BOARD PANEL (w/o Rear Seat Assembly)
Click here
19. INSTALL REAR NO. 1 FLOOR BOARD (w/o Rear Seat Assembly)
Click here
20. INSTALL REAR DOOR OPENING TRIM WEATHERSTRIP LH
Click here
21. INSTALL REAR DOOR SCUFF PLATE LH
Click here
22. INSTALL REAR SEAT ASSEMBLY (w/ Rear Seat Assembly)
Click here
23. INSTALL REAR DECK TRIM COVER (w/o Deck Board)
Click here
24. INSTALL REAR FLOOR MAT ASSEMBLY (w/o Deck Board)
Click here
25. INSTALL REAR DECK TRIM COVER (w/ Deck Board)
Click here
26. INSTALL FRONT DECK FLOOR BOX (w/ Spare Tire)
Click here
27. INSTALL REAR NO. 1 FLOOR BOARD (w/ Spare Tire)
Click here
28. INSTALL DECK FLOOR BOX RH (w/ Spare Tire)
Click here
29. INSTALL DECK FLOOR BOX LH (w/ Spare Tire)
Click here
30. INSTALL SPARE WHEEL CUSHION (for GR)
Click here
31. INSTALL DECK BOARD ASSEMBLY (w/ Deck Board)
Click here
32. INSTALL PACKAGE TRAY TRIM PANEL ASSEMBLY
Click here
33. INSTALL FRONT SEAT ASSEMBLY LH
for Manual Seat:
Click here
for Power Seat:
Click here
|
|
|