| Last Modified: 01-27-2025 | 6.11:8.1.0 | Doc ID: RM100000002PR7Z |
| Model Year Start: 2025 | Model: GR Corolla | Prod Date Range: [09/2024 - ] |
| Title: AUDIO / VIDEO: ACTIVE NOISE CONTROL ECU (w/ Stereo Component Amplifier): REMOVAL; 2025 MY Corolla Corolla Hatchback Corolla HV GR Corolla [09/2024 - ] | ||
REMOVAL
CAUTION / NOTICE / HINT
The necessary procedures (adjustment, calibration, initialization or registration) that must be performed after parts are removed and installed, or replaced during stereo component equalizer assembly removal/installation are shown below.
Necessary Procedures After Parts Removed/Installed/Replaced
|
Replaced Part or Performed Procedure |
Necessary Procedures |
Effect/Inoperative Function When Necessary Procedures are not Performed |
Link |
|---|---|---|---|
|
Stereo Component Equalizer Assembly |
ECU configuration |
- |
|
PROCEDURE
1. REMOVE NO. 1 INSTRUMENT PANEL UNDER COVER SUB-ASSEMBLY
Click here
![2023 - 2025 MY Corolla Corolla Hatchback Corolla HV [11/2022 - ]; INTERIOR PANELS / TRIM: FRONT CONSOLE BOX (except G16E-GTS): REMOVAL+](/t3Portal/stylegraphics/info.gif)
2. REMOVE LOWER CENTER INSTRUMENT PANEL FINISH PANEL
Click here
3. REMOVE CENTER INSTRUMENT CLUSTER FINISH PANEL SUB-ASSEMBLY
Click here
4. REMOVE AIR CONDITIONING CONTROL ASSEMBLY
Click here
5. REMOVE CENTER INSTRUMENT PANEL REGISTER ASSEMBLY
Click here
6. REMOVE FRONT DOOR SCUFF PLATE RH
HINT:
Use the same procedure as for the LH side.
Click here
7. REMOVE COWL SIDE TRIM SUB-ASSEMBLY RH
HINT:
Use the same procedure as for the LH side.
Click here
8. DISCONNECT FRONT DOOR OPENING TRIM WEATHERSTRIP RH
Click here
9. REMOVE NO. 2 INSTRUMENT SIDE PANEL
Click here
10. REMOVE INSTRUMENT CLUSTER FINISH PANEL GARNISH ASSEMBLY
Click here
11. REMOVE GLOVE COMPARTMENT DOOR ASSEMBLY
Click here
12. REMOVE LOWER NO. 2 INSTRUMENT PANEL FINISH PANEL
Click here
13. REMOVE STEREO COMPONENT EQUALIZER ASSEMBLY
|
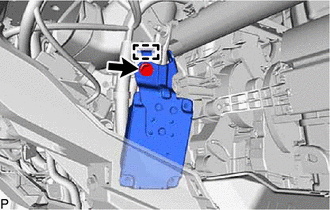
(a) Disconnect the connector. |
|
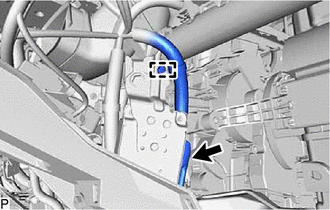
(b) Disengage the clamp.
|
(c) Remove the bolt and disengage the guide to remove the stereo component equalizer assembly. |
|
|
|
|