- Back door opener
| Last Modified: 01-27-2025 | 6.11:8.1.0 | Doc ID: RM100000002OT7D |
| Model Year Start: 2025 | Model: GR Corolla | Prod Date Range: [09/2024 - ] |
| Title: UC80F (AUTOMATIC TRANSMISSION / TRANSAXLE): PARK / NEUTRAL POSITION SWITCH: REMOVAL; 2025 MY Corolla Corolla Hatchback GR Corolla [09/2024 - ] | ||
REMOVAL
CAUTION / NOTICE / HINT
NOTICE:
Before removing the park/neutral position switch assembly, check that the shift lever is in N.
HINT:
When the cable is disconnected / reconnected to the battery terminal, systems temporarily stop operating. However, each system has a function that completes learning the first time the system is used.
Learning completes when vehicle is driven
|
Effect/Inoperative Function when Necessary Procedure not Performed |
Necessary Procedure |
Link |
|---|---|---|
|
Front Camera System |
Drive the vehicle straight ahead at 35 km/h (22 mph) or more for 5 seconds or more. |
|
Learning completes when vehicle is operated normally
|
Effect/Inoperative Function when Necessary Procedure not Performed |
Necessary Procedure |
Link |
|---|---|---|
|
Power Door Lock Control System |
Perform door unlock operation with door control switch or electrical key transmitter sub-assembly switch. |
|
PROCEDURE
1. PRECAUTION
NOTICE:
After turning the engine switch off, waiting time may be required before disconnecting the cable from the negative (-) battery terminal.
Click here
![2023 - 2025 MY Corolla Corolla Hatchback Corolla HV GR Corolla [09/2022 - ]; SETUP: WHEN DISCONNECTING OR RECONNECTING BATTERY TERMINAL: BEFORE DISCONNECTING BATTERY](/t3Portal/stylegraphics/info.gif)
2. SECURE VEHICLE
(a) Fully apply the parking brake and chock a wheel.
CAUTION:
- Make sure to apply the parking brake and chock a wheel before performing this procedure.
- If the vehicle is not secure and the shift lever is moved to N, the vehicle may suddenly move, possibly resulting in an accident or serious injury.
3. REMOVE DECK BOARD ASSEMBLY
Click here
4. DISCONNECT CABLE FROM NEGATIVE BATTERY TERMINAL
Click here
5. REMOVE RADIATOR SUPPORT OPENING COVER
Click here
6. REMOVE INLET NO. 1 AIR CLEANER
Click here
7. REMOVE AIR CLEANER WITH AIR CLEANER HOSE
Click here
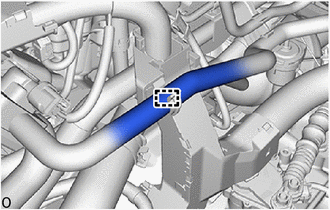
8. DISCONNECT FUEL VAPOR FEED HOSE
|
(a) Disengage the clamp to disconnect the fuel vapor feed hose. |
|
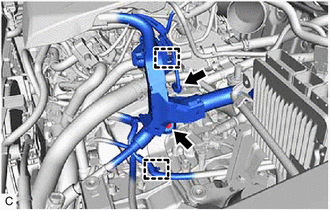
9. DISCONNECT WIRE HARNESS
|
(a) Disengage the 4 clamps. |
|

(b) Rotate the 3 lock levers while pushing the locks on the levers, and disconnect the 3 ECM connectors.
NOTICE:
After disconnecting the ECM connectors, make sure that dirt, water or other foreign matter does not contact the connecting parts of the ECM connectors.
|
(c) Disconnect the engine coolant temperature sensor connector. |
|
(d) Remove the bolt.
(e) Disengage the 2 clamps to disconnect the wire harness.
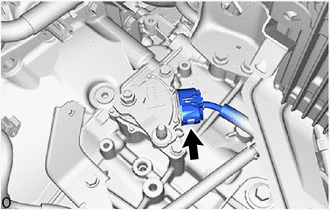
10. DISCONNECT TRANSMISSION CONTROL CABLE ASSEMBLY
|
(a) While disengaging the clip (A) as shown in the illustration, disconnect the transmission control cable assembly from the transmission control shaft lever together with the clip (A). |
|
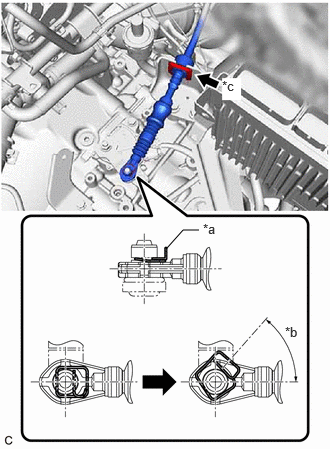
(b) Remove the clip (B) and disconnect the transmission control cable assembly from the No. 1 transmission control cable bracket.
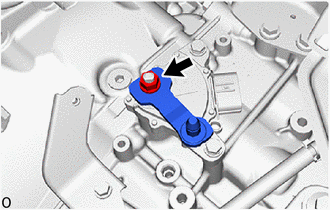
11. REMOVE PARK/NEUTRAL POSITION SWITCH ASSEMBLY
|
(a) Disconnect the park/neutral position switch assembly connector. |
|
|
(b) Remove the nut, washer and transmission control shaft lever from the manual valve lever shaft sub-assembly. |
|
|
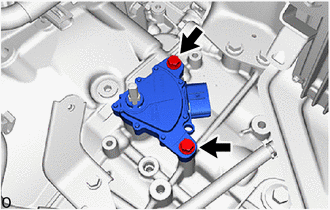
(c) Remove the 2 bolts and park/neutral position switch assembly from the automatic transaxle case sub-assembly. NOTICE: Before removing the park/neutral position switch assembly, remove any dirt or rust on the installation portion of the manual valve lever shaft sub-assembly. Be sure to remove the park/neutral position switch assembly straight along the manual valve lever shaft sub-assembly while being careful not to deform the plate spring that supports the manual valve lever shaft sub-assembly. If the plate spring is deformed, the park/neutral position switch assembly cannot be reinstalled correctly. |
|
|
|
|