| Last Modified: 01-27-2025 | 6.11:8.1.0 | Doc ID: RM100000002OT79 |
| Model Year Start: 2025 | Model: GR Corolla | Prod Date Range: [09/2024 - ] |
| Title: UC80F (AUTOMATIC TRANSMISSION / TRANSAXLE): PARK / NEUTRAL POSITION SWITCH: INSTALLATION; 2025 MY Corolla Corolla Hatchback GR Corolla [09/2024 - ] | ||
INSTALLATION
PROCEDURE
1. INSTALL PARK/NEUTRAL POSITION SWITCH ASSEMBLY
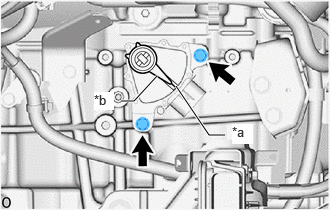
(a) Temporarily install the park/neutral position switch assembly to the automatic transaxle case sub-assembly with the 2 bolts.
NOTICE:
Before installing the park/neutral position switch assembly, remove any dirt or rust on the manual valve lever shaft sub-assembly. Be sure to install the park/neutral position switch assembly straight along the manual valve lever shaft sub-assembly while being careful not to deform the plate spring that supports the manual valve lever shaft sub-assembly. If the plate spring is deformed, the park/neutral position switch assembly cannot be installed correctly.
(b) Temporarily install the transmission control shaft lever to the manual valve lever shaft sub-assembly.
|
(c) Turn the transmission control shaft lever clockwise until it stops, then turn it counterclockwise 2 notches. |
|
(d) Remove the transmission control shaft lever from the manual valve lever shaft sub-assembly.
|
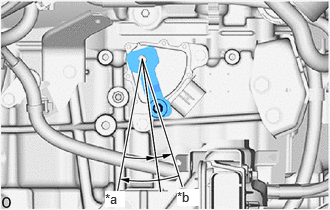
(e) Align the protrusion with the neutral basic line. |
|
(f) Hold the park/neutral position switch assembly in that position and tighten the 2 bolts.
Torque:
5.4 N·m {55 kgf·cm, 48 in·lbf}
(g) Install the transmission control shaft lever to the manual valve lever shaft sub-assembly with the washer and nut.
Torque:
12.7 N·m {130 kgf·cm, 9 ft·lbf}
(h) Connect the park/neutral position switch assembly connector.
2. CONNECT TRANSMISSION CONTROL CABLE ASSEMBLY
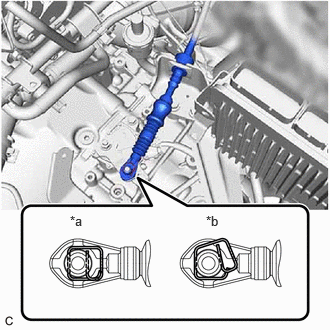
(a) Connect the transmission control cable assembly to the No. 1 transmission control cable bracket with a new clip.
|
(b) Connect the transmission control cable assembly to the transmission control shaft lever as shown in the illustration. NOTICE: Before connecting the transmission control cable assembly, check that the park/neutral position switch assembly and shift lever are in N. |
|
3. CONNECT WIRE HARNESS
(a) Engage the 2 clamps to connect the wire harness.
(b) Install the bolt.
Torque:
10 N·m {102 kgf·cm, 7 ft·lbf}
(c) Connect the engine coolant temperature sensor connector.
|
(d) Connect the 3 ECM connectors and rotate the 3 levers to lock them. NOTICE:
|
|
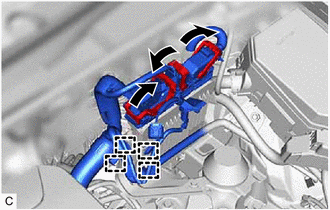
(e) Engage the 4 clamps.
4. CONNECT FUEL VAPOR FEED HOSE
(a) Engage the clamp to connect the fuel vapor feed hose.
5. INSTALL AIR CLEANER WITH AIR CLEANER HOSE
Click here
![2025 MY GR Corolla [09/2024 - ]; G16E-GTS (EMISSION CONTROL): MONOLITHIC CONVERTER: INSTALLATION+](/t3Portal/stylegraphics/info.gif)
6. INSTALL INLET NO. 1 AIR CLEANER
7. INSTALL RADIATOR SUPPORT OPENING COVER
Click here
8. CONNECT CABLE TO NEGATIVE BATTERY TERMINAL
Click here
9. INSTALL DECK BOARD ASSEMBLY
Click here
10. INITIALIZATION AFTER RECONNECTING BATTERY TERMINAL
HINT:
When disconnecting and reconnecting the battery, there is an automatic learning function that completes learning when the respective system is used.
Click here
11. INSPECT PARK/NEUTRAL POSITION SWITCH ASSEMBLY OPERATION
Click here
12. INSPECT SHIFT LEVER POSITION
Click here
13. ADJUST SHIFT LEVER POSITION
Click here
|
|
|