| Last Modified: 01-27-2025 | 6.11:8.1.0 | Doc ID: RM100000002OT71 |
| Model Year Start: 2025 | Model: GR Corolla | Prod Date Range: [09/2024 - ] |
| Title: UC80F (AUTOMATIC TRANSMISSION / TRANSAXLE): TRANSMISSION WIRE: REMOVAL; 2025 MY Corolla Corolla Hatchback GR Corolla [09/2024 - ] | ||
REMOVAL
CAUTION / NOTICE / HINT
The necessary procedures (adjustment, calibration, initialization or registration) that must be performed after parts are removed and installed, or replaced during transmission wire removal/installation are shown below.
Necessary Procedures After Parts Removed/Installed/Replaced
|
Replaced Part or Performed Procedure |
Necessary Procedure |
Effect/Inoperative Function when Necessary Procedure not Performed |
Link |
|---|---|---|---|
|
Replacement of automatic transaxle fluid |
ATF thermal degradation estimate reset |
The value of the Data List item "ATF Thermal Degradation Estimate" is not estimated correctly |
|
PROCEDURE
1. REMOVE TRANSMISSION OIL COOLER
Click here
![2025 MY Corolla Corolla Hatchback GR Corolla [09/2024 - ]; UC80F (AUTOMATIC TRANSMISSION / TRANSAXLE): OIL COOLER: REMOVAL](/t3Portal/stylegraphics/info.gif)
2. REMOVE RADIATOR SUPPORT OPENING COVER
Click here
3. REMOVE INLET NO. 1 AIR CLEANER
Click here
4. REMOVE AIR CLEANER WITH AIR CLEANER HOSE
Click here
5. REMOVE AIR CLEANER BRACKET
Click here
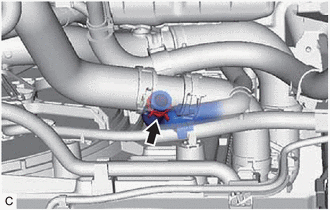
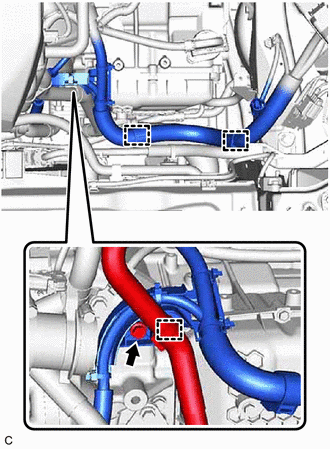
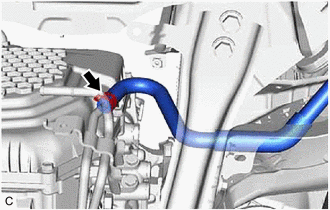
6. DISCONNECT RADIATOR HOSE ASSEMBLY (w/ Sub Radiator)
|
(a) Slide the clip and disconnect the radiator hose assembly from the water outlet. |
|
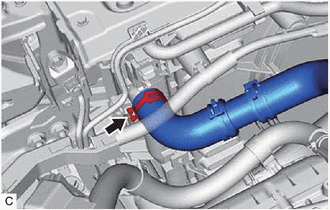
7. DISCONNECT NO. 1 SUB-RADIATOR HOSE (w/ Sub Radiator)
|
(a) Slide the clip and disconnect the No. 1 sub-radiator hose from the radiator hose assembly. |
|
8. REMOVE RADIATOR HOSE ASSEMBLY (w/ Sub Radiator)
|
(a) Slide the clip and remove the radiator hose assembly from the radiator assembly. |
|
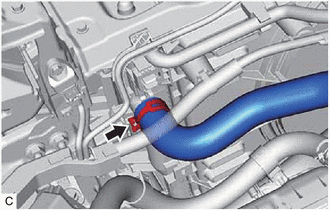
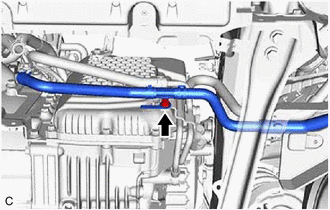
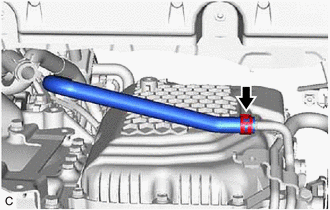
9. REMOVE NO. 1 RADIATOR HOSE (w/o Sub Radiator)
|
(a) Slide the clip and disconnect the No. 1 radiator hose from the water outlet. |
|
|
(b) Slide the clip and remove the No. 1 radiator hose from the radiator assembly. |
|
10. REMOVE NO. 2 AIR TUBE
Click here
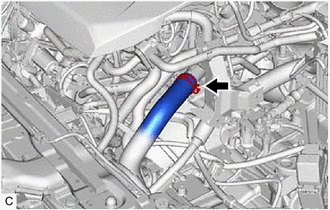
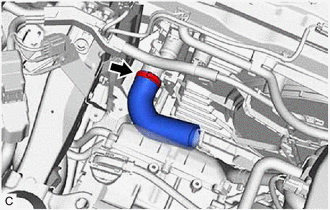
11. REMOVE NO. 4 AIR HOSE
|
(a) Loosen the hose clamp and remove the No. 4 air hose from the intercooler assembly. |
|
12. REMOVE NO. 5 AIR HOSE
Click here
13. SEPARATE ENGINE WIRE
|
(a) Disengage the 2 clamps to separate the engine wire from the 2 wire harness clamp brackets. |
|
(b) Disengage the clamp to separate the No. 4 water by-pass hose from the engine wire.
(c) Remove the bolt to separate the engine wire from the transaxle housing.
14. REMOVE WIRE HARNESS CLAMP BRACKET
|
(a) Remove the bolt and wire harness clamp bracket from the transmission case side cover. |
|

15. SEPARATE NO. 1 OIL COOLER TUBE SUB-ASSEMBLY
|
(a) Remove the bolt to separate the No. 1 oil cooler tube sub-assembly from the oil cooler union sub-assembly. HINT: Use a container to catch any automatic transaxle fluid which flows out. |
|
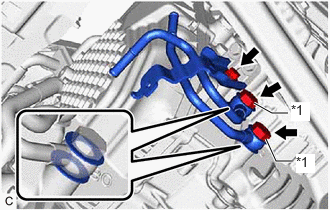
16. REMOVE OUTLET NO. 1 OIL COOLER HOSE
|
(a) Slide the clip and remove the outlet No. 1 oil cooler hose from the oil cooler union sub-assembly. HINT: Use a container to catch any automatic transaxle fluid which flows out. |
|
17. DISCONNECT NO. 1 TRANSMISSION OIL COOLER HOSE ASSEMBLY
|
(a) Slide the clip and disconnect the No. 1 transmission oil cooler hose assembly from the oil cooler union sub-assembly. HINT: Use a container to catch any automatic transaxle fluid which flows out. |
|
18. REMOVE OIL COOLER UNION SUB-ASSEMBLY
|
(a) Remove the bolt to separate the oil cooler union sub-assembly bracket portion from the automatic transaxle case sub-assembly. |
|
(b) Remove the 2 oil cooler union bolts and 4 gaskets to remove the oil cooler union sub-assembly from the automatic transaxle case sub-assembly.
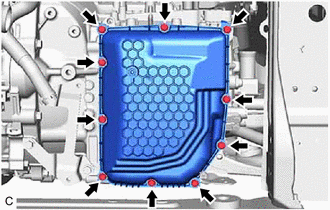
19. REMOVE TRANSMISSION CASE SIDE COVER
|
(a) Remove the 10 bolts and transmission case side cover from the automatic transaxle case sub-assembly. |
|
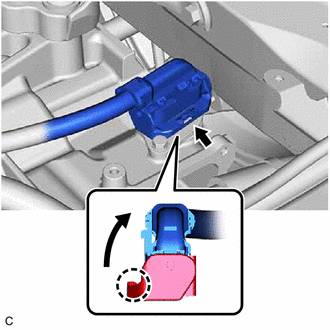
20. REMOVE TRANSMISSION WIRE
|
(a) Disengage the claw, rotate the lever and disconnect the transmission wire connector. |
|
|
(b) Disengage the clamp to disconnect the transmission wire from the solenoid lock plate. |
|
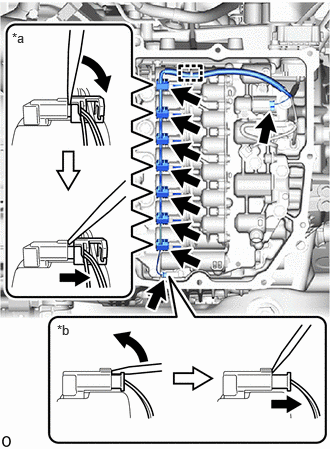
(c) Disconnect the 9 solenoid valve connectors.
HINT:
- Using a screwdriver, disconnect the solenoid valve connector (A) using the procedure shown in the illustration.
- Using a screwdriver, disconnect the solenoid valve connector (B) using the procedure shown in the illustration.
|
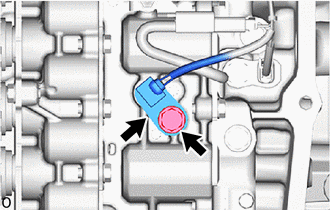
(d) Remove the bolt and temperature sensor clamp and disconnect the temperature sensor from the transmission valve body assembly. |
|
|
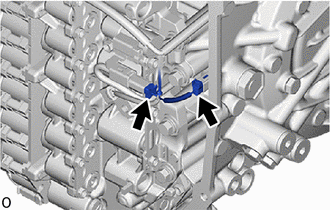
(e) Disconnect the transmission revolution sensor (NT) connector and transmission revolution sensor (NC) connector. |
|
|
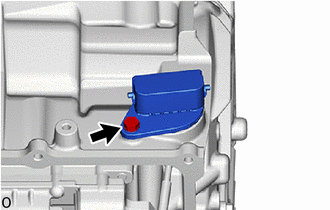
(f) Remove the bolt and transmission wire from the automatic transaxle case sub-assembly. |
|
|
|
|