| Last Modified: 05-13-2024 | 6.11:8.1.0 | Doc ID: RM10000000290TI |
| Model Year Start: 2023 | Model: GR Corolla | Prod Date Range: [11/2022 - ] |
| Title: SEAT BELT: REAR SEAT OUTER BELT ASSEMBLY (for Sedan): INSTALLATION; 2023 - 2025 MY Corolla Corolla Hatchback Corolla HV GR Corolla [11/2022 - ] | ||
INSTALLATION
CAUTION / NOTICE / HINT
CAUTION:
Wear protective gloves. Sharp areas on the parts may injure your hands.
PROCEDURE
1. INSTALL REAR 3 POINT TYPE SEAT OUTER BELT ASSEMBLY LH
(a) Secure the outer belt anchor bracket sub-assembly LH in a vise between aluminum plates.
NOTICE:
Do not overtighten the vise.
(b) Engage the 2 guides.
(c) Temporarily install the rear 3 point type seat outer belt assembly LH to the outer belt anchor bracket sub-assembly LH with the nut.
(d) Fully tighten the nut to install the rear 3 point type seat outer belt assembly LH.
Torque:
42 N·m {428 kgf·cm, 31 ft·lbf}
2. INSTALL REAR 3 POINT TYPE SEAT OUTER BELT ASSEMBLY RH
HINT:
Use the same procedure as for the LH side.
3. INSTALL REAR SEAT BELT RETRACTOR COVER LH
(a) Install the rear seat belt retractor cover LH.
4. INSTALL REAR SEAT BELT RETRACTOR COVER RH
HINT:
Use the same procedure as for the LH side.
5. INSTALL REAR 3 POINT TYPE SEAT OUTER BELT ASSEMBLY LH WITH BRACKET
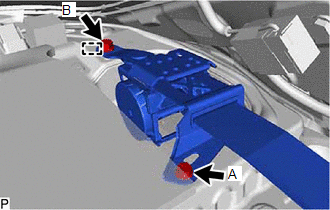
(a) w/o Pretensioner:
|
(1) Engage the guide and temporarily install the rear 3 point type seat outer belt assembly LH with bracket with the 2 bolts. |
|
(2) Fully tighten the bolt (A) and then the bolt (B) to install the rear 3 point type seat outer belt assembly LH with bracket.
Torque:
Bolt (A) :
12.5 N·m {127 kgf·cm, 9 ft·lbf}
Bolt (B) :
42 N·m {428 kgf·cm, 31 ft·lbf}
(3) Check that the ELR locks.
- With the rear 3 point type seat outer belt assembly LH with bracket installed to the vehicle, check that the belt locks when it is pulled out quickly.
NOTICE:
This check should be performed with the rear 3 point type seat outer belt assembly LH with bracket installed to the vehicle.
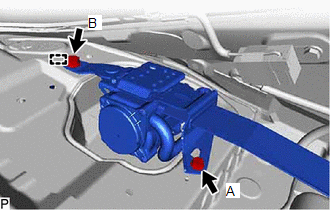
(b) w/ Pretensioner:
|
(1) Engage the guide and temporarily install the rear 3 point type seat outer belt assembly LH with bracket with the 2 bolts. |
|
(2) Fully tighten the bolt (A) and then the bolt (B) to install the rear 3 point type seat outer belt assembly LH with bracket.
Torque:
Bolt (A) :
12.5 N·m {127 kgf·cm, 9 ft·lbf}
Bolt (B) :
42 N·m {428 kgf·cm, 31 ft·lbf}
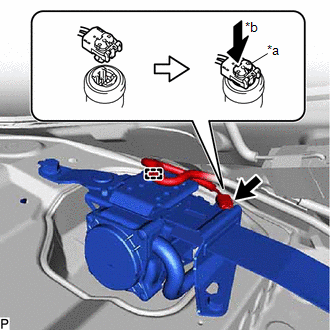
|
(3) Connect the pretensioner connector and lock the locking button as shown in the illustration. NOTICE: Securely lock the locking button. |
|
(4) Check that the ELR locks.
-
With the rear 3 point type seat outer belt assembly LH with bracket installed to the vehicle, check that the belt locks when it is pulled out quickly.
NOTICE:
This check should be performed with the rear 3 point type seat outer belt assembly LH with bracket installed to the vehicle.
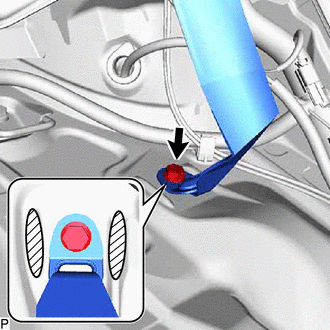
(c) Install the floor anchor of the rear 3 point type seat outer belt assembly LH with the bolt.
Torque:
42 N·m {428 kgf·cm, 31 ft·lbf}
NOTICE:
Do not allow the anchor part of the rear 3 point type seat outer belt assembly LH to overlap the protruding parts of the floor panel.


|
Protruding Part |
6. INSTALL REAR 3 POINT TYPE SEAT OUTER BELT ASSEMBLY RH WITH BRACKET
HINT:
Use the same procedure as for the LH side.
7. INSTALL PACKAGE TRAY TRIM PANEL ASSEMBLY
(a) Engage the 5 guides.
(b) Install the package tray trim panel assembly with the 3 clips.
8. INSTALL REAR SEAT SHOULDER BELT HOLE COVER
(a) Engage the 2 guides and 2 claws to install the rear seat shoulder belt hole cover.
9. INSTALL PACKAGE TRAY TRIM BRACKET LH
(a) Engage the 4 claws and 3 clips to install the package tray trim bracket LH.
10. INSTALL PACKAGE TRAY TRIM BRACKET RH
HINT:
Use the same procedure as for the LH side.
11. INSTALL CENTER STOP LIGHT SET
12. INSTALL ROOF SIDE INNER GARNISH LH
13. INSTALL ROOF SIDE INNER GARNISH RH
HINT:
Use the same procedure as for the LH side.
14. INSTALL REAR SEAT SIDE GARNISH LH (w/o Rear Seat Side Airbag)
15. INSTALL REAR SEAT SIDE GARNISH LH (w/ Rear Seat Side Airbag)
16. INSTALL REAR SEAT SIDE GARNISH RH
HINT:
Use the same procedure as for the LH side.
17. INSTALL REAR DOOR OPENING TRIM WEATHERSTRIP LH
18. INSTALL REAR DOOR OPENING TRIM WEATHERSTRIP RH
HINT:
Use the same procedure as for the LH side.
19. INSTALL REAR DOOR SCUFF PLATE LH (for Gasoline Model)
20. INSTALL REAR DOOR SCUFF PLATE RH (for Gasoline Model)
HINT:
Use the same procedure as for the LH side.
21. INSTALL REAR UNDER SIDE COVER LH (for HV Model)
22. INSTALL REAR UNDER SIDE COVER RH (for HV Model)
HINT:
Use the same procedure as for the LH side.
23. INSTALL REAR DOOR SCUFF PLATE LH (for HV Model)
24. INSTALL REAR DOOR SCUFF PLATE RH (for HV Model)
HINT:
Use the same procedure as for the LH side.
25. INSTALL REAR SEAT ASSEMBLY
26. CONNECT CABLE TO NEGATIVE AUXILIARY BATTERY TERMINAL (w/ Pretensioner)
27. INITIALIZATION AFTER RECONNECTING AUXILIARY BATTERY TERMINAL (w/ Pretensioner)
HINT:
When disconnecting and reconnecting the battery, there is an automatic learning function that completes learning when the respective system is used.
|
|
|


![2020 - 2025 MY Corolla Corolla Hatchback Corolla HV GR Corolla [01/2019 - ]; LIGHTING (EXT): HIGH MOUNTED STOP LIGHT ASSEMBLY (for Sedan): INSTALLATION](/t3Portal/stylegraphics/info.gif)