| Last Modified: 05-13-2024 | 6.11:8.1.0 | Doc ID: RM1000000028TG7 |
| Model Year Start: 2023 | Model: GR Corolla | Prod Date Range: [11/2022 - ] |
| Title: G16E-GTS (LUBRICATION): OIL PUMP: INSTALLATION; 2023 - 2025 MY GR Corolla [11/2022 - ] | ||
INSTALLATION
PROCEDURE
1. INSTALL TIMING CHAIN COVER OIL SEAL
2. INSTALL TIMING CHAIN COVER ASSEMBLY
|
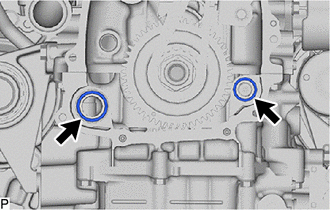
(a) Install 2 new oil pump gaskets to the cylinder block sub-assembly. |
|
(b) Clean the contact surfaces of the timing chain cover assembly, oil pan sub-assembly and cylinder block sub-assembly, and confirm that no oil, moisture, or other foreign matter is on the surfaces.
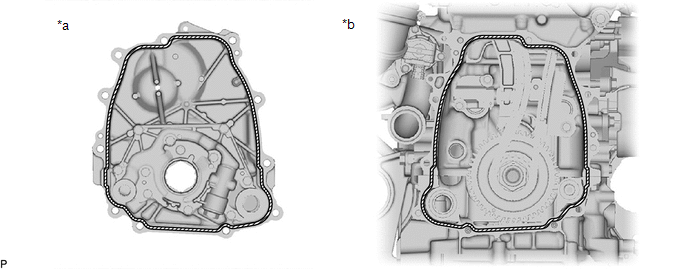
|
*a |
Timing Chain Cover Assembly Side |
*b |
Engine Assembly Side |
(c) Apply seal packing in a continuous line to the timing chain cover assembly as shown in the illustration.
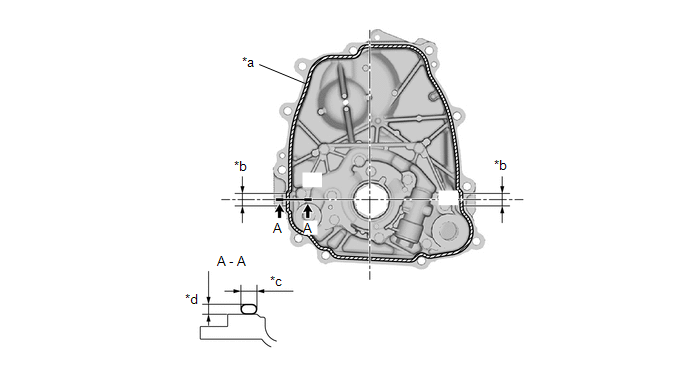
|
*a |
2.5 to 3.5 mm (0.0984 to 0.138 in.) |
*b |
10 mm (0.394 in.) |
|
*c |
4.0 to 6.0 mm (0.157 to 0.236 in.) |
*d |
3.0 to 4.0 mm (0.118 to 0.157 in.) |

|
Seal Packing |
- |
- |
Seal Packing:
Toyota Genuine Seal Packing Black, Three Bond 1207B or equivalent
NOTICE:
- Clean the surfaces with non-residue solvent before applying seal packing.
- Install the timing chain cover assembly within 3 minutes and tighten the bolts within 10 minutes of applying seal packing.
- Do not add oil for at least 2 hours after installation.
- Do not start the engine for at least 2 hours after installation.
- Make sure that the diameter at the start and end of each line of seal packing is 5 +/- 2 mm (0.197 +/- 0.0787 in.).
(d) Align the oil pump drive rotor groove of the timing chain cover assembly.

|
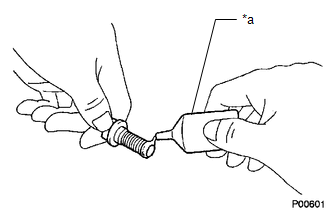
(e) Apply adhesive to 5 and a half threads or more of the end of the bolts (A, B). Adhesive: Toyota Genuine Adhesive 1344, Three Bond 1344 or equivalent |
|
|
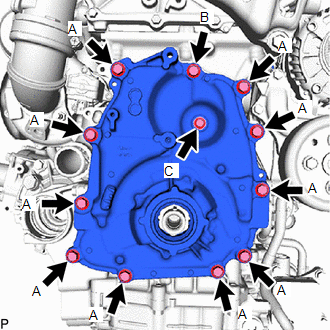
(f) Temporarily install the timing chain cover assembly with the 10 bolts a new bolt (B), (C) and seal washer. Bolt Length:
|
|
(g) Install the timing chain cover assembly with the 11 bolts and the bolt (C) and seal washer in the order shown in the illustration.
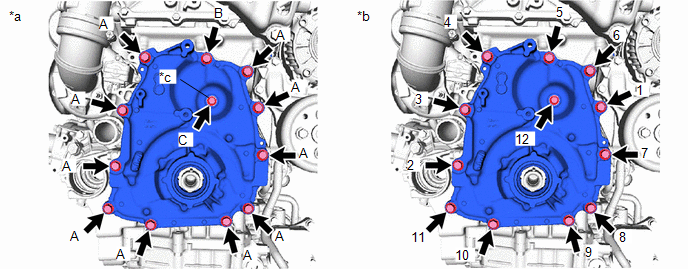
|
*a |
Torque |
*b |
Bolt Tightening Order |
|
*c |
Seal Washer |
- |
- |
Torque:
Bolt (A), (B) :
21 N·m {214 kgf·cm, 15 ft·lbf}
Bolt (C) :
10 N·m {102 kgf·cm, 7 ft·lbf}
3. INSTALL CRANKSHAFT PULLEY ASSEMBLY
4. INSTALL TIMING GEAR COVER INSULATOR
(a) Install the timing gear cover insulator to the timing chain cover assembly.
5. INSTALL V-RIBBED BELT TENSIONER ASSEMBLY
6. INSTALL ENGINE WIRE
(a) Install the engine wire to the timing chain cover assembly with the bolt.
Torque:
10 N·m {102 kgf·cm, 7 ft·lbf}
7. INSTALL NO. 2 AIR HOSE
(a) Install the No. 2 air hose to the turbocharger sub-assembly and tighten the hose clamp.
Torque:
6.0 N·m {61 kgf·cm, 53 in·lbf}
8. INSTALL NO. 1 AIR TUBE
(a) Install the 2 bolts.
Torque:
7.0 N·m {71 kgf·cm, 62 in·lbf}
(b) Install the No. 1 air tube to the No. 2 air hose and No. 3 air hose and tighten the 2 hose clamps.
Torque:
6.0 N·m {61 kgf·cm, 53 in·lbf}
9. INSTALL COMPRESSOR ASSEMBLY WITH PULLEY
10. INSTALL FAN AND GENERATOR V BELT
11. INSTALL NO. 2 ENGINE UNDER COVER AIR GUIDE (w/ Engine Under Cover Air Guide)
12. INSTALL WINDSHIELD WASHER JAR ASSEMBLY (w/ Engine Under Cover Air Guide)
13. INSTALL INLET HOSE (w/ Engine Under Cover Air Guide)
14. ADD WASHER FLUID (w/ Engine Under Cover Air Guide)
15. INSTALL FRONT FENDER SPLASH SHIELD SUB-ASSEMBLY RH (w/ Engine Under Cover Air Guide)
16. INSTALL NO. 1 ENGINE UNDER COVER ASSEMBLY
17. INSTALL REAR ENGINE UNDER COVER RH
18. INSTALL FRONT WHEELS
|
|
|
![2023 - 2025 MY GR Corolla [09/2022 - ]; G16E-GTS (ENGINE MECHANICAL): ENGINE UNIT: REASSEMBLY+](/t3Portal/stylegraphics/info.gif)
