| Last Modified: 05-13-2024 | 6.11:8.1.0 | Doc ID: RM1000000028PJJ |
| Model Year Start: 2023 | Model: GR Corolla | Prod Date Range: [11/2022 - ] |
| Title: EXTERIOR PANELS / TRIM: REAR SPOILER (for Sedan): INSTALLATION; 2023 - 2025 MY Corolla Corolla Hatchback Corolla HV GR Corolla [11/2022 - ] | ||
INSTALLATION
PROCEDURE
1. INSTALL REAR SPOILER PROTECTOR LH (for Type A)
HINT:
When installing the rear spoiler protector LH, heat the rear spoiler and rear spoiler protector LH using a heat light.
Heating Temperature
|
Item |
Temperature |
|---|---|
|
Rear Spoiler |
20 to 30°C (68 to 86°F) |
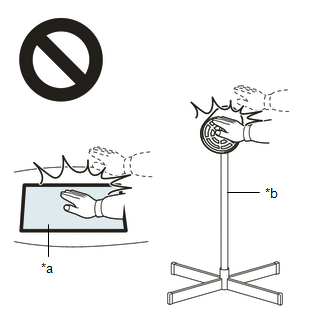
CAUTION:
- Do not touch the heat light and heated parts, touching the heat light may result in burns.
- Touching heated parts for a long time may result in burns.

|
*a |
Heated Part |
|
*b |
Heat Light |
NOTICE:
Do not heat the rear spoiler excessively.
(a) Clean the rear spoiler surface.
(1) Using a heat light, heat the rear spoiler surface.
(2) Remove any remaining double-sided tape from the rear spoiler.
(3) Wipe off any tape adhesive residue with cleaner.
(b) Remove the release paper from a new rear spoiler protector LH.
HINT:
After removing the release paper, keep the exposed adhesive free from foreign matter.
(c) Install the rear spoiler protector LH.
HINT:
Press the rear spoiler protector LH firmly to install it.
2. INSTALL REAR SPOILER PROTECTOR RH (for Type A)
HINT:
Use the same procedure as for the LH side.
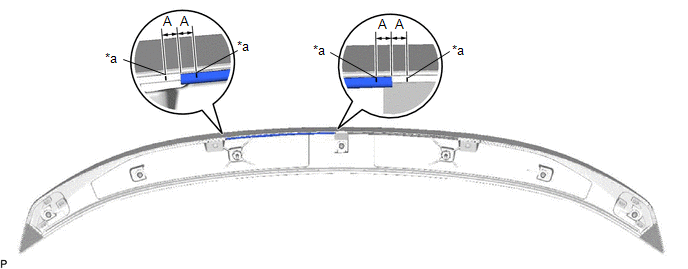
3. INSTALL NO. 4 REAR SPOILER PROTECTOR (for Type A)
HINT:
- Use the same procedure for the RH side and LH side.
- When installing the No. 4 rear spoiler protector, heat the rear spoiler and No. 4 rear spoiler protector using a heat light.
Heating Temperature
|
Item |
Temperature |
|---|---|
|
Rear Spoiler |
20 to 30°C (68 to 86°F) |
CAUTION:
- Do not touch the heat light and heated parts, touching the heat light may result in burns.
- Touching heated parts for a long time may result in burns.

|
*a |
Heated Part |
|
*b |
Heat Light |
NOTICE:
Do not heat the rear spoiler excessively.
(a) Clean the rear spoiler surface.
(1) Using a heat light, heat the rear spoiler surface.
(2) Remove any remaining double-sided tape from the rear spoiler.
(3) Wipe off any tape adhesive residue with cleaner.
(b) Remove the release paper from a new No. 4 rear spoiler protector.
HINT:
After removing the release paper, keep the exposed adhesive free from foreign matter.
(c) Align the No. 4 rear spoiler protector with the mark on the rear spoiler and install it as shown in the illustration.

|
*a |
Line |
- |
- |
Standard Measurement:
|
Area |
Measurement |
Area |
Measurement |
|---|---|---|---|
|
A |
2.5 mm (0.0984 in.) |
- |
- |
HINT:
Press the No. 4 rear spoiler protector firmly to install it.
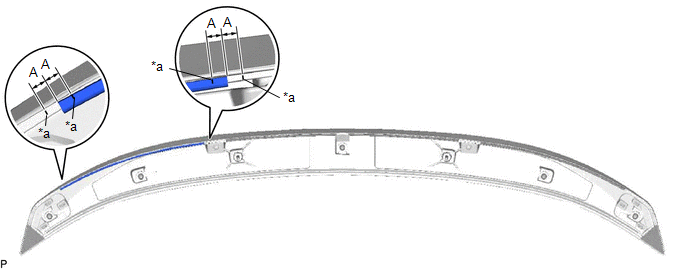
4. INSTALL NO. 10 REAR SPOILER PROTECTOR (for Type A)
HINT:
- Use the same procedure for the RH side and LH side.
- When installing the No. 10 rear spoiler protector, heat the rear spoiler and No. 10 rear spoiler protector using a heat light.
Heating Temperature
|
Item |
Temperature |
|---|---|
|
Rear Spoiler |
20 to 30°C (68 to 86°F) |
CAUTION:
- Do not touch the heat light and heated parts, touching the heat light may result in burns.
- Touching heated parts for a long time may result in burns.

|
*a |
Heated Part |
|
*b |
Heat Light |
NOTICE:
Do not heat the rear spoiler excessively.
(a) Clean the rear spoiler surface.
(1) Using a heat light, heat the rear spoiler surface.
(2) Remove any remaining double-sided tape from the rear spoiler.
(3) Wipe off any tape adhesive residue with cleaner.
(b) Remove the release paper from a new No. 10 rear spoiler protector.
HINT:
After removing the release paper, keep the exposed adhesive free from foreign matter.
(c) Align the No. 10 rear spoiler protector with the mark on the rear spoiler and install it as shown in the illustration.

|
*a |
Line |
- |
- |
Standard Measurement:
|
Area |
Measurement |
Area |
Measurement |
|---|---|---|---|
|
A |
2.5 mm (0.0984 in.) |
- |
- |
HINT:
Press the No. 10 rear spoiler protector firmly to install it.
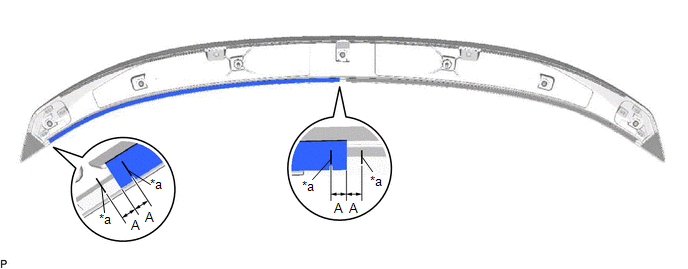
5. INSTALL REAR SPOILER CENTER PROTECTOR (for Type A)
HINT:
- Use the same procedure for the RH side and LH side.
- When installing the rear spoiler center protector, heat the rear spoiler and rear spoiler center protector using a heat light.
Heating Temperature
|
Item |
Temperature |
|---|---|
|
Rear Spoiler |
20 to 30°C (68 to 86°F) |
CAUTION:
- Do not touch the heat light and heated parts, touching the heat light may result in burns.
- Touching heated parts for a long time may result in burns.

|
*a |
Heated Part |
|
*b |
Heat Light |
NOTICE:
Do not heat the rear spoiler excessively.
(a) Clean the rear spoiler surface.
(1) Using a heat light, heat the rear spoiler surface.
(2) Remove any remaining double-sided tape from the rear spoiler.
(3) Wipe off any tape adhesive residue with cleaner.
(b) Remove the release paper from a new rear spoiler center protector.
HINT:
After removing the release paper, keep the exposed adhesive free from foreign matter.
(c) Align the rear spoiler center protector with the mark on the rear spoiler and install it as shown in the illustration.

|
*a |
Line |
- |
- |
Standard Measurement:
|
Area |
Measurement |
Area |
Measurement |
|---|---|---|---|
|
A |
2.5 mm (0.0984 in.) |
- |
- |
HINT:
Press the rear spoiler center protector firmly to install it.
6. INSTALL REAR SPOILER SUB-ASSEMBLY
(a) Clean the rear spoiler sub-assembly surface.
(1) Using a heat light, heat the double-sided tape remaining on the vehicle body and rear spoiler sub-assembly.
Heating Temperature
|
Item |
Temperature |
|---|---|
|
Rear Spoiler Sub-assembly |
20 to 30°C (68 to 86°F) |
|
Vehicle Body |
20 to 30°C (68 to 86°F) |
CAUTION:
- Do not touch the heat light and heated parts, touching the heat light may result in burns.
- Touching heated parts for a long time may result in burns.

|
*a |
Heated Part |
|
*b |
Heat Light |
NOTICE:
Do not heat the vehicle body, rear spoiler sub-assembly excessively.
(2) Remove any remaining double-sided tape from the rear spoiler sub-assembly.
(3) Wipe off any tape adhesive residue with cleaner.
(b) Remove the release paper from a new rear spoiler sub-assembly.
HINT:
After removing the release paper, keep the exposed adhesive free from foreign matter.
(c) Engage the 5 clips.
(d) Install the rear spoiler sub-assembly with the 2 nuts.
Torque:
for Type A: :
6.0 N·m {61 kgf·cm, 53 in·lbf}
for Type B: :
3.8 N·m {39 kgf·cm, 34 in·lbf}
7. INSTALL LUGGAGE COMPARTMENT DOOR COVER
|
|
|
![2020 - 2025 MY Corolla Corolla Hatchback Corolla HV GR Corolla [01/2019 - ]; DOOR / HATCH: LUGGAGE COMPARTMENT DOOR: REASSEMBLY+](/t3Portal/stylegraphics/info.gif)