| Last Modified: 08-23-2025 | 6.11:8.1.0 | Doc ID: RM1000000028ILE |
| Model Year Start: 2023 | Model: GR Corolla | Prod Date Range: [11/2022 - 09/2024] |
| Title: HEATING / AIR CONDITIONING: COMPRESSOR (for G16E-GTS): REMOVAL; 2023 - 2025 MY GR Corolla [11/2022 - 09/2024] | ||
REMOVAL
CAUTION / NOTICE / HINT
NOTICE:
If metal dust is produced inside the compressor with motor assembly, it could cause a clog in the modulator. If any metal dust comes out, replace the cooler dryer inside the modulator also.
Click here
![2023 - 2026 MY GR Corolla [09/2022 - ]; HEATING / AIR CONDITIONING: CONDENSER (for G16E-GTS): DISASSEMBLY](/t3Portal/stylegraphics/info.gif)
PROCEDURE
1. RECOVER REFRIGERANT FROM REFRIGERATION SYSTEM
Click here
2. REMOVE FRONT BUMPER ASSEMBLY (w/o Rear Seat Assembly)
Click here
3. REMOVE FRONT WHEEL RH (w/o Rear Seat Assembly)
Click here
4. REMOVE FRONT FENDER LINER RH (w/o Rear Seat Assembly)
Click here
5. DRAIN WASHER FLUID (w/o Rear Seat Assembly)
Click here
6. REMOVE INLET HOSE (w/o Rear Seat Assembly)
Click here
7. REMOVE WINDSHIELD WASHER JAR ASSEMBLY (w/o Rear Seat Assembly)
Click here
8. REMOVE NO. 2 ENGINE UNDER COVER AIR GUIDE (w/o Rear Seat Assembly)
Click here
9. REMOVE NO. 1 ENGINE UNDER COVER ASSEMBLY
Click here
10. REMOVE REAR ENGINE UNDER COVER RH
Click here
11. REMOVE FAN AND GENERATOR V BELT
Click here
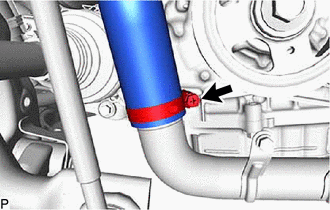
12. DISCONNECT NO. 2 AIR HOSE
|
(a) Loosen the hose clamp and disconnect the No. 2 air hose. |
|
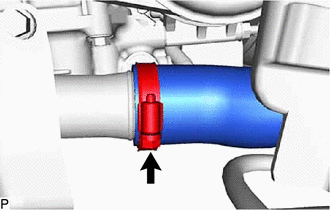
13. DISCONNECT NO. 3 AIR HOSE
|
(a) Loosen the hose clamp and disconnect the No. 3 air hose. |
|
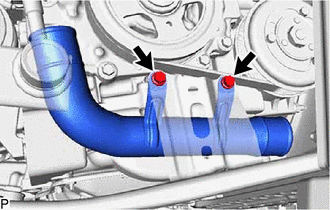
14. REMOVE NO. 1 AIR TUBE
|
(a) Remove the 2 bolts and No. 1 air tube. |
|
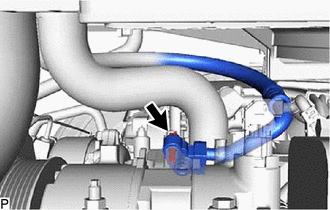
15. DISCONNECT SUCTION HOSE SUB-ASSEMBLY
|
(a) Remove the bolt and disconnect the suction hose sub-assembly from the compressor assembly with pulley. |
|
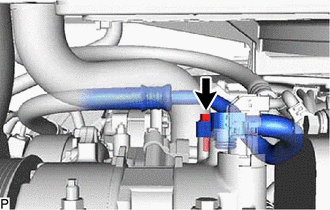
(b) Remove the O-ring from the suction hose sub-assembly.
NOTICE:
Seal the openings of the disconnected parts using vinyl tape to prevent moisture and foreign matter from entering them.
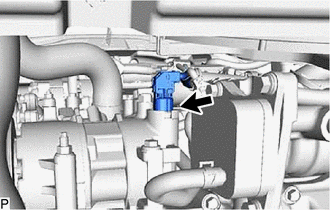
16. DISCONNECT DISCHARGE HOSE SUB-ASSEMBLY
|
(a) Remove the bolt and disconnect the discharge hose sub-assembly from the compressor assembly with pulley. |
|
(b) Remove the O-ring from the discharge hose sub-assembly.
NOTICE:
Seal the openings of the disconnected parts using vinyl tape to prevent moisture and foreign matter from entering them.
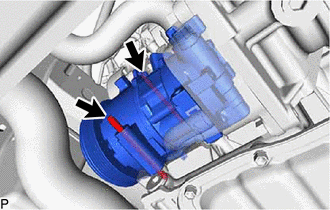
17. REMOVE COMPRESSOR ASSEMBLY WITH PULLEY
|
(a) Disconnect the connector. |
|
(b) Remove the 2 bolts and 2 nuts.
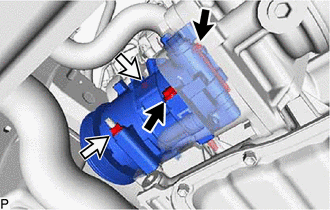

|
Bolt |

|
Nut |
|
(c) Using an E8 "TORX" socket wrench, remove the 2 stud bolts and compressor assembly with pulley. |
|
|
|
|