- Door control receiver*1
| Last Modified: 05-13-2024 | 6.11:8.1.0 | Doc ID: RM1000000028GQR |
| Model Year Start: 2023 | Model: GR Corolla | Prod Date Range: [09/2022 - 11/2022] |
| Title: DOOR LOCK: DOOR CONTROL RECEIVER (for Sedan without Tire Pressure Warning System): REMOVAL; 2023 MY Corolla Corolla Hatchback Corolla HV GR Corolla [09/2022 - 11/2022] | ||
REMOVAL
CAUTION / NOTICE / HINT
The necessary procedures (adjustment, calibration, initialization or registration) that must be performed after parts are removed and installed, or replaced during door control receiver removal/installation are shown below.
Necessary Procedure After Parts Removed/Installed/Replaced (for HV Model)
|
Replaced Part or Performed Procedure |
Necessary Procedure |
Effect/Inoperative Function when Necessary Procedures are not Performed |
Link |
|---|---|---|---|
| *1: w/o Smart Key System | |||
|
|
Code registration |
Wireless door lock control system |
|
Necessary Procedure After Parts Removed/Installed/Replaced (for Gasoline Model)
|
Replaced Part or Performed Procedure |
Necessary Procedure |
Effect/Inoperative Function when Necessary Procedures are not Performed |
Link |
|---|---|---|---|
| *1: w/o Smart Key System | |||
|
Code registration |
Wireless door lock control system |
|
PROCEDURE
1. REMOVE REAR SEAT ASSEMBLY
2. REMOVE REAR DOOR SCUFF PLATE LH (for Gasoline Model)
3. REMOVE REAR DOOR SCUFF PLATE RH (for Gasoline Model)
HINT:
Use the same procedure as for the LH side.
4. REMOVE REAR DOOR SCUFF PLATE LH (for HV Model)
5. REMOVE REAR DOOR SCUFF PLATE RH (for HV Model)
HINT:
Use the same procedure as for the LH side.
6. REMOVE REAR UNDER SIDE COVER LH (for HV Model)
7. REMOVE REAR UNDER SIDE COVER RH (for HV Model)
HINT:
Use the same procedure as for the LH side.
8. DISCONNECT REAR DOOR OPENING TRIM WEATHERSTRIP LH
9. DISCONNECT REAR DOOR OPENING TRIM WEATHERSTRIP RH
HINT:
Use the same procedure as for the LH side.
10. REMOVE REAR SEAT SIDE GARNISH LH (w/o Rear Seat Side Airbag)
11. REMOVE REAR SEAT SIDE GARNISH LH (w/ Rear Seat Side Airbag)
12. REMOVE REAR SEAT SIDE GARNISH RH (w/o Rear Seat Side Airbag)
HINT:
Use the same procedure as for the LH side.
13. REMOVE REAR SEAT SIDE GARNISH RH (w/ Rear Seat Side Airbag)
HINT:
Use the same procedure as for the LH side.
14. REMOVE ROOF SIDE INNER GARNISH LH
15. REMOVE ROOF SIDE INNER GARNISH RH
HINT:
Use the same procedure as for the LH side.
16. REMOVE CENTER STOP LIGHT SET
17. REMOVE PACKAGE TRAY TRIM BRACKET LH
18. REMOVE PACKAGE TRAY TRIM BRACKET RH
HINT:
Use the same procedure as for the LH side.
19. REMOVE REAR SEAT SHOULDER BELT HOLE COVER
20. REMOVE PACKAGE TRAY TRIM PANEL ASSEMBLY
21. REMOVE DOOR CONTROL RECEIVER (w/o Smart Key System)
NOTICE:
- Do not drop, strike or otherwise subject the door control receiver to impact.
- If the door control receiver is subjected to an impact, replace it with a new one.
|
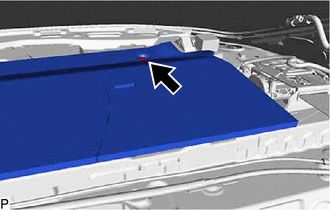
(a) Remove the clip. |
|
|
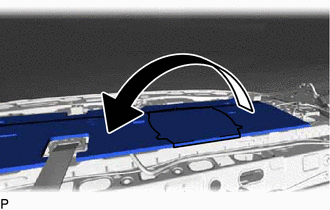
(b) Turn back the package tray trim pad as shown in the illustration. |
|
|
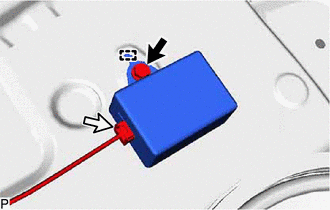
(c) Remove the bolt. |
|
(d) Disengage the guide.
(e) Disconnect the connector to remove the door control receiver.
22. REMOVE SMART DOOR CONTROL RECEIVER ASSEMBLY (w/ Smart Key System)
NOTICE:
- Do not drop, strike or otherwise subject the smart door control receiver assembly to impact.
- If the smart door control receiver assembly is subjected to an impact, replace it with a new one.
|
(a) Remove the clip. |
|
|
(b) Turn back the package tray trim pad as shown in the illustration. |
|
|
(c) Remove the bolt. |
|
(d) Disengage the guide.
(e) Disconnect the connector to remove the smart door control receiver assembly.
|
|
|
![2023 MY Corolla Corolla Hatchback Corolla HV GR Corolla [09/2022 - 11/2022]; DOOR LOCK: WIRELESS DOOR LOCK CONTROL SYSTEM (for TMC Made without Smart Key System): REGISTRATION](/t3Portal/stylegraphics/info.gif)


