- Perform reset memory
- CVT oil pressure calibration
- Perform road test to allow TCM to learn
| Last Modified: 05-13-2024 | 6.11:8.1.0 | Doc ID: RM1000000028GEQ |
| Model Year Start: 2023 | Model: Corolla Hatchback | Prod Date Range: [11/2022 - 03/2023] |
| Title: M20A-FKS (ENGINE CONTROL): ECM: REMOVAL; 2023 MY Corolla Corolla Hatchback [11/2022 - 03/2023] | ||
REMOVAL
CAUTION / NOTICE / HINT
The necessary procedures (adjustment, calibration, initialization or registration) that must be performed after parts are removed and installed, or replaced during ECM removal/installation are shown below.
Necessary Procedures After Parts Removed/Installed/Replaced
|
Replaced Part or Performed Procedure |
Necessary Procedure |
Effect/Inoperative Function when Necessary Procedure not Performed |
Link |
|---|---|---|---|
|
*1: w/ Smart Key System
*2: w/o Smart Key System *3: w/ Steering Lock Function |
|||
|
Replacement of ECM |
Vehicle Identification Number (VIN) registration |
MIL comes on |
|
|
Update ECU security key |
Vehicle Control History (RoB) are stored |
|
|
|
ECU communication ID registration (Immobiliser system) |
Engine start function |
|
|
|
|
|
|
|
|
Replacement of ECM*1 |
Code registration (Smart Key System (for Gasoline Model, Start Function)) |
|
|
|
Replacement of ECM*2 |
Code registration (Immobiliser system) |
|
|
NOTICE:
If the ECM has been struck or dropped, replace it.
HINT:
When the cable is disconnected / reconnected to the battery terminal, systems temporarily stop operating. However, each system has a function that completes learning the first time the system is used.
Learning completes when vehicle is driven
|
Effect/Inoperative Function when Necessary Procedure not Performed |
Necessary Procedure |
Link |
|---|---|---|
|
Front Camera System |
Drive the vehicle straight ahead at 15 km/h (9 mph) or more for 1 second or more. |
|
Learning completes when vehicle is operated normally
|
Effect/Inoperative Function when Necessary Procedure not Performed |
Necessary Procedure |
Link |
|---|---|---|
| *1: for Hatchback | ||
|
Power Door Lock Control System
|
Perform door unlock operation with door control switch or electrical key transmitter sub-assembly switch. |
|
PROCEDURE
1. PRECAUTION
NOTICE:
After turning the engine switch off, waiting time may be required before disconnecting the cable from the negative (-) battery terminal.
Click here
![2023 - 2025 MY Corolla Corolla Hatchback Corolla HV GR Corolla [09/2022 - ]; SETUP: WHEN DISCONNECTING OR RECONNECTING BATTERY TERMINAL: BEFORE DISCONNECTING BATTERY](/t3Portal/stylegraphics/info.gif)
2. DISCONNECT CABLE FROM NEGATIVE BATTERY TERMINAL
Click here
3. REMOVE RADIATOR SUPPORT OPENING COVER
-
for Hatchback except GR
Click here
-
for Sedan with Illumination
Click here
-
for Sedan without Illumination
Click here
4. REMOVE INLET NO. 1 AIR CLEANER
Click here
5. REMOVE AIR CLEANER CAP WITH AIR CLEANER HOSE
Click here
6. REMOVE AIR CLEANER FILTER ELEMENT SUB-ASSEMBLY
Click here
7. REMOVE AIR CLEANER CASE SUB-ASSEMBLY
|
(a) Remove the 2 bolts. |
|
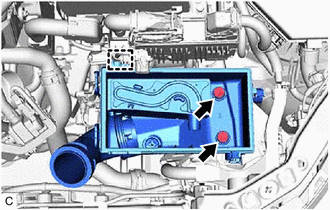
(b) Disengage the guide to remove the air cleaner case sub-assembly.
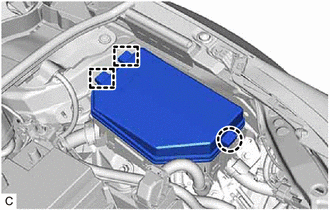
8. REMOVE ECM
|
(a) Disengage the claw and 2 guides to remove the No. 1 relay block cover from the No. 1 engine room relay block and No. 1 junction block assembly. |
|
|
(b) Disconnect the 3 connectors from the No. 1 engine room relay block and No. 1 junction block assembly. |
|
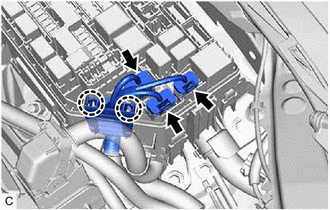
(c) Disengage the 2 claws to separate the engine wire from the No. 1 engine room relay block and No. 1 junction block assembly.
|
(d) Raise the 2 lock levers while pushing the locks on the levers, and disconnect the 2 ECM connectors. NOTICE: After disconnecting the ECM connectors, make sure that dirt, water or other foreign matter does not contact the connecting parts of the ECM connectors. |
|
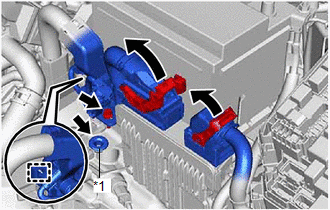
(e) Remove the bolt and disengage the wire harness clamp to separate the engine wire.
(f) Remove the grommet.
|
(g) Remove the bolt and nut. |
|
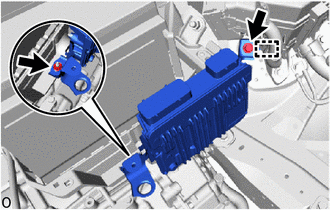
(h) Disengage the guide to remove the ECM.
NOTICE:
If the ECM has been struck or dropped, replace it.
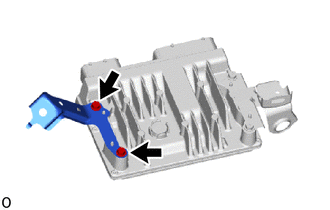
9. REMOVE NO. 2 ECM BRACKET
|
(a) Remove the 2 screws and No. 2 ECM bracket from the ECM. |
|
10. REMOVE NO. 1 ECM BRACKET
|
(a) Remove the 2 screws and No. 1 ECM bracket from the ECM. |
|

|
|
|