- Back door opener
| Last Modified: 07-31-2024 | 6.11:8.1.0 | Doc ID: RM1000000028GD8 |
| Model Year Start: 2023 | Model: GR Corolla | Prod Date Range: [11/2022 - ] |
| Title: GF1A (TRANSFER / 4WD / AWD): 4WD CONTROL ECU: REMOVAL; 2023 - 2025 MY Corolla Corolla Hatchback GR Corolla [11/2022 - ] | ||
REMOVAL
CAUTION / NOTICE / HINT
The necessary procedures (adjustment, calibration, initialization, or registration) that must be performed after parts are removed and installed, or replaced during the 4WD ECU removal/installation are shown below.
Necessary Procedure After Parts Removed/Installed/Replaced
|
Replacement Part or Procedure |
Necessary Procedure |
Effect/Inoperative Function when Necessary Procedure not Performed |
Link |
|---|---|---|---|
|
4WD ECU assembly |
1.ECU Data Save (ECU being replaced) |
Active Torque Split AWD System |
|
|
2.ECU Configuration (New ECU) |
Vehicle Control History (RoB) are stored |
||
|
3.ECU Data Write (When replacing 4WD ECU assembly) (New ECU) |
Active Torque Split AWD System |
HINT:
When the cable is disconnected / reconnected to the auxiliary battery terminal, systems temporarily stop operating. However, each system has a function that completes learning the first time the system is used.
-
Learning completes when vehicle is driven
Effect/Inoperative Function When Necessary Procedures are not Performed
Necessary Procedures
Link
Front Camera System
Drive the vehicle straight ahead at 35 km/h (22 mph) or more for 5 seconds or more.
-
Learning completes when vehicle is operated normally
Effect/Inoperative Function When Necessary Procedures are not Performed
Necessary Procedures
Link
Power Door Lock Control System
Perform door unlock operation with door control switch or electrical key transmitter sub-assembly switch.
PROCEDURE
1. PRECAUTION
NOTICE:
After turning the ignition switch off, waiting time may be required before disconnecting the cable from the negative (-) auxiliary battery terminal.
2. REMOVE PACKAGE TRAY TRIM PANEL ASSEMBLY
3. REMOVE DECK BOARD ASSEMBLY
4. REMOVE SPARE WHEEL CUSHION
5. DISCONNECT CABLE FROM NEGATIVE BATTERY TERMINAL
6. REMOVE REAR DECK TRIM COVER
7. REMOVE REAR SEAT HEADREST ASSEMBLY
8. REMOVE REAR SEAT CENTER HEADREST ASSEMBLY
9. DISCONNECT REAR SEAT CENTER LAP TYPE BELT ASSEMBLY
10. REMOVE REAR SEATBACK ASSEMBLY RH
11. REMOVE REAR SEAT CUSHION ASSEMBLY
12. REMOVE REAR SEAT CUSHION LOCK HOOK
13. REMOVE REAR DOOR SCUFF PLATE RH
14. DISCONNECT REAR DOOR OPENING TRIM WEATHERSTRIP RH
15. REMOVE REAR NO. 1 FLOOR BOARD (w/o Rear Seat Assembly)
16. REMOVE REAR NO. 1 FLOOR BOARD PANEL (w/o Rear Seat Assembly)
17. REMOVE SIDE TRIM COVER RH (w/o Rear Seat Assembly)
18. REMOVE REAR PILLAR COVER RH (w/o Rear Seat Assembly)
19. REMOVE REAR SEAT SIDE GARNISH RH
20. REMOVE DECK TRIM SIDE PANEL ASSEMBLY RH
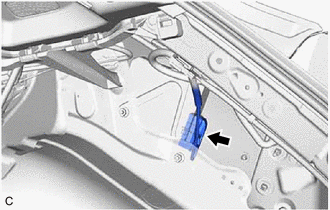
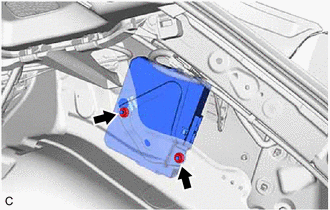
21. REMOVE 4WD ECU ASSEMBLY
|
(a) Disconnect the connector. |
|
|
(b) Remove the 2 nut and 4WD ECU assembly. |
|
|
|
|
![2023 - 2025 MY Corolla Corolla Hatchback GR Corolla [09/2022 - ]; GF1A (TRANSFER / 4WD / AWD): ACTIVE TORQUE SPLIT AWD SYSTEM: CALIBRATION](/t3Portal/stylegraphics/info.gif)

