- Rear Door window regulator sub-assembly*1
- Rear Power window regulator motor sub-assembly
- Rear Door glass*1
- Rear Door glass run*1
- Rear Door belt moulding*1
- Rear Door glass weatherstrip inner*1
| Last Modified: 05-13-2024 | 6.11:8.1.0 | Doc ID: RM1000000028FWZ |
| Model Year Start: 2023 | Model: GR Corolla | Prod Date Range: [11/2022 - ] |
| Title: DOOR / HATCH: REAR DOOR: DISASSEMBLY; 2023 - 2025 MY Corolla Corolla Hatchback Corolla HV GR Corolla [11/2022 - ] | ||
DISASSEMBLY
CAUTION / NOTICE / HINT
The necessary procedures (adjustment, calibration, initialization, or registration) that must be performed after parts are removed and installed, or replaced during rear door removal/installation are shown below.
Necessary Procedure After Parts Removed/Installed/Replaced (for Gasoline Model)
|
Replaced Part or Performed Procedure |
Necessary Procedure |
Effect/Inoperative Function when Necessary Procedures are not Performed |
Link |
|---|---|---|---|
| *1: If matchmarks were not placed when removing parts related to steering operation, perform automatic rack centering. | |||
|
|
Initialize power window control system |
|
|
NOTICE:
- After the ignition switch is turned off, the radio and display receiver assembly records various types of memory and settings. As a result, after turning the ignition switch off, make sure to wait at least 3 minutes before disconnecting the cable from the negative (-) auxiliary battery terminal.
- When the cable is disconnected from the negative (-) auxiliary battery terminal and the security lock setting has been enabled, multi-display operations will be disabled upon next startup unless the password is entered. Be sure to check the security lock setting before disconnecting the cable from the negative (-) auxiliary battery terminal. (for Audio and Visual System (for Single Knob Type))
HINT:
When the cable is disconnected / reconnected to the auxiliary battery terminal, systems temporarily stop operating. However, each system has a function that completes learning the first time the system is used.
-
Learning completes when vehicle is driven
Effect/Inoperative Function When Necessary Procedures are not Performed
Necessary Procedures
Link
*1: for GR Model *2: except GR Model
Front Camera System
- Drive the vehicle straight ahead at 35 km/h (22 mph) or more for 5 seconds or more.*1
- Drive the vehicle straight ahead at 15 km/h (9 mph) or more for 1 second or more.*2
![2023 - 2025 MY Corolla Corolla Hatchback Corolla HV GR Corolla [11/2022 - ]; ADVANCED DRIVER ASSISTANCE SYSTEM: FRONT CAMERA SYSTEM: INITIALIZATION](/t3Portal/stylegraphics/info.gif)
-
Learning completes when vehicle is operated normally
Effect/Inoperative Function When Necessary Procedures are not Performed
Necessary Procedures
Link
*1: for Hatchback Power Door Lock Control System
- Back door opener*1
Perform door unlock operation with door control switch or electrical key transmitter sub-assembly switch.
Necessary Procedure After Parts Removed/Installed/Replaced (for HV Model)
|
Replaced Part or Performed Procedure |
Necessary Procedure |
Effect/Inoperative Function when Necessary Procedures are not Performed |
Link |
|---|---|---|---|
| *1: If matchmarks were not placed when removing parts related to steering operation, perform automatic rack centering. | |||
|
Initialize power window control system |
|
|
NOTICE:
- After the ignition switch is turned off, the radio and display receiver assembly records various types of memory and settings. As a result, after turning the ignition switch off, make sure to wait at least 3 minutes before disconnecting the cable from the negative (-) auxiliary battery terminal.
- When the cable is disconnected from the negative (-) auxiliary battery terminal and the security lock setting has been enabled, multi-display operations will be disabled upon next startup unless the password is entered. Be sure to check the security lock setting before disconnecting the cable from the negative (-) auxiliary battery terminal. (for Audio and Visual System (for Single Knob Type))
HINT:
When the cable is disconnected / reconnected to the auxiliary battery terminal, systems temporarily stop operating. However, each system has a function that completes learning the first time the system is used.
-
Learning completes when vehicle is driven
Effect/Inoperative Function When Necessary Procedures are not Performed
Necessary Procedures
Link
Front Camera System
Drive the vehicle straight ahead at 15 km/h (9 mph) or more for 1 second or more.
- Use the same procedure for the RH side and LH side.
- The following procedure is for the LH side.
PROCEDURE
1. PRECAUTION
NOTICE:
After turning the ignition switch (for Gasoline Model) or power switch (for HV Model) off, waiting time may be required before disconnecting the cable from the negative (-) auxiliary battery terminal. Therefore, make sure to read the disconnecting the cable from the negative (-) auxiliary battery terminal notices before proceeding with work.
2. REMOVE DECK BOARD ASSEMBLY (for G16E-GTS)
Click here
3. REMOVE SPARE WHEEL CUSHION (for G16E-GTS)
Click here
4. DISCONNECT CABLE FROM NEGATIVE AUXILIARY BATTERY TERMINAL
for M20A-FKS:
Click here
for 2ZR-FAE:
Click here
for 2ZR-FXE:
Click here
for G16E-GTS:
Click here
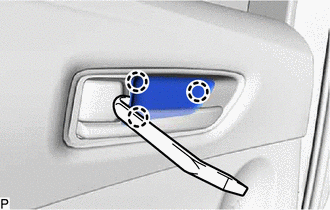
5. REMOVE REAR DOOR INSIDE HANDLE BEZEL PLUG
|
(a) Using a moulding remover, disengage the 3 claws to remove the rear door inside handle bezel plug. |
|
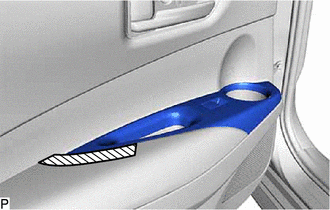
6. REMOVE REAR POWER WINDOW REGULATOR SWITCH ASSEMBLY WITH REAR DOOR UPPER ARMREST BASE PANEL
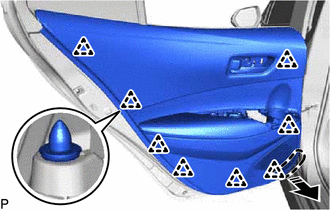
(a) Apply protective tape to the rear door trim board sub-assembly as shown in the illustration.

|
Protective Tape |
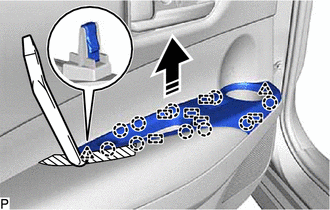
(b) for Hatchback:
(1) Using a moulding remover, disengage the 2 clips, 10 claws and 6 guides as shown in the illustration.

|
Remove in this Direction |
(c) for Sedan:
(1) Using a moulding remover, disengage the 2 clips, 9 claws and 8 guides as shown in the illustration.

|
|
Remove in this Direction |
(d) w/Rear Seat Assembly:
(1) Disconnect each connector to remove the rear power window regulator switch assembly with rear door upper armrest base panel.
(e) w/o Rear Seat Assembly:
(1) Remove the rear power window regulator switch assembly with rear door upper armrest base panel.
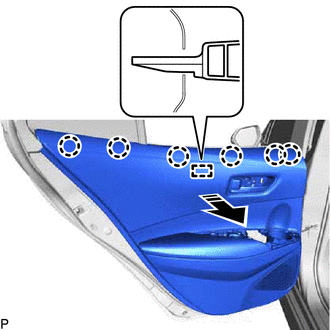
7. REMOVE REAR DOOR TRIM BOARD SUB-ASSEMBLY
|
(a) Remove the 3 screws. |
|
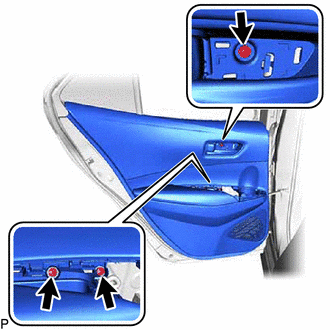
(b) Disengage the 8 clips as shown in the illustration.

|
Place Hand Here |
|
|
Remove in this Direction |
(c) Disengage the 6 claws and guide as shown in the illustration.
|
|
Remove in this Direction |
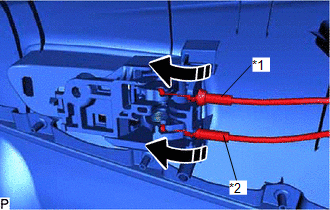
(d) Disconnect the rear door lock open lever remote control cable and rear door inside lock/unlock knob locking cable as shown in the illustration to remove the rear door trim board sub-assembly.
|
*1 |
Rear Door Inside Lock/Unlock Knob Locking Cable |
|
*2 |
Rear Door Lock Open Lever Remote Control Cable |
|
|
Remove in this Direction |
8. REMOVE REAR DOOR INSIDE HANDLE SUB-ASSEMBLY
|
(a) Disengage the 3 claws to remove the rear door inside handle sub-assembly. |
|
9. REMOVE REAR SPEAKER ASSEMBLY
(a) w/ Speaker:
Click here
10. REMOVE REAR DOOR FRAME GARNISH
(a) Using a clip remover, disengage the clip.
|
|
Remove in this Direction |
(b) Disengage the 2 guides to remove the rear door frame garnish as shown in the illustration.
11. REMOVE REAR DOOR NO. 1 VENT SEAL
(a) Remove the rear door inner glass weatherstrip with the rear door No. 1 vent seal as shown in the illustration.
|
|
Remove in this Direction |
(b) Disengage the 2 guides to remove the rear door No. 1 vent seal from the rear door inner glass weatherstrip as shown in the illustration.
|
|
Remove in this Direction |
12. REMOVE REAR DOOR PANEL PROTECTOR
(a) Remove the rear door panel protector as shown in the illustration.
|
|
Remove in this Direction |
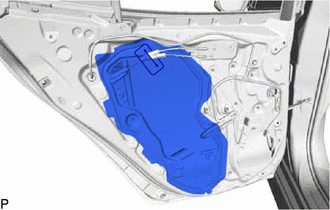
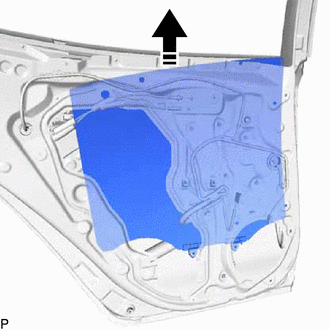
13. REMOVE REAR DOOR SERVICE HOLE COVER
|
(a) Remove the rear door service hole cover. HINT: Remove any remaining butyl tape from the door. |
|
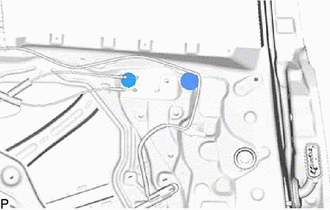
14. REMOVE REAR DOOR WINDOW REGULATOR LIFT ARM BRACKET (w/o Rear Seat Assembly)
|
(a) Remove the 2 hole plugs. |
|
|
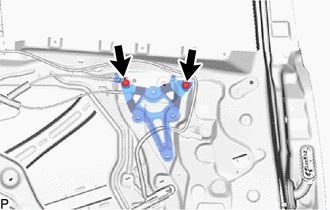
(b) Remove the 2 bolts. |
|
|
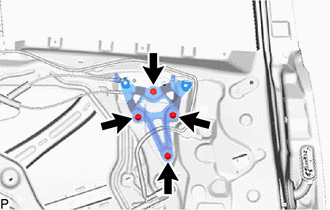
(c) Remove the 4 bolts and rear door window regulator lift arm bracket. NOTICE:
|
|
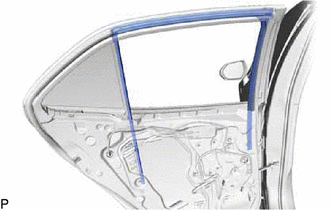
15. REMOVE REAR DOOR GLASS RUN
|
(a) Remove the rear door glass run. |
|
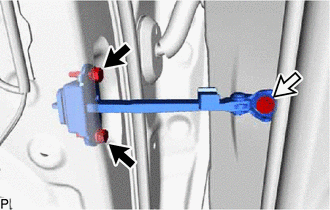
16. REMOVE REAR DOOR CHECK ASSEMBLY
(a) Remove the 2 bolts (A), bolt (B) and rear door check assembly.

|
Bolt (A) |

|
Bolt (B) |
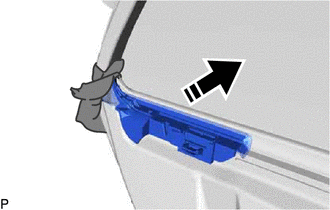
17. REMOVE REAR DOOR NO. 2 SERVICE HOLE COVER
|
(a) Disengage the clip and disconnect the rear door weatherstrip as shown in the illustration. |
|
(b) Remove the rear door No. 2 service hole cover as shown in the illustration.
|
|
Remove in this Direction |
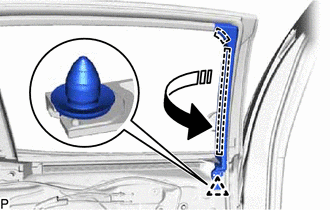
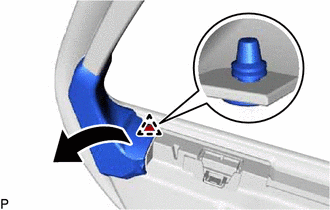
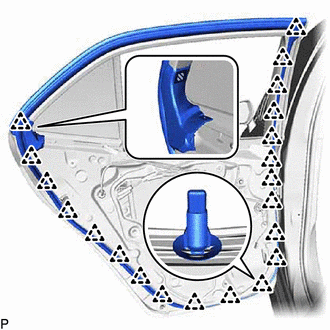
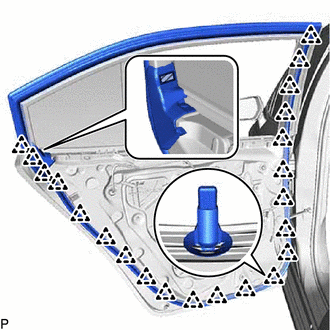
18. REMOVE REAR DOOR WEATHERSTRIP
(a) for Hatchback:
(1) Using a clip remover, disengage the 21 clips and remove the rear door weatherstrip.
|
|
Double-sided Tape |
(b) for Sedan:
(1) Using a clip remover, disengage the 22 clips and remove the rear door weatherstrip.
|
|
Double-sided Tape |
19. REMOVE REAR DOOR WINDOW DIVISION BAR SUB-ASSEMBLY
|
(a) Remove the screw. |
|
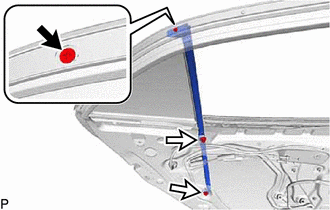
(b) Remove the 2 bolts and rear door window division bar sub-assembly.
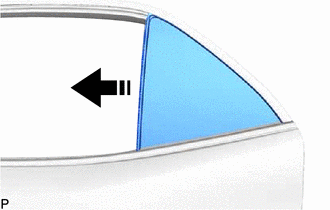
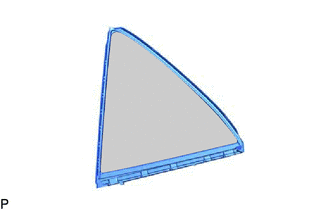
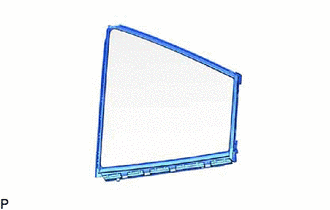
20. REMOVE REAR DOOR QUARTER WINDOW WEATHERSTRIP
(a) for Hatchback:
(1) Remove the rear door quarter window weatherstrip with rear door quarter window glass as shown in the illustration.
|
|
Remove in this Direction |
|
(2) Remove the rear door quarter window weatherstrip from the rear door quarter window glass. |
|
(b) for Sedan:
(1) Remove the rear door quarter window weatherstrip with rear door quarter window glass as shown in the illustration.
|
|
Remove in this Direction |
|
(2) Remove the rear door quarter window weatherstrip from the rear door quarter window glass. |
|
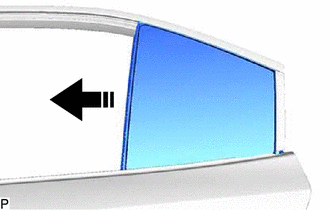
21. REMOVE REAR DOOR GLASS SUB-ASSEMBLY
(a) w/ Rear Seat Assembly:
(1) Connect the rear power window regulator switch assembly.
(2) Connect the cable to the negative (-) auxiliary battery terminal.
(3) Turn the ignition switch (for Gasoline Model) or power switch (for HV Model) on (IG).
(4) Move the rear door glass sub-assembly so that the door glass bolts can be seen.
(5) Turn the ignition switch (for Gasoline Model) or power switch (for HV Model) off.
(6) Disconnect the cable from the negative (-) auxiliary battery terminal.
(7) Disconnect the rear power window regulator switch assembly.
|
(8) Remove the 2 bolts. NOTICE: After the bolts are removed, do not allow the rear door glass sub-assembly to fall. |
|
(9) Remove the rear door glass sub-assembly as shown in the illustration.
|
|
Remove in this Direction |
NOTICE:
Do not damage the rear door glass sub-assembly.
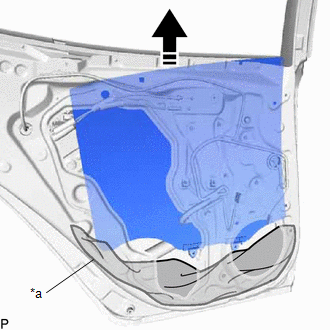
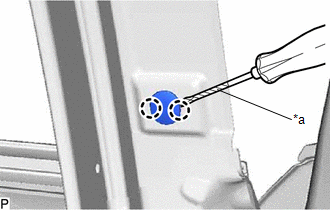
(b) w/o Rear Seat Assembly:
(1) Remove the rear door glass sub-assembly as shown in the illustration.
|
*a |
Cloth |
|
|
Remove in this Direction |
NOTICE:
Do not damage the rear door glass sub-assembly.
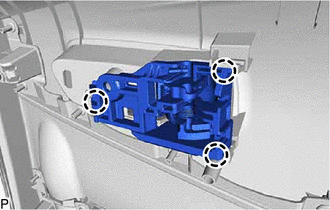
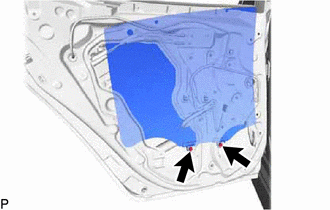
22. REMOVE REAR DOOR WINDOW REGULATOR ASSEMBLY (w/ Rear Seat Assembly)
|
(a) Disconnect the connector. |
|

(b) Remove the 6 nuts and rear door window regulator assembly.
23. REMOVE REAR DOOR LOCK WITH MOTOR ASSEMBLY
Click here
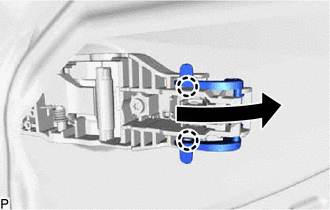
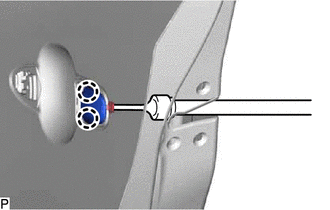
24. REMOVE REAR DOOR OUTSIDE HANDLE ASSEMBLY
|
(a) Disengage the 2 claws and move the lever as shown in the illustration. |
|
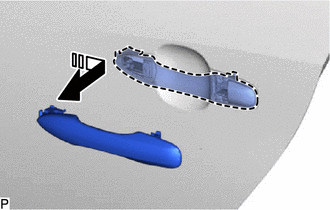
(b) Remove the rear door outside handle assembly as shown in the illustration.
|
|
Remove in this Direction |
25. REMOVE REAR DOOR OUTSIDE HANDLE COVER
|
(a) Using a T30 "TORX" socket wrench, loosen the screw. HINT: The screw cannot be removed because it is integrated into the rear door outside handle frame sub-assembly. |
|
(b) Disengage the 2 claws to remove the rear door outside handle cover.
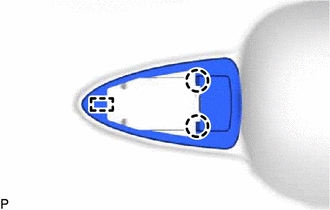
26. REMOVE REAR DOOR FRONT OUTSIDE HANDLE PAD
|
(a) Disengage the 2 claws and guide to remove the rear door front outside handle pad. |
|
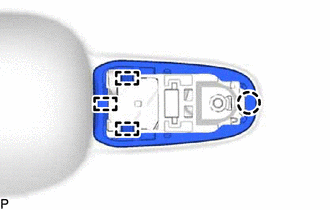
27. REMOVE REAR DOOR REAR OUTSIDE HANDLE PAD
|
(a) Disengage the claw and 3 guides to remove the rear door rear outside handle pad. |
|
28. REMOVE REAR DOOR OUTSIDE HANDLE FRAME SUB-ASSEMBLY
|
(a) Using a T30 "TORX" socket wrench, remove the screw. |
|

(b) Disengage the claw and guide to remove the rear door outside handle frame sub-assembly as shown in the illustration.
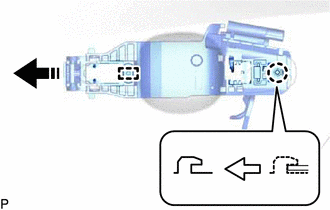
|
|
Remove in this Direction |
29. REMOVE REAR DOOR LOCK CHILD PROTECTION COVER (w/ Cover)
|
(a) Disengage the 6 claws to remove the rear door lock child protection cover. |
|

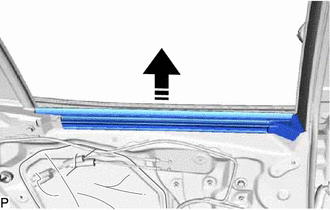
30. REMOVE REAR DOOR BELT MOULDING (for Hatchback)
Click here
31. REMOVE REAR DOOR BELT MOULDING (for Sedan)
Click here
32. REMOVE REAR DOOR WINDOW FRAME MOULDING (CENTER PILLAR SIDE)
Click here
33. REMOVE REAR DOOR UPPER WINDOW FRAME MOULDING (for Hatchback)
Click here
34. REMOVE REAR DOOR UPPER WINDOW FRAME MOULDING (for Sedan)
Click here
35. REMOVE REAR DOOR REAR WINDOW FRAME MOULDING (for Sedan)
Click here
36. REMOVE REAR DOOR OUTSIDE STRIPE (for Hatchback)
Click here
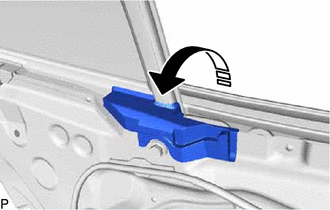
37. REMOVE REAR DOOR PANEL CUSHION
|
(a) Disengage the 2 claws to remove the rear door panel cushion. |
|
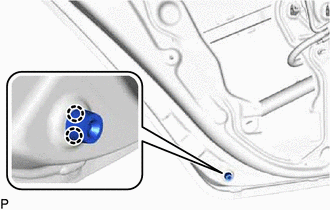
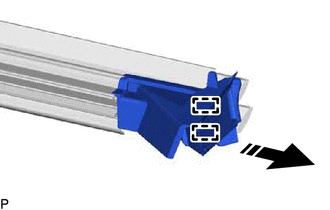
38. REMOVE DOOR WINDOW FRAME MOULDING CLIP
|
(a) Using a screwdriver with its tip wrapped with protective tape, disengage the 2 claws to remove the door window frame moulding clip. |
|
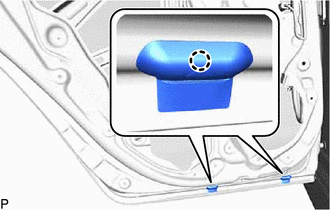
39. REMOVE REAR DOOR DUST PROOF SEAL
|
(a) Disengage the 2 claws to remove the 2 rear door dust proof seals. |
|
40. REMOVE OUTSIDE MOULDING SET (for Hatchback)
(a) for GR:
Click here
41. REMOVE QUARTER OPENING RETAINER (for Hatchback)
(a) for GR:
Click here
42. REMOVE GROMMET (for Hatchback)
(a) for GR:
Click here
|
|
|