| Last Modified: 05-13-2024 | 6.11:8.1.0 | Doc ID: RM1000000028DX8 |
| Model Year Start: 2023 | Model: GR Corolla | Prod Date Range: [11/2022 - ] |
| Title: INTERIOR PANELS / TRIM: ROOF HEADLINING (for Hatchback): INSTALLATION; 2023 - 2025 MY Corolla Corolla Hatchback Corolla HV GR Corolla [11/2022 - ] | ||
INSTALLATION
PROCEDURE
1. INSTALL ROOF HEADLINING ASSEMBLY
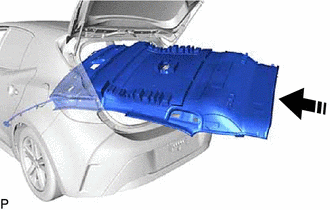
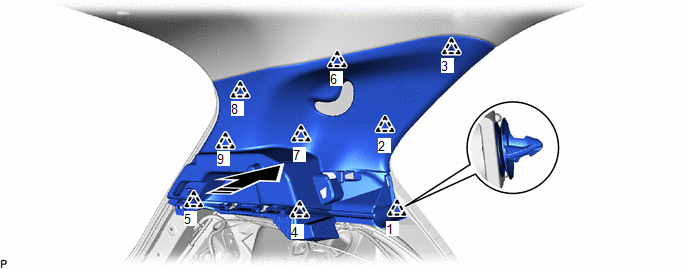
(a) Put the roof headlining assembly back into the vehicle through the back door as shown in the illustration.
NOTICE:
Do not damage the roof headlining assembly or vehicle interior.

|
Install in this Direction |
(b) Install the roof headlining assembly with the 3 clips.
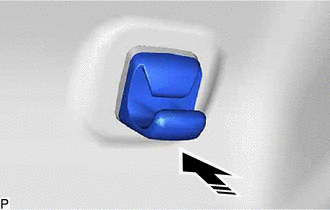
(c) Engage the 2 claws to install the base of each visor holder.
(d) Install the visor holder as shown in the illustration.
|
|
Install in this Direction |
HINT:
Use the same procedure for the LH side and RH side.
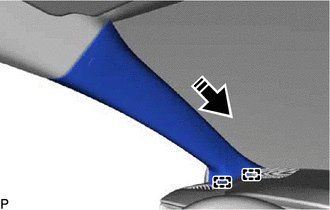
(e) for Rear Pillar RH Side:
(1) Connect the 2 connectors.
(2) Engage the guide.
(3) Connect the connector bracket with the bolt.
Torque:
10 N·m {102 kgf·cm, 7 ft·lbf}
(4) Engage the clamp.
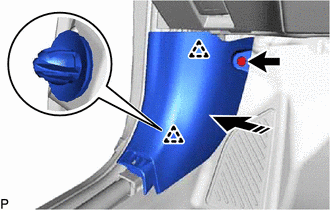
(f) for Front Pillar RH Side:
(1) Remove the protective cover.
(2) Connect each connector.
(3) Engage the 3 clamps.
(4) Install the protective cover.
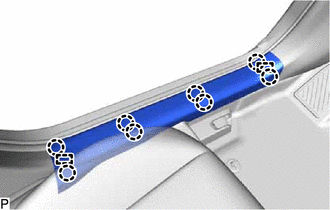
(g) for Front Pillar LH Side:
(1) Remove the protective cover.
(2) Connect the 2 connectors.
(3) Engage the 4 clamps.
(4) Install the protective cover.
(h) for Windshield Glass Side:
(1) Connect the 2 connectors.
2. INSTALL VISOR ASSEMBLY LH
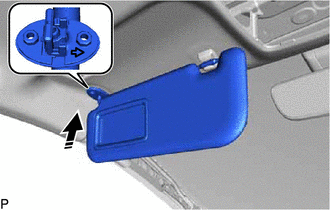
(a) Set the visor assembly LH into place by aligning it with the connector and screw fastening hole.
|
|
Install in this Direction |
NOTICE:
- Make sure to install the visor assembly LH with its arrow facing the front of the vehicle.
- When setting the part into place, move it straight upward so as not to damage the connector.
- Hold the visor assembly with one hand so that it does not drop.
(b) Connect the visor assembly LH to the visor holder.
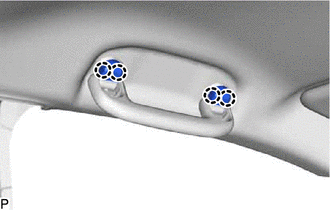
(c) Install the visor assembly LH with the 2 screws.
3. INSTALL VISOR ASSEMBLY RH
HINT:
Use the same procedure as for the LH side.
4. INSTALL ASSIST GRIP SUB-ASSEMBLY
HINT:
Use the same procedure for all assist grip sub-assemblies.
|
(a) Install the 2 clips to the assist grip. |
|
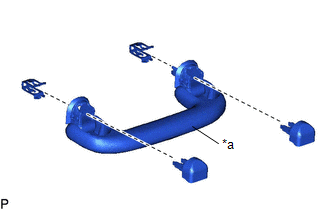
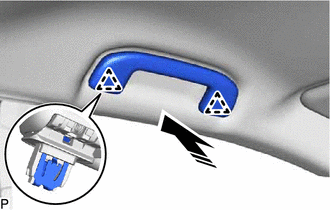
(b) Temporarily install the 2 assist grip covers to the assist grip as shown in the illustration.
(c) Engage the 2 clips to install the assist grip sub-assembly as shown in the illustration.
|
|
Install in this Direction |
|
(d) Engage the 4 claws to install the assist grip cover LH and assist grip cover RH. NOTICE: Make sure that the clips are engaged securely. |
|
5. INSTALL REAR ASSIST GRIP ASSEMBLY LH
HINT:
Use the same procedure as for the assist grip sub-assembly.
6. INSTALL REAR ASSIST GRIP ASSEMBLY RH
HINT:
Use the same procedure as for the assist grip sub-assembly.
7. INSTALL NO. 1 FORWARD RECOGNITION COVER
Click here
![2023 - 2025 MY Corolla Corolla Hatchback Corolla HV GR Corolla [11/2022 - ]; ADVANCED DRIVER ASSISTANCE SYSTEM: FRONT CAMERA: INSTALLATION+](/t3Portal/stylegraphics/info.gif)
8. INSTALL NO. 2 FORWARD RECOGNITION COVER
Click here
9. INSTALL VANITY LIGHT ASSEMBLY
for Bulb Type:
for LED Type:
10. INSTALL NO. 1 ROOM LIGHT ASSEMBLY
for Bulb Type:
for LED Type:
11. INSTALL MAP LIGHT ASSEMBLY
Click here
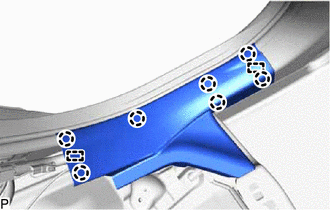
12. INSTALL ROOF SIDE INNER GARNISH LH (w/ Rear Seat Assembly)
(a) Pass the anchor of the rear 3 point type seat outer belt assembly LH through the roof side inner garnish LH.
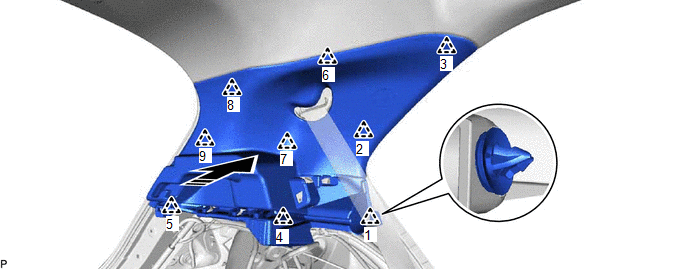
(b) Engage the 9 clips to install the roof side inner garnish LH as shown in the illustration.
|
|
Install in this Direction |
- |
- |
HINT:
Engage the clip in the order shown in the illustration.
13. CONNECT REAR 3 POINT TYPE SEAT OUTER BELT ASSEMBLY LH (w/ Rear Seat Assembly)
Click here
14. INSTALL REAR SUSPENSION UPPER CENTER BRACE (w/o Rear Seat Assembly)
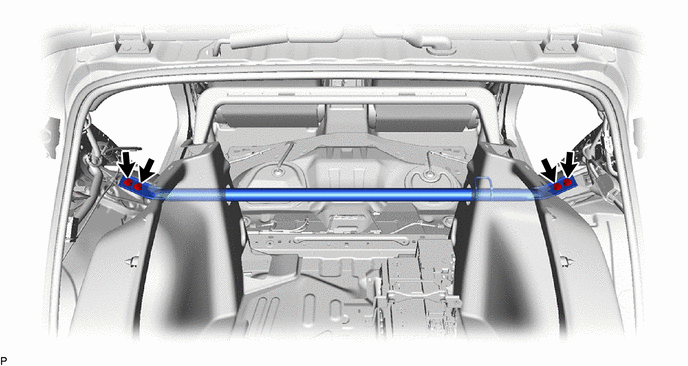
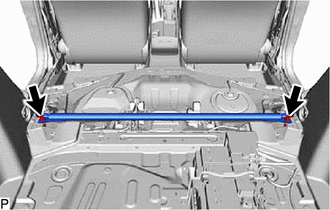
(a) Pass the rear suspension upper center brace through the hole of the deck trim side panel assembly LH and deck trim side panel assembly RH.
(b) Install the suspension upper center brace with the 4 bolts.
Torque:
20 N·m {204 kgf·cm, 15 ft·lbf}
15. INSTALL DECK TRIM SIDE PANEL ASSEMBLY LH
(a) w/o Rear Seat Assembly:
(1) Engage the 9 clips to install the roof side inner garnish LH as shown in the illustration.
|
|
Install in this Direction |
- |
- |
HINT:
Engage the clip in the order shown in the illustration.
(2) Engage the guide, 2 clips and 3 claws.
(3) Install the deck trim side panel assembly LH with the 2 clips.
(b) w/ Rear Seat Assembly:
(1) Engage the 2 clips and 3 claws.
(2) Install the deck trim side panel assembly LH with the 2 clips.
|
(c) Engage the guide. |
|
(d) Install the luggage hold belt striker assembly with the bolt.
16. INSTALL DECK TRIM SIDE LOWER BOARD LH (w/ Spare Tire)
(a) Engage the 4 claws to install the deck trim side lower board LH.
17. INSTALL REAR SEAT SIDE GARNISH LH
(a) w/o Rear Seat Assembly:
(1) Engage the 2 guides and 3 claws to install the rear seat side garnish LH.
(b) w/ Rear Seat Assembly:
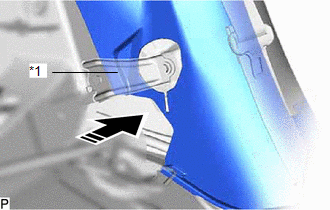
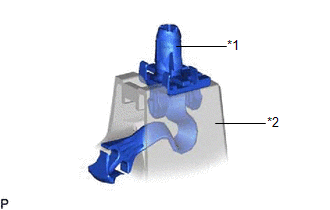
(1) Pass the rear seatback hinge sub-assembly LH through the rear seat side garnish LH as shown in the illustration.
|
*1 |
Rear Seatback Hinge Sub-assembly LH |
|
|
Install in this Direction |
(2) Engage the 4 guides and 8 claws to install the rear seat side garnish LH.
18. INSTALL REAR PILLAR COVER LH (w/o Rear Seat Assembly)
(a) Engage the 3 claws to install the rear pillar cover LH.
19. INSTALL SIDE TRIM COVER LH (w/o Rear Seat Assembly)
(a) Install the side trim cover LH with the 2 bolts.
(b) Install the cap.
20. INSTALL ROOF SIDE INNER GARNISH RH (w/ Rear Seat Assembly)
HINT:
Use the same procedure as for the LH side.
21. CONNECT REAR 3 POINT TYPE SEAT OUTER BELT ASSEMBLY RH (w/ Rear Seat Assembly)
HINT:
Use the same procedure as for the LH side.
22. INSTALL DECK TRIM SIDE PANEL ASSEMBLY RH
HINT:
Use the same procedure as for the LH side.
23. INSTALL NO. 1 LUGGAGE COMPARTMENT LIGHT ASSEMBLY
for Bulb Type:
for LED Type:
24. INSTALL CENTER FLOOR CROSSMEMBER BRACE SUB-ASSEMBLY (for GR)
|
(a) Install the center floor crossmember brace sub-assembly with the 2 bolts. Torque: 73 N·m {744 kgf·cm, 54 ft·lbf} |
|
25. INSTALL DECK TRIM SIDE LOWER BOARD RH (w/ Spare Tire)
HINT:
Use the same procedure as for the LH side.
26. INSTALL REAR SEAT SIDE GARNISH RH
HINT:
Use the same procedure as for the LH side.
27. INSTALL REAR PILLAR COVER RH (w/o Rear Seat Assembly)
HINT:
Use the same procedure as for the LH side.
28. INSTALL SIDE TRIM COVER RH (w/o Rear Seat Assembly)
HINT:
Use the same procedure as for the LH side.
29. INSTALL REAR NO. 1 FLOOR BOARD PANEL (w/o Rear Seat Assembly)
(a) Install the rear No. 1 floor board panel.
30. INSTALL REAR NO. 1 FLOOR BOARD (w/o Rear Seat Assembly)
(a) Install the rear No. 1 floor board with the 6 clips.
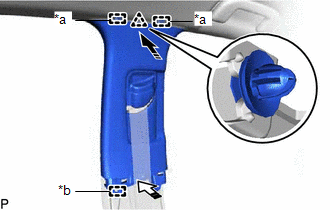
31. INSTALL CENTER PILLAR UPPER GARNISH LH
(a) Pass the anchor of the front seat outer belt assembly LH through the center pillar upper garnish LH.
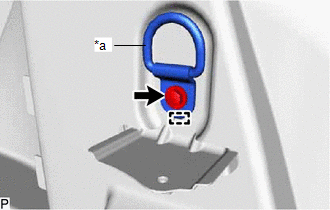
(b) Engage the 2 guides (A) and clip as shown in the illustration.
|
*a |
Guide (A) |
|
*b |
Guide (B) |
|
|
Install in this Direction (1) |

|
Install in this Direction (2) |
(c) Engage the guide (B) as shown in the illustration.
(d) Install the center pillar upper garnish LH with the 2 clips.
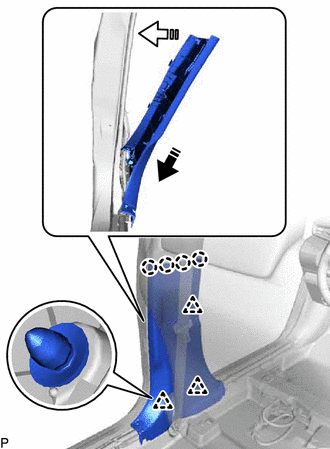
32. INSTALL CENTER PILLAR LOWER GARNISH LH
(a) Engage the 4 claws and 3 clips to install the center pillar lower garnish LH as shown in the illustration.
|
|
Install in this Direction (1) |
|
|
Install in this Direction (2) |
33. CONNECT FRONT SEAT OUTER BELT ASSEMBLY LH
Click here
34. INSTALL LAP BELT OUTER ANCHOR COVER (for LH Side)
Click here
35. INSTALL REAR DOOR OPENING TRIM WEATHERSTRIP LH
Click here
36. INSTALL REAR DOOR SCUFF PLATE LH
|
(a) Engage the 2 guides and 7 claws to install the rear door scuff plate LH. HINT: Install the center pillar lower garnish LH side of the rear door scuff plate LH first. |
|
37. INSTALL FRONT PILLAR GARNISH LH
(a) Remove the protective cover.
|
(b) Install 2 new front pillar garnish clips to the front pillar garnish LH. HINT: Make sure that the front pillar garnish clip is engaged correctly. |
|
(c) w/o Front No. 3 Speaker:
(1) Push the front pillar garnish LH as shown in the illustration to engage the 2 guides.
|
|
Install in this Direction |
(d) w/ Front No. 3 Speaker:
(1) Connect the connector.
(2) Push the front pillar garnish LH as shown in the illustration to engage the 2 guides.
(e) Engage the 2 front pillar garnish clips to install the front pillar garnish LH as shown in the illustration.
HINT:
Make sure that the curtain shield airbag assembly LH is not pinched.

|
|
Install in this Direction |
(f) Remove the protective tape.
38. INSTALL FRONT DOOR OPENING TRIM WEATHERSTRIP LH
Click here
39. INSTALL COWL SIDE TRIM SUB-ASSEMBLY LH
(a) Engage the 2 clips as shown in the illustration.
|
|
Install in this Direction |
(b) Install the cowl side trim sub-assembly LH with the clip.
40. INSTALL FRONT DOOR SCUFF PLATE LH
|
(a) Engage the 2 guides and 8 claws to install the front door scuff plate LH. HINT: Install the center pillar lower garnish LH side of the front door scuff plate LH first. |
|
41. INSTALL CENTER PILLAR UPPER GARNISH RH
HINT:
Use the same procedure as for the LH side.
42. INSTALL CENTER PILLAR LOWER GARNISH RH
HINT:
Use the same procedure as for the LH side.
43. CONNECT FRONT SEAT OUTER BELT ASSEMBLY RH
HINT:
Use the same procedure as for the LH side.
44. INSTALL LAP BELT OUTER ANCHOR COVER (for RH Side)
HINT:
Use the same procedure as for the LH side.
45. INSTALL REAR DOOR OPENING TRIM WEATHERSTRIP RH
HINT:
Use the same procedure as for the LH side.
46. INSTALL REAR DOOR SCUFF PLATE RH
HINT:
Use the same procedure as for the LH side.
47. INSTALL FRONT PILLAR GARNISH RH
HINT:
Use the same procedure as for the LH side.
48. INSTALL FRONT DOOR OPENING TRIM WEATHERSTRIP RH
HINT:
Use the same procedure as for the LH side.
49. INSTALL COWL SIDE TRIM SUB-ASSEMBLY RH
HINT:
Use the same procedure as for the LH side.
50. INSTALL FRONT DOOR SCUFF PLATE RH
HINT:
Use the same procedure as for the LH side.
51. INSTALL REAR SEAT ASSEMBLY (w/ Rear Seat Assembly)
Click here
52. INSTALL REAR DECK TRIM COVER (w/o Deck Board)
(a) Engage the 4 guides, 4 clips and 4 claws to install the rear deck trim cover.
(b) Engage the 2 guides.
(c) Install the 2 luggage hold belt striker assemblies with the 2 bolts.
53. INSTALL REAR FLOOR MAT ASSEMBLY (w/o Deck Board)
(a) Install the rear floor mat assembly.
54. INSTALL REAR DECK TRIM COVER (w/ Deck Board)
(a) Engage the 4 guides, 4 clips and 4 claws to install the rear deck trim cover.
(b) Engage the 2 guides.
(c) Install the 2 luggage hold belt striker assemblies with the 2 bolts.
55. INSTALL FRONT DECK FLOOR BOX (w/ Spare Tire)
(a) Engage the 2 clips.
(b) Install the front deck floor box with the 2 bolts.
56. INSTALL REAR NO. 1 FLOOR BOARD (w/ Spare Tire)
(a) Engage the 7 clips to install the rear No. 1 floor board.
57. INSTALL DECK FLOOR BOX RH (w/ Spare Tire)
(a) Install the deck floor box RH with the clip.
58. INSTALL DECK FLOOR BOX LH (w/ Spare Tire)
(a) Install the deck floor box LH with the clip.
59. INSTALL SPARE WHEEL CUSHION (for GR)
(a) Install the spare wheel cushion.
60. INSTALL DECK BOARD ASSEMBLY (w/ Deck Board)
(a) Install the deck board assembly.
61. INSTALL PACKAGE TRAY TRIM PANEL ASSEMBLY
(a) Install the package tray trim panel assembly.
|
|
|