- Occupant Classification System
- Passenger airbag ON/OFF indicator
- Airbag System (Front passenger side)
- Seat Belt Warning System (Front passenger)
| Last Modified: 05-13-2024 | 6.11:8.1.0 | Doc ID: RM1000000028DUU |
| Model Year Start: 2023 | Model: GR Corolla | Prod Date Range: [11/2022 - ] |
| Title: SEAT: FRONT SEAT ASSEMBLY (for Manual Seat): REMOVAL; 2023 - 2025 MY Corolla Corolla Hatchback Corolla HV GR Corolla [11/2022 - ] | ||
REMOVAL
CAUTION / NOTICE / HINT
The necessary procedures (adjustment, calibration, initialization, or registration) that must be performed after parts are removed and installed, or replaced during front seat assembly removal/installation are shown below.
Necessary Procedures After Parts Removed/Installed/Replaced (for HV Model)
|
Replaced Part or Performed Procedure |
Necessary Procedure |
Effect/Inoperative Function when Necessary Procedure not Performed |
Link |
|---|---|---|---|
|
Removal/installation of the front passenger seat |
Zero point calibration (Occupant classification system) |
|
|
Necessary Procedures After Parts Removed/Installed/Replaced (for Gasoline Model)
|
Replaced Part or Performed Procedure |
Necessary Procedure |
Effect/Inoperative Function when Necessary Procedure not Performed |
Link |
|---|---|---|---|
|
Removal/installation of the front passenger seat |
Zero point calibration (Occupant classification system) |
|
|
CAUTION:
-
Be sure to read Precaution thoroughly before servicing.
Click here
![2023 - 2025 MY Corolla Corolla Hatchback Corolla HV GR Corolla [11/2022 - ]; SUPPLEMENTAL RESTRAINT SYSTEMS: AIRBAG SYSTEM: PRECAUTION](/t3Portal/stylegraphics/info.gif)
- Wear protective gloves. Sharp areas on the parts may injure your hands.
NOTICE:
- If a front seat airbag assembly has been deployed, replace the front seat airbag assembly, front seatback frame sub-assembly, separate type front seatback pad and separate type front seatback cover with the necessary parts in accordance with the extent of the collision damage.
- If the front seat cushion airbag assembly RH has been deployed, replace the front seat cushion airbag assembly RH, front seat adjuster assembly RH, separate type front seat cushion pad and separate type front seat cushion cover with the necessary parts in accordance with the extent of the collision damage.
for HV Model
- After the ignition switch is turned off, the radio and display receiver assembly records various types of memory and settings. As a result, after turning the ignition switch off, make sure to wait at least 3 minutes before disconnecting the cable from the negative (-) auxiliary battery terminal.
- When the cable is disconnected from the negative (-) auxiliary battery terminal and the security lock setting has been enabled, multi-display operations will be disabled upon next startup unless the password is entered. Be sure to check the security lock setting before disconnecting the cable from the negative (-) auxiliary battery terminal. (for Audio and Visual System (for Single Knob Type))
for Gasoline Model
- After the ignition switch is turned off, the radio and display receiver assembly records various types of memory and settings. As a result, after turning the ignition switch off, make sure to wait at least 3 minutes before disconnecting the cable from the negative (-) auxiliary battery terminal.
- When the cable is disconnected from the negative (-) auxiliary battery terminal and the security lock setting has been enabled, multi-display operations will be disabled upon next startup unless the password is entered. Be sure to check the security lock setting before disconnecting the cable from the negative (-) auxiliary battery terminal. (for Audio and Visual System (for Single Knob Type))
HINT:
When the cable is disconnected / reconnected to the battery terminal, systems temporarily stop operating. However, each system has a function that completes learning the first time the system is used.
Items for which learning is completed by driving the vehicle (for HV Model)
|
Effect/Inoperative Function when Necessary Procedure not Performed |
Necessary Procedures |
Link |
|---|---|---|
|
Front Camera System |
Drive the vehicle straight ahead at 15 km/h (9 mph) or more for 1 second or more. |
|
Items for which learning is completed by driving the vehicle (for Gasoline Model)
|
Effect/Inoperative Function when Necessary Procedure not Performed |
Necessary Procedures |
Link |
|---|---|---|
|
*1: for GR Model
*2: except GR Model |
||
|
Front Camera System |
|
|
Learning completes when vehicle is operated normally (for Gasoline Model)
|
Effect/Inoperative Function when Necessary Procedure not Performed |
Necessary Procedures |
Link |
|---|---|---|
| *1: for Hatchback | ||
Power Door Lock Control System
|
Perform door unlock operation with door control switch or electrical key transmitter sub-assembly switch. |
|
HINT:
- Use the same procedure for the RH side and LH side.
- The following procedure is for the LH side.
-
Refer to the illustration to determine the seat type. (w/ Removable Headrest)
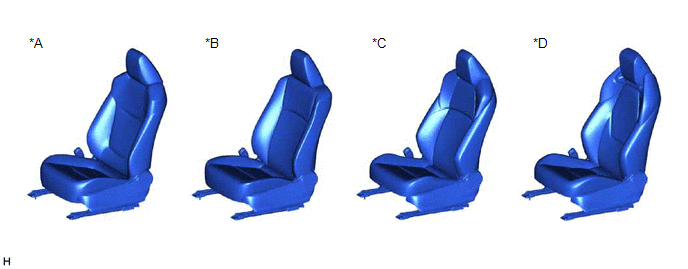
*A
for Type A
*B
for Type B
*C
for Type C
*D
for Type D
PROCEDURE
1. PRECAUTION
NOTICE:
After turning the ignition switch (for Gasoline Model) or power switch (for HV Model) off, waiting time may be required before disconnecting the cable from the negative (-) auxiliary battery terminal.
Click here
2. REMOVE DECK BOARD ASSEMBLY (for G16E-GTS)
Click here
3. DISCONNECT CABLE FROM NEGATIVE AUXILIARY BATTERY TERMINAL
for M20A-FKS: Click here
for 2ZR-FXE: Click here
for G16E-GTS: Click here
CAUTION:
Wait at least 60 seconds after disconnecting the cable from the negative (-) auxiliary battery terminal to disable the SRS system.
4. REMOVE FRONT SEAT HEADREST ASSEMBLY (w/ Removable Headrest)
(a) Remove the front seat headrest assembly from the front seat assembly.
5. REMOVE FRONT OUTER SEAT TRACK BRACKET COVER
(a) Operate the seat track adjusting handle and move the front seat assembly to the rearmost position.
|
(b) Disengage the 2 claws to remove the front outer seat track bracket cover. |
|
6. REMOVE FRONT INNER SEAT TRACK BRACKET COVER
|
(a) Disengage the 2 claws to remove the front inner seat track bracket cover. |
|
7. REMOVE OUTER SEAT TRACK COVER
(a) Operate the seat track adjusting handle and move the front seat assembly to the foremost position.
|
(b) Disengage the 2 claws and guide to remove the outer seat track cover. |
|
8. REMOVE INNER SEAT TRACK BRACKET COVER
|
(a) Disengage the 2 claws and guide to remove the inner seat track bracket cover. |
|
9. REMOVE FRONT SEAT ASSEMBLY
|
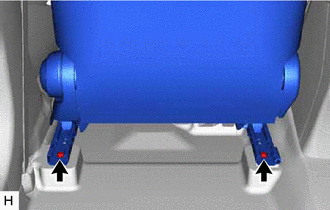
(a) Using a T50 "TORX" socket wrench, remove the 2 bolts on the rear side of the front seat assembly. |
|
(b) Operate the seat track adjusting handle and move the front seat assembly to the rearmost position.
|
(c) Using a T50 "TORX" socket wrench, remove the 2 bolts on the front side of the front seat assembly. |
|

(d) for Driver Side:
(1) Operate the vertical adjusting handle LH and move the front seat assembly to the uppermost position.
(e) Operate the seat track adjusting handle and move the front seat assembly to the center position.
(f) Operate the reclining adjuster release handle and move the seatback to the upright position.
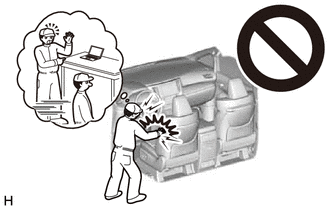
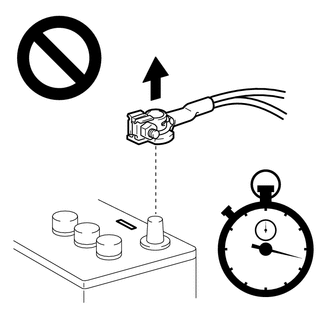
(g) Disconnect the front seat airbag assembly connector under the front seat assembly.
NOTICE:
When disconnecting any airbag connector, take care not to damage the airbag wire harness.
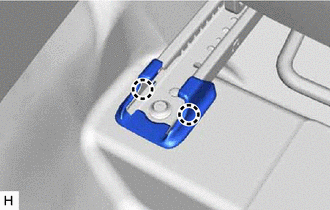
(1) Push down the white housing lock and slide the yellow CPA as shown in the illustration. (At this time, the connector cannot be disconnected yet.)
|
*a |
White Housing Lock |
|
*b |
Yellow CPA |

|
Slide in this Direction |
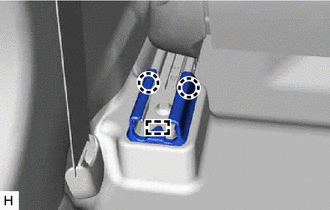
(2) Push down the white housing lock again and disconnect the connector.
NOTICE:
Do not push down the part (A) shown in the illustration when disconnecting the connector.
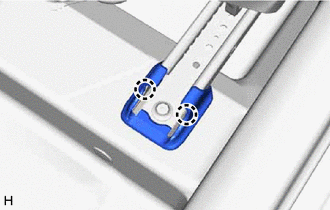
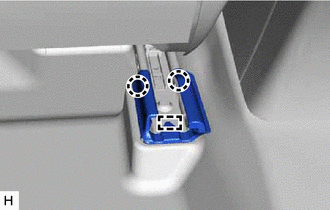
(h) Disconnect the front seat cushion airbag assembly RH connector under the front seat assembly. (for Front Passenger Side)
NOTICE:
When disconnecting any airbag connector, take care not to damage the airbag wire harness.
(1) Slide the slider to release the lock as shown in the illustration.
|
*a |
Slider |
- |
- |

|
Slide in this Direction (1) |

|
Slide in this Direction (2) |
(2) Disconnect the connector as shown in the illustration.
(i) Disconnect each connector and disengage each clamp under the front seat assembly.
|
(j) Remove the front seat assembly. NOTICE: Be careful not to damage the vehicle body. |
|

|
|
|