| Last Modified: 05-13-2024 | 6.11:8.1.0 | Doc ID: RM1000000027B4I |
| Model Year Start: 2023 | Model: Corolla Hatchback | Prod Date Range: [09/2022 - 11/2022] |
| Title: M20A-FKS (COOLING): COOLING FAN MOTOR (w/o Cooling Fan ECU): REMOVAL; 2023 MY Corolla Corolla Hatchback [09/2022 - 11/2022] | ||
REMOVAL
PROCEDURE
1. REMOVE NO. 1 ENGINE UNDER COVER ASSEMBLY
Click here
![2023 MY Corolla Corolla Hatchback [09/2022 - 11/2022]; M20A-FKS (ENGINE MECHANICAL): ENGINE ASSEMBLY: REMOVAL+](/t3Portal/stylegraphics/info.gif)
2. DRAIN ENGINE COOLANT (for Fully Sealed Type)
Click here
3. DRAIN ENGINE COOLANT (for Non-Fully Sealed Type)
Click here
4. REMOVE HEADLIGHT ASSEMBLY
Click here
5. REMOVE INLET NO. 3 AIR CLEANER
|
(a) Remove the 2 clips. |
|
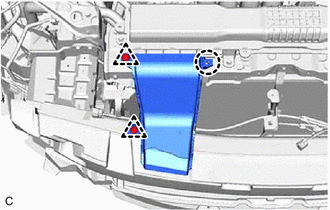
(b) Disengage the claw to remove the inlet No. 3 air cleaner.
6. REMOVE INLET NO. 1 AIR CLEANER
|
(a) Remove the 4 bolts and inlet No. 1 air cleaner from the upper radiator support sub-assembly and inlet No. 2 air cleaner. |
|
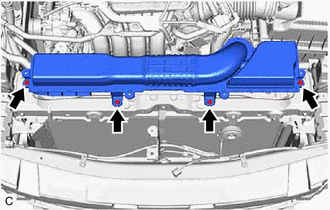
7. REMOVE INLET NO. 2 AIR CLEANER
|
(a) Remove the inlet No. 2 air cleaner from the air cleaner case sub-assembly. |
|

8. REMOVE HOOD LOCK ASSEMBLY
Click here
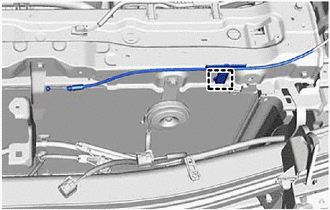
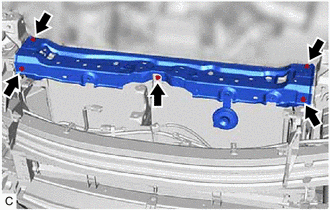
9. REMOVE UPPER RADIATOR SUPPORT SUB-ASSEMBLY
|
(a) Disengage the clamp to disconnect the hood lock control cable assembly from the upper radiator support sub-assembly. |
|
|
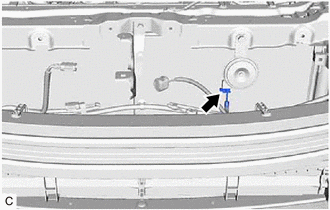
(b) Disconnect the horn connector. |
|
|
(c) Disengage the 3 clamps to disconnect the wire harness from the upper radiator support sub-assembly. |
|
|
(d) Remove the 5 bolts and upper radiator support sub-assembly. |
|
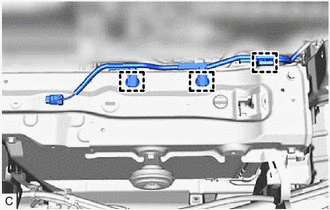
10. DISCONNECT NO. 2 WATER BY-PASS HOSE (for Fully Sealed Type)
|
(a) Disengage the 5 clamps to disconnect the No. 2 water by-pass hose from the radiator assembly and fan shroud. |
|
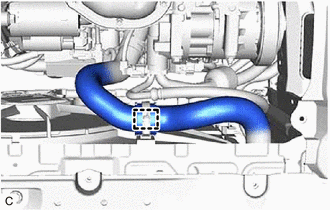
11. DISCONNECT NO. 1 RADIATOR HOSE
|
(a) Disengage the clamp and disconnect the No. 1 radiator hose from the hose clamp. |
|
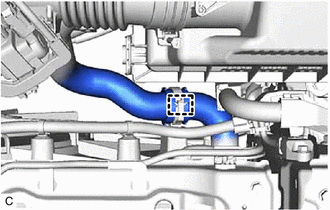
12. DISCONNECT NO. 2 RADIATOR HOSE
|
(a) Disengage the clamp and disconnect the No. 2 radiator hose from the hose clamp. |
|
13. REMOVE NO. 2 RADIATOR AIR GUIDE
|
(a) Disengage the 5 claws to remove the No. 2 radiator air guide. |
|

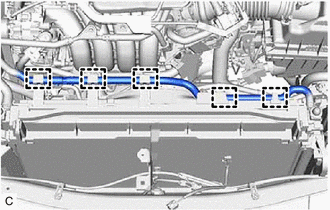
14. REMOVE FAN WITH MOTOR ASSEMBLY
|
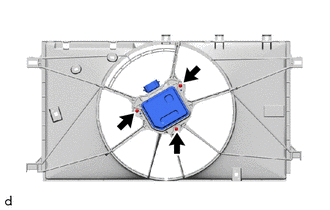
(a) Disconnect the cooling fan motor connector. (1) Disengage the claw and raise the lock lever to disconnect the cooling fan motor connector as shown in the illustration. NOTICE: After disconnecting the cooling fan motor connector, make sure that dirt, water or other foreign matter does not contact the connecting parts of the cooling fan motor connector. |
|
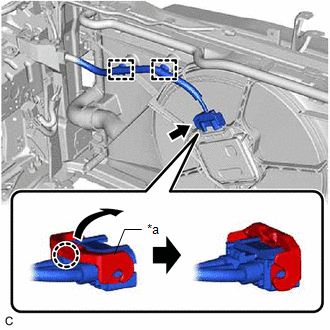
(b) Disengage the 2 wire harness clamps.
|
(c) Disengage the 2 claws. |
|
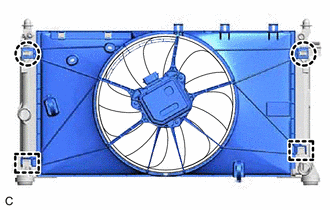
(d) Disengage the 2 guides to remove the fan with motor assembly from the radiator assembly.
NOTICE:
Do not damage the radiator assembly when removing the fan with motor assembly.
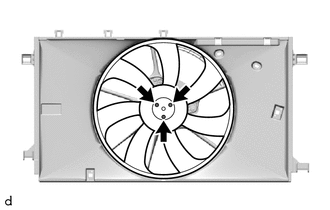
15. REMOVE FAN
|
(a) Remove the 3 screws and fan from the cooling fan motor. |
|
16. REMOVE COOLING FAN MOTOR
|
(a) Remove the 3 screws and cooling fan motor from the fan shroud. |
|
|
|
|