| Last Modified: 05-13-2024 | 6.11:8.1.0 | Doc ID: RM10000000275U1 |
| Model Year Start: 2023 | Model: GR Corolla | Prod Date Range: [09/2022 - 11/2022] |
| Title: SEAT BELT: FRONT SEAT OUTER BELT ASSEMBLY: INSTALLATION; 2023 MY Corolla Corolla Hatchback Corolla HV GR Corolla [09/2022 - 11/2022] | ||
INSTALLATION
CAUTION / NOTICE / HINT
HINT:
- Use the same procedure for the RH side and LH side.
- The following procedure is for the LH side.
PROCEDURE
1. INSTALL FRONT SHOULDER BELT ANCHOR ADJUSTER ASSEMBLY
|
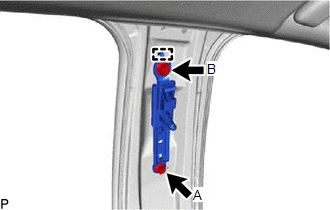
(a) Engage the guide and temporarily install the front shoulder belt anchor adjuster assembly with the 2 bolts. |
|
(b) Fully tighten the bolt (A) and then the bolt (B) to install the front shoulder belt anchor adjuster assembly.
Torque:
42 N·m {428 kgf·cm, 31 ft·lbf}
2. INSPECT FRONT SEAT OUTER BELT ASSEMBLY
3. INSTALL FRONT SEAT OUTER BELT ASSEMBLY
|
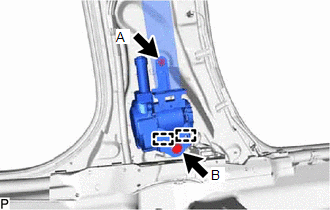
(a) Engage the 2 guides and temporarily install the front seat outer belt assembly with the 2 bolts. |
|
(b) Fully tighten the bolt (A) and then the bolt (B) to install the front seat outer belt assembly.
Torque:
Bolt (A) :
12.5 N·m {127 kgf·cm, 9 ft·lbf}
Bolt (B) :
42 N·m {428 kgf·cm, 31 ft·lbf}
|
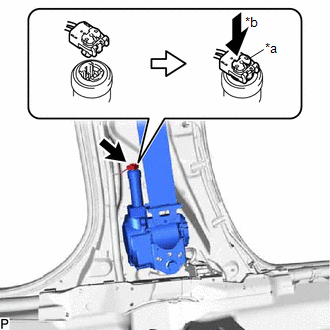
(c) Connect the pretensioner connector and lock the locking button as shown in the illustration. NOTICE: Securely lock the locking button. |
|
(d) Connect the shoulder anchor of the front seat outer belt assembly with the nut.
Torque:
42 N·m {428 kgf·cm, 31 ft·lbf}
(e) Check that the ELR locks.
NOTICE:
This check should be performed with the front seat outer belt assembly installed to the vehicle.
(1) With the front seat outer belt assembly installed to the vehicle, check that the belt locks when it is pulled out quickly.
4. INSTALL CENTER PILLAR UPPER GARNISH
5. INSTALL CENTER PILLAR LOWER GARNISH
6. CONNECT FRONT SEAT OUTER BELT ASSEMBLY
(a) Connect the floor anchor of the front seat outer belt assembly with the bolt.
Torque:
42 N·m {428 kgf·cm, 31 ft·lbf}
7. INSTALL LAP BELT OUTER ANCHOR COVER
(a) Engage the 3 claws to install the lap belt outer anchor cover.
8. CONNECT REAR DOOR OPENING TRIM WEATHERSTRIP
9. INSTALL REAR DOOR SCUFF PLATE (for Gasoline Model)
10. INSTALL REAR DOOR SCUFF PLATE (for HV Model)
11. CONNECT FRONT DOOR OPENING TRIM WEATHERSTRIP
12. INSTALL FRONT DOOR SCUFF PLATE
13. INSTALL REAR SEAT CUSHION LOCK HOOK (for Gasoline Model)
w/o Rear Seat Heater: Click here
![2020 - 2025 MY Corolla Corolla Hatchback Corolla HV GR Corolla [01/2019 - ]; SEAT: REAR SEAT ASSEMBLY: INSTALLATION+](/t3Portal/stylegraphics/info.gif)
14. INSTALL REAR SEAT CUSHION ASSEMBLY (for Gasoline Model)
w/o Rear Seat Heater: Click here
![2020 - 2025 MY Corolla Corolla Hatchback Corolla HV GR Corolla [01/2019 - ]; SEAT: REAR SEAT ASSEMBLY: INSTALLATION+](/t3Portal/stylegraphics/info.gif)
15. CONNECT REAR SEAT CENTER LAP TYPE BELT ASSEMBLY (for Gasoline Model)
w/o Rear Seat Heater: Click here
![2020 - 2025 MY Corolla Corolla Hatchback Corolla HV GR Corolla [01/2019 - ]; SEAT: REAR SEAT ASSEMBLY: INSTALLATION+](/t3Portal/stylegraphics/info.gif)
16. INSTALL REAR SEAT ASSEMBLY (for Gasoline Model)
w/ Rear Seat Heater: Click here
![2020 - 2025 MY Corolla Corolla Hatchback Corolla HV GR Corolla [01/2019 - ]; SEAT: REAR SEAT ASSEMBLY: INSTALLATION](/t3Portal/stylegraphics/info.gif)
17. CONNECT CABLE TO NEGATIVE AUXILIARY BATTERY TERMINAL
18. INSTALL SPARE WHEEL CUSHION (for G16E-GTS)
19. INSTALL DECK BOARD ASSEMBLY (for G16E-GTS)
20. PERFORM DIAGNOSTIC SYSTEM CHECK (for TMMMS Made)
21. INSPECT SRS WARNING LIGHT
22. INITIALIZATION AFTER RECONNECTING AUXILIARY BATTERY TERMINAL
HINT:
When disconnecting and reconnecting the battery, there is an automatic learning function that completes learning when the respective system is used.
|
|
|


