| Last Modified: 05-13-2024 | 6.11:8.1.0 | Doc ID: RM1000000026XRT |
| Model Year Start: 2023 | Model: GR Corolla | Prod Date Range: [09/2022 - ] |
| Title: EA67F / EA68F (MANUAL TRANSMISSION / TRANSAXLE): MANUAL TRANSAXLE ASSEMBLY: INSTALLATION; 2023 - 2025 MY Corolla Corolla Hatchback GR Corolla [09/2022 - ] | ||
INSTALLATION
CAUTION / NOTICE / HINT
NOTICE:
When the manual transaxle assembly is removed, be sure to use a new clutch release with bearing cylinder assembly and new installation bolts. Removal of the manual transaxle assembly allows the compressed clutch release with bearing cylinder assembly to return to its original position. Dust from the moving section may damage the seal of the clutch release with bearing cylinder assembly, possibly causing clutch fluid leaks.
PROCEDURE
1. INSTALL TRANSMISSION CASE PLUG ASSEMBLY
HINT:
Perform this procedure only when replacement of the transmission case plug assembly or manual transaxle assembly is necessary.
|
(a) Coat the O-ring of a new transmission case plug assembly with gear oil. |
|
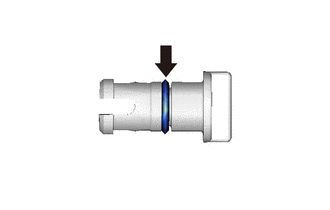
|
(b) Install the transmission case plug assembly to the manual transaxle assembly. |
|
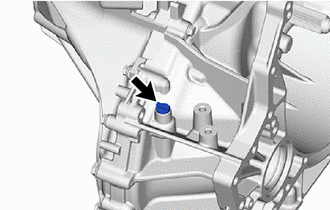
2. INSTALL TRANSFER AND TRANSAXLE SETTING STUD BOLT
(a) Clean the transfer and transaxle setting stud bolt holes.
(b) Using 2 nuts, install 4 new transfer and transaxle setting stud bolts to the manual transaxle assembly at the positions shown in the illustration.
|
*a |
73 mm (2.87 in.) |
*b |
53 mm (2.09 in.) |

|
Sealed Portion |
- |
- |
Torque:
39.2 N·m {400 kgf·cm, 29 ft·lbf}
NOTICE:
Install the sealed side of the transfer and transaxle setting stud bolt to the manual transaxle assembly.
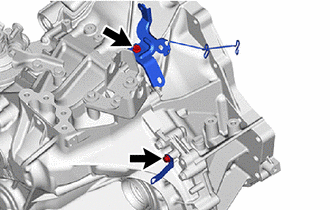
3. INSTALL WIRE HARNESS CLAMP BRACKET
|
(a) Install the wire harness clamp bracket to the manual transaxle assembly with the bolt. Torque: 10 N·m {102 kgf·cm, 7 ft·lbf} |
|
|
(b) Install the 2 wire harness clamp brackets to the manual transaxle assembly with the 2 bolts. Torque: 10 N·m {102 kgf·cm, 7 ft·lbf} |
|
4. INSTALL EXHAUST PIPE SUPPORT STAY
(a) Install the exhaust pipe support stay to the manual transaxle assembly with the 2 bolts.
Torque:
43 N·m {438 kgf·cm, 32 ft·lbf}
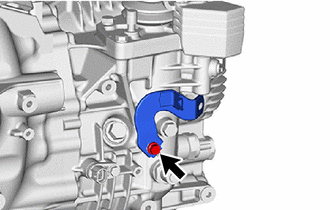
5. INSTALL CLUTCH FLEXIBLE HOSE BRACKET
(a) Install the clutch flexible hose bracket to the manual transaxle assembly with the bolt.
Torque:
19 N·m {194 kgf·cm, 14 ft·lbf}
6. INSTALL CLUTCH RELEASE CYLINDER WITH BEARING ASSEMBLY
Click here
![2023 - 2025 MY Corolla Corolla Hatchback GR Corolla [09/2022 - ]; CLUTCH: CLUTCH UNIT (for EA67F / EA68F): INSTALLATION+](/t3Portal/stylegraphics/info.gif)
7. INSTALL CLUTCH RELEASE BEARING PLATE
Click here
8. REMOVE CLUTCH RELEASE BLEEDER SUB-ASSEMBLY
Click here
9. INSPECT CLUTCH PIPE LINE
Click here
10. INSTALL CLUTCH RELEASE BLEEDER SUB-ASSEMBLY
Click here
11. INSTALL BLEEDER TO FLEXIBLE HOSE TUBE
Click here
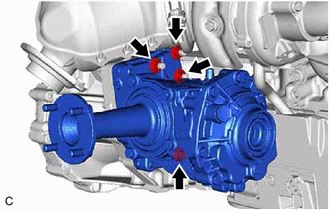
12. TEMPORARILY INSTALL TRANSFER ASSEMBLY
|
(a) Temporarily install the transfer assembly to the manual transaxle assembly with the 4 nuts. |
|
|
(b) Temporarily install the 4 nuts. |
|
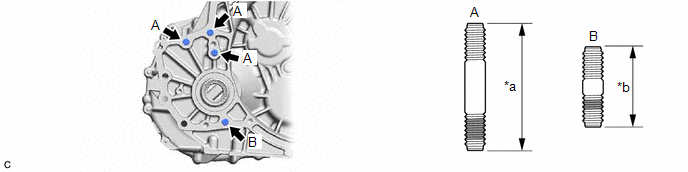
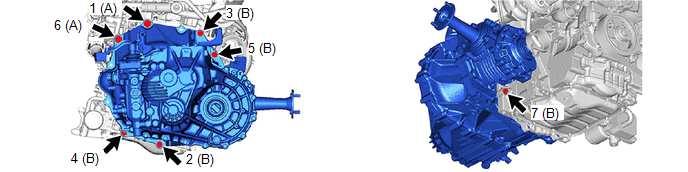
13. INSTALL MANUAL TRANSAXLE ASSEMBLY
(a) Align the input shaft with the clutch disc and install the manual transaxle assembly to the engine assembly.
NOTICE:
- Make sure that the wire harness or similar items are not pinched between the contact surfaces.
- Do not forcibly pry on the manual transaxle assembly when installing it to the engine assembly.
- Do not apply excessive force to the manual transaxle assembly as this will break the input shaft.
- Make sure that the knock pins fit securely into the holes when installing the manual transaxle assembly to the engine assembly.
- Make sure that the contact surfaces of the engine assembly and manual transaxle assembly are flat against each other before tightening the bolts.
(b) Install the transaxle assembly with the 7 bolts, in the sequence shown in the illustration.
Torque:
Bolt (A) :
64 N·m {653 kgf·cm, 47 ft·lbf}
Bolt (B) :
46 N·m {469 kgf·cm, 34 ft·lbf}
14. INSTALL TRANSFER ASSEMBLY
Click here
15. INSTALL PROPELLER SHAFT HEAT INSULATOR
(a) Install the propeller shaft heat insulator to the transfer assembly with the 2 bolts.
Torque:
25 N·m {255 kgf·cm, 18 ft·lbf}
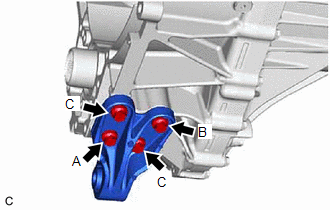
16. INSTALL NO. 2 ENGINE MOVING CONTROL ROD
|
(a) Install the No. 2 engine moving control rod to the manual transaxle assembly with the 4 bolts. Torque: 44 N·m {449 kgf·cm, 32 ft·lbf} HINT: Tightening order: Temporarily tighten bolt (A) → Fully tighten bolt (B) → Fully tighten bolt (C)→ Fully tighten bolt (A) |
|
17. INSTALL FRONT SUSPENSION CROSSMEMBER SUB-ASSEMBLY
(a) Install the front suspension crossmember sub-assembly to the No. 2 engine moving control rod with the bolt.
Torque:
170 N·m {1734 kgf·cm, 125 ft·lbf}
18. INSTALL OUTLET TURBINE ELBOW GASKET
Click here
19. INSTALL EXHAUST MANIFOLD CONVERTER SUB-ASSEMBLY
Click here
20. CONNECT ENGINE WIRE
|
(a) Engage the 4 clamps to connect the engine wire to the wire harness clamp bracket. |
|
|
(b) Engage the 4 clamps to connect the engine wire to the wire harness clamp bracket. |
|
(c) Install the bolt.
Torque:
10 N·m {102 kgf·cm, 7 ft·lbf}
|
(d) Connect the engine wire to the manual transaxle assembly with the 2 bolts. Torque: Bolt (A) : 10 N·m {102 kgf·cm, 7 ft·lbf} Bolt (B) : 20 N·m {204 kgf·cm, 15 ft·lbf} |
|
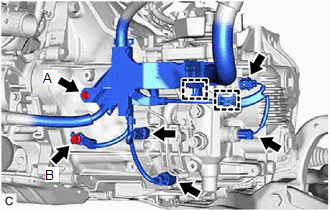
(e) Engage the 2 clamps to connect the engine wire to the wire harness clamp bracket.
(f) Connect the 4 connectors.
21. INSTALL STARTER ASSEMBLY
Click here
22. INSTALL FLYWHEEL HOUSING SIDE COVER
Click here
23. INSTALL ENGINE ASSEMBLY WITH TRANSAXLE
Click here
|
|
|