| Last Modified: 05-13-2024 | 6.11:8.1.0 | Doc ID: RM1000000026NQI |
| Model Year Start: 2023 | Model: Corolla Hatchback | Prod Date Range: [09/2022 - 11/2022] |
| Title: M20A-FKS (ENGINE CONTROL): ECM: INSTALLATION; 2023 MY Corolla Corolla Hatchback [09/2022 - 11/2022] | ||
INSTALLATION
CAUTION / NOTICE / HINT
NOTICE:
- After replacing the ECM, make sure to perform vehicle identification number (vin) registration and update ECU security key.(for TMC Made)
- After performing the vehicle identification number (vin) registration and update ECU security key procedure, make sure to perform the initialization procedure for when the cable has been disconnected and reconnected to the negative (-) battery terminal.(for TMC Made:)
PROCEDURE
1. INSTALL NO. 1 ECM BRACKET
(a) Install the No. 1 ECM bracket to the ECM with the 2 screws.
Torque:
4.5 N·m {46 kgf·cm, 40 in·lbf}
2. INSTALL NO. 2 ECM BRACKET
(a) Install the No. 2 ECM bracket to the ECM with the 2 screws.
Torque:
4.5 N·m {46 kgf·cm, 40 in·lbf}
3. INSTALL ECM
(a) Engage the guide to install the ECM.
NOTICE:
If the ECM has been struck or dropped, replace it.
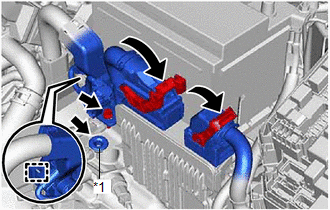
(b) Install the bolt and nut.
Torque:
Bolt :
12.5 N·m {127 kgf·cm, 9 ft·lbf}
Nut :
8.0 N·m {82 kgf·cm, 71 in·lbf}
|
(c) Install the grommet. |
|
(d) Engage the wire harness clamp and install the engine wire with the bolt.
Torque:
10 N·m {102 kgf·cm, 7 ft·lbf}
(e) Connect the 2 ECM connectors and lower the 2 lock levers.
NOTICE:
- When connecting the ECM connectors, make sure that dirt, water or other foreign matter does not contact the connecting parts of the ECM connectors.
- Be sure to securely connect the ECM connectors.
(f) Engage the 2 claws to connect the engine wire to the No. 1 engine room relay block and No. 1 junction block assembly.
(g) Connect the 3 connectors to the No. 1 engine room relay block and No. 1 junction block assembly.
(h) Engage the 2 guides and claw to install the No. 1 relay block cover to the No. 1 engine room relay block and No. 1 junction block assembly.
4. INSTALL AIR CLEANER CASE SUB-ASSEMBLY
(a) Engage the guide to install the air cleaner case sub-assembly.
(b) Install the 2 bolts.
Torque:
4.0 N·m {41 kgf·cm, 35 in·lbf}
5. INSTALL AIR CLEANER FILTER ELEMENT SUB-ASSEMBLY
6. INSTALL AIR CLEANER CAP WITH AIR CLEANER HOSE
7. INSTALL INLET NO. 1 AIR CLEANER
8. INSTALL RADIATOR SUPPORT OPENING COVER
9. CONNECT CABLE TO NEGATIVE BATTERY TERMINAL
10. VEHICLE IDENTIFICATION NUMBER (VIN) REGISTRATION
11. UPDATE ECU SECURITY KEY (for TMC Made)
12. PERFORM INITIALIZATION
13. INITIALIZATION AFTER RECONNECTING BATTERY TERMINAL
HINT:
When disconnecting and reconnecting the battery, there is an automatic learning function that completes learning when the respective system is used.
|
|
|

![2019 - 2025 MY Corolla Corolla Hatchback [06/2018 - ]; MAINTENANCE: M20A-FKS AIR CLEANER FILTER ELEMENT: INSTALLATION+](/t3Portal/stylegraphics/info.gif)