- Drive the vehicle straight ahead at 35 km/h (22 mph) or more for 5 seconds or more.*1
- Drive the vehicle straight ahead at 15 km/h (9 mph) or more for 1 second or more.*2
| Last Modified: 05-13-2024 | 6.11:8.1.0 | Doc ID: RM1000000026LK0 |
| Model Year Start: 2023 | Model: GR Corolla | Prod Date Range: [09/2022 - 11/2022] |
| Title: SUPPLEMENTAL RESTRAINT SYSTEMS: SPIRAL CABLE: REMOVAL; 2023 MY Corolla Corolla Hatchback Corolla HV GR Corolla [09/2022 - 11/2022] | ||
REMOVAL
CAUTION / NOTICE / HINT
The necessary procedures (adjustment, calibration, initialization or registration) that must be performed after parts are removed and installed, or replaced during spiral cable sub-assembly removal/installation are shown below.
HINT:
When the cable is disconnected / reconnected to the battery terminal, systems temporarily stop operating. However, each system has a function that completes learning the first time the system is used.
Items for which learning is completed by driving the vehicle (for HV Model)
|
Effect/Inoperative Function when Necessary Procedure not Performed |
Necessary Procedures |
Link |
|---|---|---|
|
Front Camera System (for TMC Made) |
Drive the vehicle straight ahead at 15 km/h (9 mph) or more for 1 second or more. |
Items for which learning is completed by driving the vehicle (for Gasoline Model)
|
Effect/Inoperative Function when Necessary Procedure not Performed |
Necessary Procedures |
Link |
|---|---|---|
|
*1: for GR Model
*2: except GR Model |
||
|
Front Camera System (for TMC Made) |
|
|
|
Pre-collision System (for TMMMS Made) |
Drive the vehicle straight ahead at 35 km/h (22 mph) or more for 5 seconds or more. |
|
|
Lane Tracing Assist System (for TMMMS Made) |
||
|
Lane Departure Alert System (for TMMMS Made) |
||
Learning completes when vehicle is operated normally (for Gasoline Model)
|
Effect/Inoperative Function when Necessary Procedure not Performed |
Necessary Procedures |
Link |
|---|---|---|
| *1: for Hatchback | ||
Power Door Lock Control System
|
Perform door unlock operation with door control switch or electrical key transmitter sub-assembly switch. |
|
NOTICE:
for HV Model
- After the ignition switch is turned off, the radio and display receiver assembly records various types of memory and settings. As a result, after turning the ignition switch off, make sure to wait at least 3 minutes before disconnecting the cable from the negative (-) auxiliary battery terminal.
- When the cable is disconnected from the negative (-) auxiliary battery terminal and the security lock setting has been enabled, multi-display operations will be disabled upon next startup unless the password is entered. Be sure to check the security lock setting before disconnecting the cable from the negative (-) auxiliary battery terminal. (for Audio and Visual System (for Single Knob Type))
for Gasoline Model
- After the ignition switch is turned off, the radio and display receiver assembly records various types of memory and settings. As a result, after turning the ignition switch off, make sure to wait at least 3 minutes before disconnecting the cable from the negative (-) auxiliary battery terminal.
- When the cable is disconnected from the negative (-) auxiliary battery terminal and the security lock setting has been enabled, multi-display operations will be disabled upon next startup unless the password is entered. Be sure to check the security lock setting before disconnecting the cable from the negative (-) auxiliary battery terminal. (for Audio and Visual System (for Single Knob Type))
PROCEDURE
1. REMOVE STEERING WHEEL ASSEMBLY
2. ALIGN FRONT WHEELS FACING STRAIGHT AHEAD
3. REMOVE LOWER STEERING COLUMN COVER SUB-ASSEMBLY
4. REMOVE UPPER STEERING COLUMN COVER
5. REMOVE SPIRAL CABLE WITH SENSOR SUB-ASSEMBLY
NOTICE:
- Do not remove/install the spiral cable with sensor sub-assembly with the auxiliary battery connected and the ignition switch (for Gasoline Model) or power switch (for HV Model) on (IG).
- Do not rotate the spiral cable with sensor sub-assembly without the steering wheel assembly installed, with the auxiliary battery connected and the ignition switch (for Gasoline Model) or power switch (for HV Model) on (IG).
- Ensure that the steering wheel assembly is installed and aligned straight when inspecting the steering sensor.
(a) Check that the ignition switch (for Gasoline Model) or power switch (for HV Model) is off.
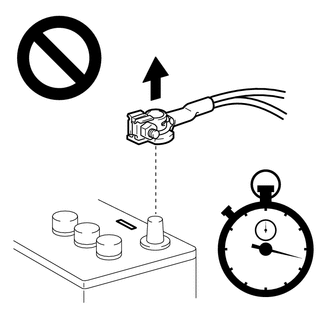
(b) Check that the cable is disconnected from the negative (-) auxiliary battery terminal.
CAUTION:
for TMC Made:
- Wait at least 60 seconds after disconnecting the cable from the negative (-) auxiliary battery terminal to disable the SRS system.
for TMMMS Made:
- Wait at least 90 seconds after disconnecting the cable from the negative (-) auxiliary battery terminal to disable the SRS system.
(c) Check that the front wheels are aligned facing straight ahead.
|
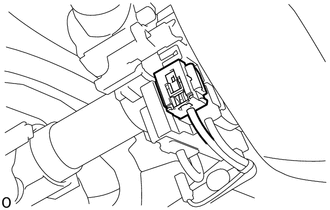
(d) Disconnect the yellow airbag connector from the spiral cable with sensor sub-assembly. NOTICE: When disconnecting any airbag connector, take care not to damage the airbag wire harness. HINT: Refer to How to Connect or Disconnect Airbag Connector. |
|
(e) Disconnect the other connectors from the spiral cable with sensor sub-assembly.
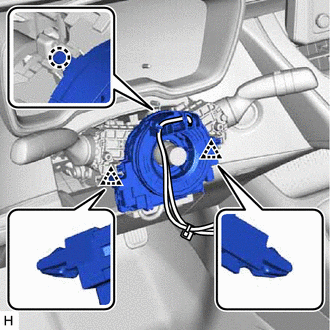
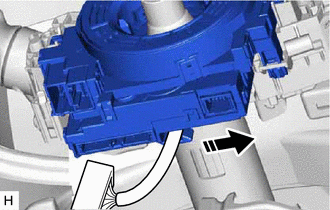
(f) Separate the wire harness from the spiral cable with sensor sub-assembly as shown in the illustration.

|
Separate in this Direction |
|
(g) Disengage the claw and 2 clips to remove the spiral cable with sensor sub-assembly. |
|
6. REMOVE SPIRAL CABLE SUB-ASSEMBLY
NOTICE:
- Remove the steering sensor from the spiral cable sub-assembly only when replacing the spiral cable sub-assembly or the steering sensor.
- Removing the steering sensor from the spiral cable sub-assembly without using a lock pin may result in the center position of the steering sensor becoming misaligned. Therefore, make sure to use the lock pin provided with a new spiral cable sub-assembly when removing the steering sensor from the spiral cable sub-assembly.
- When replacing the steering sensor:
|
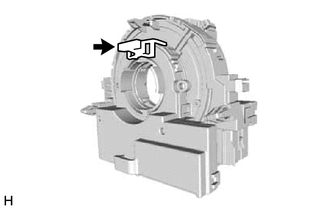
(a) Install the lock pin to the steering sensor. NOTICE:
|
|
|
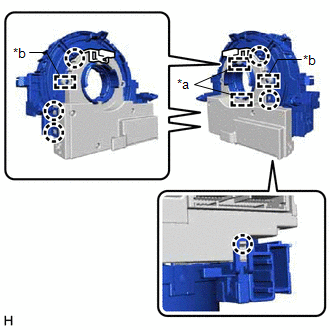
(b) Disengage the 6 claws and 2 pins to remove the spiral cable sub-assembly from the steering sensor. NOTICE: Do not damage the pins of the spiral cable sub-assembly or guides of the steering sensor. |
|
|
|
|
![2023 MY Corolla Corolla Hatchback Corolla HV GR Corolla [09/2022 - 11/2022]; ADVANCED DRIVER ASSISTANCE SYSTEM: FRONT CAMERA SYSTEM (for TMC Made): INITIALIZATION](/t3Portal/stylegraphics/info.gif)
