| Last Modified: 06-05-2026 | 6.11:8.1.0 | Doc ID: RM1000000026D2X |
| Model Year Start: 2023 | Model: GR Corolla | Prod Date Range: [09/2022 - ] |
| Title: BRAKE (FRONT): FRONT BRAKE (for 4-Pot Caliper): REMOVAL; 2023 - 2026 MY GR Corolla Corolla Corolla Hatchback Corolla HV [09/2022 - ] | ||
REMOVAL
CAUTION / NOTICE / HINT
The necessary procedures (adjustment, calibration, initialization, or registration) that must be performed after parts are removed and installed, or replaced during front brake removal/installation are shown below.
Necessary Procedures After Parts Removed/Installed/Replaced
|
Replaced Part or Performed Procedure |
Necessary Procedure |
Effect/Inoperative Function when Necessary Procedure not Performed |
Link |
|---|---|---|---|
|
Tire |
ECU Data Initialization (When performing tire replacement after RoB code X2104 is output) |
Active Torque Split AWD System |
|
CAUTION / NOTICE / HINT
NOTICE:
-
To avoid degrading the precision of the assembly, do not loosen or remove the 2 bolts shown in the illustration.
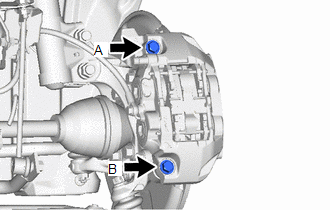
-
If the bolts have been loosened or removed, use the following procedure to reassemble the parts.
- Temporarily install the front disc brake cylinder assembly with the 2 bolts.
- Start the engine.
- Depress the brake pedal to continuously apply hydraulic pressure.
- Temporarily tighten bolt A to 30 N*m (306 kgf*cm, 22 ft.*lbf).
- Temporarily tighten bolt B to 30 N*m (306 kgf*cm, 22 ft.*lbf).
- Fully tighten bolt A to 100 N*m (1020 kgf*cm, 74 ft.*lbf).
- Fully tighten bolt B to 100 N*m (1020 kgf*cm, 74 ft.*lbf).
- Release the brake pedal to release the hydraulic pressure.
- Check that the 2 bolts are tightened to 100 N*m (1020 kgf*cm, 74 ft.*lbf).
- Immediately after installing the brake pads, the braking performance may be reduced. Always perform a road test in a safe place while paying attention to the surroundings.
- After replacing the front disc brake pads, the brake pedal may feel soft due to clearance between the front disc brake pads and front disc. Depress the brake pedal several times until the brake pedal feels firm.
- After replacing the front disc brake pads, always perform a road test to check the braking performance and check for vibrations.
HINT:
- Use the same procedure for the RH side and LH side.
- The following procedure is for the LH side.
PROCEDURE
1. REMOVE FRONT WHEEL
Click here
![2023 - 2026 MY GR Corolla Corolla Corolla Hatchback Corolla HV [09/2022 - ]; MAINTENANCE: TIRE AND WHEEL: REMOVAL](/t3Portal/stylegraphics/info.gif)
2. DRAIN BRAKE FLUID
NOTICE:
If brake fluid leaks onto any painted surface, immediately wash it off.
3. REMOVE FRONT DISC BRAKE PIN HOLD CLIP
Click here
4. REMOVE FRONT DISC BRAKE ANTI-RATTLE PIN
Click here
5. REMOVE FRONT DISC BRAKE ANTI-RATTLE SPRING
Click here
6. REMOVE FRONT DISC BRAKE PAD
Click here
7. REMOVE FRONT DISC BRAKE ANTI-SQUEAL SHIM KIT
Click here
8. DISCONNECT FRONT FLEXIBLE HOSE
|
(a) Remove the union bolt and disconnect the front flexible hose from the front disc brake cylinder assembly. |
|
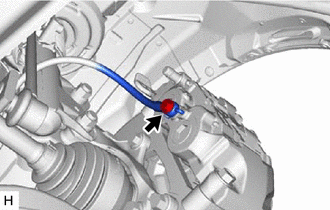
|
(b) Remove the gasket from the front flexible hose. |
|
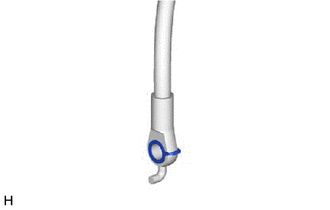
9. REMOVE FRONT DISC BRAKE CYLINDER ASSEMBLY
|
(a) Remove the 2 bolts and front disc brake cylinder assembly from the steering knuckle. |
|
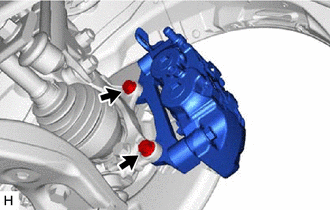
10. REMOVE FRONT DISC
|
(a) Put matchmarks on the front disc and the front axle hub sub-assembly. HINT: Not required when replacing the front disc. |
|
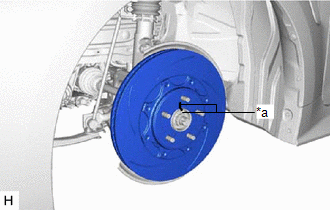
(b) Remove the front disc from the front axle hub sub-assembly.

|

|