|
Last Modified: 05-13-2024 |
6.11:8.1.0 |
Doc ID: RM1000000026CM3 |
|
Model Year Start: 2023 |
Model: GR Corolla |
Prod Date Range: [09/2022 - 11/2022] |
|
Title: REAR SUSPENSION: REAR TRAILING ARM (w/o Electric Parking Brake): REMOVAL; 2023 MY Corolla Corolla Hatchback Corolla HV GR Corolla [09/2022 - 11/2022] |
REMOVAL
CAUTION / NOTICE / HINT
The necessary procedures (adjustment, calibration, initialization, or registration) that must be performed after parts are removed and installed, or replaced during rear trailing arm assembly removal/installation are shown below.
Necessary Procedures After Parts Removed/Installed/Replaced (for Gasoline Model)
|
Replaced Part or Performed Procedure
|
Necessary Procedure
|
Effect/Inoperative Function when Necessary Procedure not Performed
|
Link
|
|
Rear wheel alignment adjustment
|
for TMC Made
-
Perform "Reset Memory"
-
Perform "Calibration"
|
-
VSC is disabled or malfunctions
-
DTCs are output
-
Slip indicator light illuminates
-
ABS warning light illuminates
|
![2023 - 2025 MY Corolla Corolla Hatchback GR Corolla [09/2022 - ]; BRAKE CONTROL / DYNAMIC CONTROL SYSTEMS: ELECTRONICALLY CONTROLLED BRAKE SYSTEM (for Gasoline Model without Electric Parking Brake System TMC Made): UTILITY](/t3Portal/stylegraphics/info.gif)
|
for TMMMS Made
-
Perform "Reset Memory"
-
Perform acceleration sensor zero point calibration and store system information memorization
|
-
VSC is disabled or malfunctions
-
DTCs are output
-
Slip indicator light illuminates
-
ABS warning light illuminates
|
![2023 MY Corolla Corolla Hatchback GR Corolla [09/2022 - 11/2022]; BRAKE CONTROL / DYNAMIC CONTROL SYSTEMS: ELECTRONICALLY CONTROLLED BRAKE SYSTEM (for Gasoline Model without Electric Parking Brake System TMMMS Made): UTILITY](/t3Portal/stylegraphics/info.gif)
|
|
Tire
|
ECU Data Initialization (When performing tire replacement after RoB code X2104 is output)
|
Active Torque Split AWD System
|
![2023 - 2025 MY Corolla Corolla Hatchback GR Corolla [09/2022 - ]; GF1A (TRANSFER / 4WD / AWD): ACTIVE TORQUE SPLIT AWD SYSTEM: CALIBRATION](/t3Portal/stylegraphics/info.gif)
|
CAUTION / NOTICE / HINT
HINT:
-
Use the same procedure for the RH side and LH side.
-
The following procedure is for the LH side.
PROCEDURE
1. REMOVE REAR WHEEL
Click here
![2023 - 2025 MY Corolla Corolla Hatchback Corolla HV GR Corolla [09/2022 - ]; MAINTENANCE: TIRE AND WHEEL: REMOVAL](/t3Portal/stylegraphics/info.gif)
2. REMOVE FRONT FLOOR COVER LH (for AWD)
(a) for LH Side:
Click here
![2023 - 2025 MY GR Corolla [09/2022 - ]; G16E-GTS (INTAKE / EXHAUST): EXHAUST PIPE: REMOVAL+](/t3Portal/stylegraphics/info.gif)
3. REMOVE REAR FLOOR SIDE MEMBER COVER LH (for AWD)
(a) for LH Side:
Click here
![2023 MY GR Corolla [09/2022 - 11/2022]; G16E-GTS (FUEL): FUEL TANK: REMOVAL+](/t3Portal/stylegraphics/info.gif)
4. REMOVE FRONT FLOOR COVER RH (for AWD)
(a) for RH Side:
Click here
![2023 - 2025 MY GR Corolla [09/2022 - ]; G16E-GTS (INTAKE / EXHAUST): EXHAUST PIPE: REMOVAL+](/t3Portal/stylegraphics/info.gif)
5. REMOVE REAR FLOOR SIDE MEMBER COVER RH (for AWD)
(a) for RH Side:
Click here
![2023 MY GR Corolla [09/2022 - 11/2022]; G16E-GTS (FUEL): FUEL TANK: REMOVAL+](/t3Portal/stylegraphics/info.gif)
6. SEPARATE NO. 3 PARKING BRAKE CABLE ASSEMBLY (for 2WD)
|
(a) Remove the nut and separate the No. 3 parking brake cable assembly from the rear trailing arm assembly.
|
|
7. SEPARATE NO. 3 PARKING BRAKE CABLE ASSEMBLY (for AWD)
|
(a) Remove the nut and separate the No. 3 parking brake cable assembly from the rear trailing arm assembly.
|
|
8. SEPARATE SKID CONTROL SENSOR WIRE (for 2WD)
|
(a) Disengage the 2 clamps.
|
|
(b) Remove the bolt and separate the skid control sensor wire from the rear trailing arm assembly.
9. SEPARATE REAR SPEED SENSOR (for AWD)
|
(a) Disengage the 2 clamps.
|
|
(b) Remove the bolt and separate the rear speed sensor from the rear trailing arm assembly.
10. REMOVE REAR STABILIZER LINK ASSEMBLY (for 2WD with Stabilizer Bar)
for Sedan: Click here
![2023 MY Corolla Corolla Hatchback Corolla HV GR Corolla [09/2022 - 11/2022]; REAR SUSPENSION: REAR STABILIZER BAR (for Sedan): REMOVAL+](/t3Portal/stylegraphics/info.gif)
for Hatchback: Click here
![2023 - 2025 MY Corolla Corolla Hatchback Corolla HV GR Corolla [09/2022 - ]; REAR SUSPENSION: REAR STABILIZER BAR (for Hatchback): REMOVAL+](/t3Portal/stylegraphics/info.gif)
11. REMOVE REAR STABILIZER LINK ASSEMBLY (for AWD)
Click here
![2023 - 2025 MY Corolla Corolla Hatchback Corolla HV GR Corolla [09/2022 - ]; REAR SUSPENSION: REAR STABILIZER BAR (for Hatchback): REMOVAL+](/t3Portal/stylegraphics/info.gif)
12. REMOVE REAR TRAILING ARM ASSEMBLY (for 2WD)
|
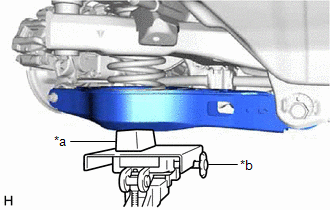
(a) Using a transmission jack and a wooden block, support the rear No. 2 suspension arm assembly.
NOTICE:
-
When jacking up the rear No. 2 suspension arm assembly, be sure to jack it up slowly.
-
Make sure to perform this operation with the vehicle kept as low as possible.
|

|
|
*a
|
Wooden Block
|
|
*b
|
Transmission Jack
|
|
|
(b) w/o Stabilizer Bar:
(1) Remove the cap.
|
(2) Remove the bolt and nut from the rear axle carrier sub-assembly and rear trailing arm assembly.
|
|
|
(c) Remove the 2 bolts and separate the rear trailing arm assembly from the rear axle carrier sub-assembly.
|
|
|
(d) Remove the 4 bolts and rear trailing arm assembly.
|
|
13. REMOVE REAR TRAILING ARM ASSEMBLY (for AWD)
|
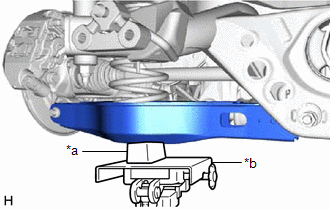
(a) Using a transmission jack and a wooden block, support the rear No. 2 suspension arm assembly.
NOTICE:
-
When jacking up the rear No. 2 suspension arm assembly, be sure to jack it up slowly.
-
Make sure to perform this operation with the vehicle kept as low as possible.
|

|
|
*a
|
Wooden Block
|
|
*b
|
Transmission Jack
|
|
|
|
(b) Remove the 2 bolts and separate the rear trailing arm assembly from the rear axle carrier sub-assembly.
|
|
|
(c) Remove the 4 bolts and rear trailing arm assembly.
|
|
14. REMOVE REAR SUSPENSION ARM COVER (for 2WD)
|
(a) Secure the rear trailing arm assembly in a vise using aluminum plates.
NOTICE:
Do not overtighten the vise.
|
|
|
(b) Disengage the 4 claws and remove the rear suspension arm cover.
|
|
15. REMOVE REAR NO. 1 SUSPENSION SUPPORT COVER (for AWD)
|
(a) Secure the rear trailing arm assembly in a vise using aluminum plates.
NOTICE:
Do not overtighten the vise.
|
|
|
(b) Disengage the 3 claws and remove the rear No. 1 suspension support cover.
|
|
16. REMOVE REAR SUSPENSION ARM BRACKET (for 2WD)
|
(a) Remove the bolt, nut and rear suspension arm bracket from the rear trailing arm assembly.
|
|
17. REMOVE REAR SUSPENSION ARM BRACKET (for AWD)
|
(a) Remove the bolt, nut and rear suspension arm bracket from the rear trailing arm assembly.
|
|
|