| Last Modified: 07-31-2024 | 6.11:8.1.0 | Doc ID: RM10000000269GE |
| Model Year Start: 2023 | Model: GR Corolla | Prod Date Range: [09/2022 - 11/2022] |
| Title: CELLULAR COMMUNICATION: BACK-UP BATTERY: REMOVAL; 2023 MY Corolla Corolla Hatchback Corolla HV GR Corolla [09/2022 - 11/2022] | ||
REMOVAL
CAUTION / NOTICE / HINT
The necessary procedures (adjustment, calibration, initialization, or registration) that must be performed after parts are removed and installed, or replaced during back-up battery removal/installation are shown below.
Necessary Procedure After Parts Removed/Installed/Replaced (for HV Model)
|
Replaced Part or Performed Procedure |
Necessary Procedure |
Effect/Inoperative Function When Necessary Procedures are not Performed |
Link |
|---|---|---|---|
|
Back-up battery |
Perform the reset back-up battery condition |
Safety Connect System |
Necessary Procedure After Parts Removed/Installed/Replaced (for Gasoline Model)
|
Replaced Part or Performed Procedure |
Necessary Procedure |
Effect/Inoperative Function When Necessary Procedures are not Performed |
Link |
|---|---|---|---|
|
Back-up battery |
Perform the reset back-up battery condition |
Safety Connect System |
PROCEDURE
1. REMOVE DCM (TELEMATICS TRANSCEIVER) WITH BRACKET
2. REMOVE BACK-UP BATTERY (for TMMMS Made)
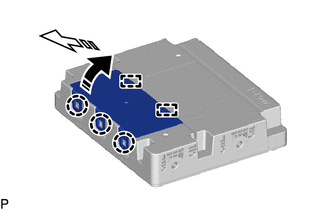
(a) Disengage the 3 claws and 2 guides as shown in the illustration to remove the transceiver cover.


|
Remove in this Direction (1) |

|
Remove in this Direction (2) |
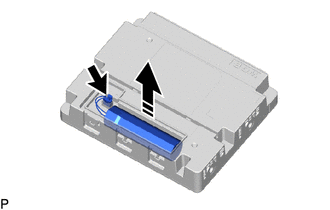
(b) Disconnect the connector.


|
Remove in this Direction |
(c) Remove the back-up battery as shown in the illustration.
3. REMOVE BACK-UP BATTERY (for TMC Made)
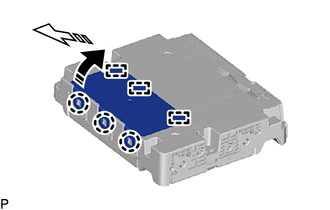
(a) Disengage the 3 claws and 3 guides as shown in the illustration to remove the transceiver cover.


|
Remove in this Direction (1) |

|
Remove in this Direction (2) |
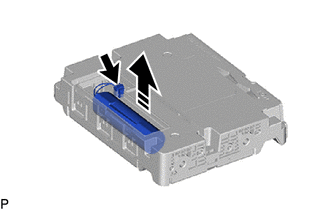
(b) Disconnect the connector.


|
Remove in this Direction |
(c) Remove the back-up battery as shown in the illustration.
|
|
|
![2021 - 2025 MY Corolla Corolla HV [04/2020 - ]; CELLULAR COMMUNICATION: SAFETY CONNECT SYSTEM (for HV Model): INITIALIZATION](/t3Portal/stylegraphics/info.gif)