- DTCs are stored
- Slight vibration at a vehicle speed of 5 km/h (3 mph) or less
- Shock or vibration during acceleration
| Last Modified: 07-31-2024 | 6.11:8.1.0 | Doc ID: RM10000000267IU |
| Model Year Start: 2023 | Model: Corolla | Prod Date Range: [09/2022 - 11/2022] |
| Title: 2ZR-FXE (ENGINE MECHANICAL): REAR CRANKSHAFT OIL SEAL: REMOVAL; 2023 MY Corolla Corolla HV [09/2022 - 11/2022] | ||
REMOVAL
CAUTION / NOTICE / HINT
The necessary procedures (adjustment, calibration, initialization, or registration) that must be performed after parts are removed and installed, or replaced during rear crankshaft oil seal removal/installation are shown below.
Necessary Procedure After Parts Removed/Installed/Replaced
|
Replaced Part or Performed Procedure |
Necessary Procedure |
Effect/Inoperative Function when Necessary Procedure not Performed |
Link |
|---|---|---|---|
|
Replacement of inverter with converter assembly |
ECU configuration |
- |
|
|
Resolver learning |
|
||
|
Replacement of hybrid vehicle transaxle assembly |
|
||
|
Replacement of ECM |
Vehicle Identification Number (VIN) registration |
MIL comes on |
|
|
ECU configuration |
- |
||
|
Update ECU security key |
Vehicle Control History (RoB) are stored |
||
|
Inspection After Repair |
|
|
|
Front wheel alignment adjustment |
|
|
HINT:
When the cable is disconnected / reconnected to the auxiliary battery terminal, systems temporarily stop operating. However, each system has a function that completes learning the first time the system is used.
Learning completes when vehicle is driven
|
Effect/Inoperative Function when Necessary Procedure not Performed |
Necessary Procedure |
Link |
|---|---|---|
|
Front Camera System (for TMC Made) |
Drive the vehicle straight ahead at 15 km/h (9 mph) or more for 1 second or more. |
PROCEDURE
1. REMOVE ENGINE ASSEMBLY
2. REMOVE TRANSMISSION INPUT DAMPER ASSEMBLY
(a) Using height adjustment attachments and plate lift attachments, place the engine assembly on a flat level surface.
NOTICE:
- Using height adjustment attachments and plate lift attachments, keep the engine assembly horizontal.
- To prevent the oil pan sub-assembly from deforming, do not place any attachments under the oil pan sub-assembly of the engine assembly.
- Using an engine sling device and engine lift, secure the engine assembly before servicing.
|
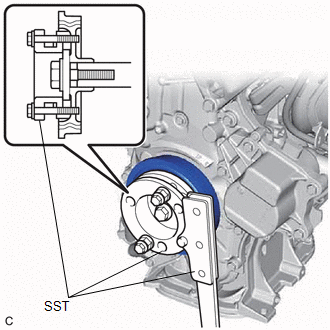
(b) Using SST, hold the crankshaft pulley. SST: 09213-58014 91551-80840 SST: 09330-00021 |
|
|
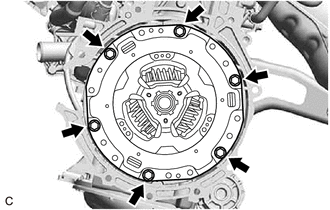
(c) Remove the 6 bolts and transmission input damper assembly from the flywheel sub-assembly. |
|
3. REMOVE FLYWHEEL SUB-ASSEMBLY
|
(a) Using SST, hold the crankshaft pulley. SST: 09213-58014 91551-80840 SST: 09330-00021 |
|
|
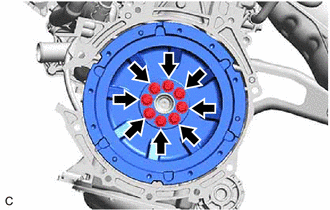
(b) Remove the 8 bolts and flywheel sub-assembly from the crankshaft. |
|
4. REMOVE REAR ENGINE OIL SEAL
|
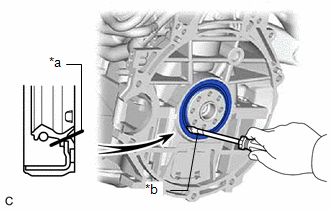
(a) Using a knife, cut through the lip of the rear engine oil seal. |
|
(b) Using a screwdriver with its tip wrapped with protective tape, pry out the rear engine oil seal.
NOTICE:
Be careful not to damage the crankshaft.
|
|
|
![2023 - 2025 MY Corolla Corolla Hatchback Corolla HV GR Corolla [09/2022 - ]; SETUP: WHEN REPLACING OR REMOVING/INSTALLING PARTS: ECU CONFIGURATION](/t3Portal/stylegraphics/info.gif)


