| Last Modified: 05-13-2024 | 6.11:8.1.0 | Doc ID: RM10000000261GN |
| Model Year Start: 2023 | Model: Corolla | Prod Date Range: [09/2022 - ] |
| Title: 2ZR-FXE (INTAKE / EXHAUST): EXHAUST MANIFOLD: INSTALLATION; 2023 - 2025 MY Corolla Corolla HV [09/2022 - ] | ||
INSTALLATION
PROCEDURE
1. INSTALL NO. 2 EXHAUST MANIFOLD HEAT INSULATOR
(a) Install the No. 2 exhaust manifold heat insulator to the exhaust manifold (TWC: Front Catalyst) with the 3 bolts.
Torque:
12 N·m {122 kgf·cm, 9 ft·lbf}
2. INSTALL EXHAUST MANIFOLD (TWC: Front Catalyst)
(a) Install a new exhaust manifold to head gasket and EGR cooler gasket to the cylinder head sub-assembly.
(b) Temporarily install the exhaust manifold (TWC: Front Catalyst) to the cylinder head sub-assembly with 7 new nuts.
(c) Temporarily install the manifold stay to the exhaust manifold (TWC: Front Catalyst) and cylinder block sub-assembly with the 3 bolts.
|
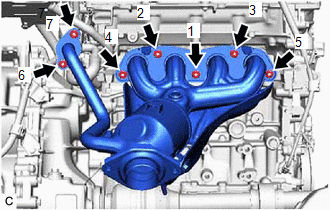
(d) Using a 12 mm deep socket wrench, tighten the 7 nuts in the order shown in the illustration. Torque: 26 N·m {265 kgf·cm, 19 ft·lbf} |
|
|
(e) Tighten the 3 bolts in the order shown in the illustration. Torque: 43 N·m {438 kgf·cm, 32 ft·lbf} |
|

3. INSTALL NO. 1 EXHAUST MANIFOLD HEAT INSULATOR
(a) Install the No. 1 exhaust manifold heat insulator to the exhaust manifold (TWC: Front Catalyst) with the 3 bolts.
Torque:
12 N·m {122 kgf·cm, 9 ft·lbf}
4. INSTALL WIRING HARNESS CLAMP BRACKET
(a) Install the wiring harness clamp bracket to the engine assembly with the bolt and engage the clamp.
Torque:
39 N·m {398 kgf·cm, 29 ft·lbf}
5. CONNECT FLOOR SHIFT TRANSMISSION CONTROL SELECT CABLE
(a) Connect the floor shift transmission control select cable to the engine assembly with the bolt.
Torque:
12 N·m {122 kgf·cm, 9 ft·lbf}
6. INSTALL FRONT NO. 1 FLOOR HEAT INSULATOR
Click here
![2023 - 2025 MY Corolla Corolla Hatchback Corolla HV [09/2022 - ]; PA10 (HYBRID TRANSMISSION / TRANSAXLE): TRANSMISSION CONTROL CABLE: INSTALLATION+](/t3Portal/stylegraphics/info.gif)
7. INSTALL FRONT EXHAUST PIPE ASSEMBLY (TWC: Rear Catalyst)
|
(a) Using a vernier caliper, measure the free length of the compression springs.
If the free length is less than the minimum, replace the compression spring. |
|

(b) Temporarily install 2 new gaskets to the exhaust manifold (TWC: Front Catalyst) and front exhaust pipe assembly (TWC: Rear Catalyst).
|
(c) Using a plastic hammer and wooden block, tap in each gasket until its surface is flush with the exhaust manifold (TWC: Front Catalyst) and front exhaust pipe assembly (TWC: Rear Catalyst). NOTICE:
|
|

(d) Connect the front exhaust pipe assembly (TWC: Rear Catalyst) to the 2 exhaust pipe supports.
(e) Install the front exhaust pipe assembly (TWC: Rear Catalyst) to the exhaust manifold (TWC: Front Catalyst) with the 2 compression springs and 2 bolts.
Torque:
43 N·m {438 kgf·cm, 32 ft·lbf}
HINT:
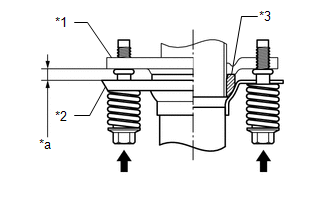
After installation, check that the space between the flanges of the exhaust manifold (TWC: Front Catalyst) and front exhaust pipe assembly (TWC: Rear Catalyst) is consistent front-to-rear and left-to-right.
|
*1 |
Exhaust Manifold (TWC: Front Catalyst) |
|
*2 |
Front Exhaust Pipe Assembly (TWC: Rear Catalyst) |
|
*3 |
Gasket |
|
*a |
Space between Flanges: 8.5 mm (0.335 in.) |
(f) Install the front exhaust pipe assembly (TWC: Rear Catalyst) to the tail exhaust pipe assembly with the 2 compression springs and 2 bolts.
Torque:
43 N·m {438 kgf·cm, 32 ft·lbf}
HINT:
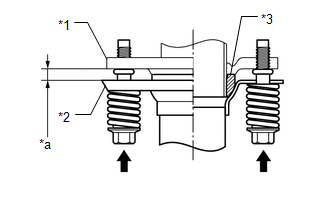
After installation, check that the space between the flanges of the front exhaust pipe assembly (TWC: Rear Catalyst) and tail exhaust pipe assembly is consistent front-to-rear and left-to-right.
|
*1 |
Front Exhaust Pipe Assembly (TWC: Rear Catalyst) |
|
*2 |
Tail Exhaust Pipe Assembly |
|
*3 |
Gasket |
|
*a |
Space between Flanges: 6.5 mm (0.256 in.) |
(g) Engage the wire harness clamp.
(h) Connect the heated oxygen sensor connector.
8. INSTALL FRONT FLOOR CENTER BRACE
(a) Install the 3 front floor center braces to the vehicle body with the 12 bolts.
Torque:
29 N·m {296 kgf·cm, 21 ft·lbf}
9. INSTALL FRONT FLOOR COVER LH
(a) Engage the 6 clamps to install the front floor cover LH to the vehicle body with the 2 bolts and 3 clips.
Torque:
7.5 N·m {76 kgf·cm, 66 in·lbf}
10. INSTALL FRONT FLOOR COVER RH
HINT:
Perform the same procedure as for the front floor cover LH.
11. INSTALL HEATED OXYGEN SENSOR
Click here
12. INSPECT FOR EXHAUST GAS LEAK
Click here
13. INSTALL NO. 1 ENGINE UNDER COVER ASSEMBLY
Click here
|
|
|