| Last Modified: 05-13-2024 | 6.11:8.1.0 | Doc ID: RM1000000025V92 |
| Model Year Start: 2023 | Model: GR Corolla | Prod Date Range: [09/2022 - ] |
| Title: G16E-GTS (FUEL): FUEL INJECTOR (for Port Injection): INSTALLATION; 2023 - 2025 MY GR Corolla [09/2022 - ] | ||
INSTALLATION
CAUTION / NOTICE / HINT
NOTICE:
This procedure includes the installation of small-head bolts. Refer to Small-Head Bolts of Basic Repair Hint to identify the small-head bolts.
PROCEDURE
1. INSTALL PORT FUEL INJECTOR ASSEMBLY
HINT:
Perform "Inspection After Repair" after replacing a port fuel injector assembly.
(a) Apply a light coat of spindle oil or gasoline to 3 new O-rings, and install one to each port fuel injector assembly.
NOTICE:
Check that there is no damage or foreign matter on the groove of the port fuel injector assembly when installing the O-ring to each port fuel injector assembly.
|
(b) Install the 3 port fuel injector assemblies to the fuel delivery pipe. NOTICE:
|
|
2. INSTALL NO. 5 ENGINE WIRE
(a) Engage the 2 clamps to install the No. 5 engine wire to the fuel delivery pipe.
(b) Connect the 3 port fuel injector assembly connectors and fuel pressure sensor connector.
3. INSTALL INJECTOR VIBRATION INSULATOR
(a) Install 3 new injector vibration insulators to the cylinder head sub-assembly.
4. INSTALL FUEL DELIVERY SPACER
(a) Install the 2 fuel delivery spacers to the cylinder head sub-assembly.
5. INSTALL FUEL DELIVERY PIPE
(a) Place the fuel delivery pipe with the 3 port fuel injector assemblies onto the cylinder head sub-assembly.
NOTICE:
Be careful not to drop the port fuel injector assemblies when installing the fuel delivery pipe.
(b) Install the fuel delivery pipe with the port fuel injector assemblies with the 2 bolts.
Torque:
29 N·m {296 kgf·cm, 21 ft·lbf}
(c) Connect the No. 5 engine wire connector.
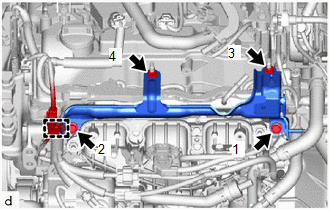
6. INSTALL FUEL DELIVERY GUARD
|
(a) Temporarily install the fuel delivery guard with the 2 bolts and 2 nuts. |
|
(b) Install the 2 bolts and 2 nuts in the order shown in the illustration.
Torque:
21 N·m {214 kgf·cm, 15 ft·lbf}
(c) Engage the engine wire clamp.
7. INSTALL OIL LEVEL GAUGE GUIDE
(a) Apply a light coat of engine oil to a new O-ring.
(b) Install the O-ring to the oil level gauge guide.
(c) Install the oil level gauge guide with the bolt.
Torque:
10 N·m {102 kgf·cm, 7 ft·lbf}
8. INSTALL OIL LEVEL GAUGE SUB-ASSEMBLY
(a) Install the oil level gauge sub-assembly.
9. INSTALL NO. 4 WATER BY-PASS PIPE
(a) Install the No. 4 water by-pass pipe to the cylinder head sub-assembly with the 3 bolts.
Torque:
10 N·m {102 kgf·cm, 7 ft·lbf}
10. CONNECT NO. 2 FUEL TUBE SUB-ASSEMBLY
(a) Connect the No. 2 fuel tube sub-assembly to the fuel delivery pipe.
11. INSTALL FUEL PIPE CLAMP
(a) Install the fuel pipe clamp to the fuel tube connector.
12. INSTALL ENGINE WIRE
13. INSTALL NO. 1 ENGINE COVER SUB-ASSEMBLY
14. CONNECT CABLE TO NEGATIVE BATTERY TERMINAL
15. INSTALL SPARE WHEEL CUSHION
16. INSTALL DECK BOARD ASSEMBLY
17. ADD ENGINE COOLANT
18. INSPECT FOR FUEL LEAK
19. PERFORM INITIALIZATION
(a) Perform "Inspection After Repair" after replacing a port fuel injector assembly.
20. INITIALIZATION AFTER RECONNECTING BATTERY TERMINAL
HINT:
When disconnecting and reconnecting the battery, there is an automatic learning function that completes learning when the respective system is used.
|
|
|
![2019 - 2025 MY Corolla Corolla Hatchback Corolla HV GR Corolla [06/2018 - ]; INTRODUCTION: REPAIR INSTRUCTION: PRECAUTION](/t3Portal/stylegraphics/info.gif)

