- Back door opener*1
| Last Modified: 05-13-2024 | 6.11:8.1.0 | Doc ID: RM1000000025RHT |
| Model Year Start: 2023 | Model: Corolla Hatchback | Prod Date Range: [09/2022 - 11/2022] |
| Title: M20A-FKS (COOLING): FLOW SHUTTING VALVE (for Heater): REMOVAL; 2023 MY Corolla Corolla Hatchback [09/2022 - 11/2022] | ||
REMOVAL
CAUTION / NOTICE / HINT
The necessary procedures (adjustment, calibration, initialization or registration) that must be performed after parts are removed and installed, or replaced during flow shutting valve (water valve) removal/installation are shown below.
NOTICE:
When replacing the battery, use a new battery of the same dimensions and same capacity or more from the same class at a 20-hour rate.
HINT:
When the cable is disconnected / reconnected to the battery terminal, systems temporarily stop operating. However, each system has a function that completes learning the first time the system is used.
Learning completes when vehicle is driven
|
Effect/Inoperative Function when Necessary Procedure not Performed |
Necessary Procedure |
Link |
|---|---|---|
|
Front Camera System (for TMC Made) |
Drive the vehicle straight ahead at 15 km/h (10 mph) or more for 1 second or more. |
|
|
Pre-collision System (for TMMMS Made) |
Drive the vehicle straight ahead at 35 km/h (22 mph) or more for 5 seconds or more. |
|
|
Lane Tracing Assist System (for TMMMS Made) |
||
|
Lane Departure Alert System (for TMMMS Made) |
Learning completes when vehicle is operated normally
|
Effect/Inoperative Function when Necessary Procedure not Performed |
Necessary Procedure |
Link |
|---|---|---|
| *1: for Hatchback | ||
|
Power Door Lock Control System |
Perform door unlock operation with door control switch or electrical key transmitter sub-assembly switch. |
|
PROCEDURE
1. REMOVE WINDSHIELD WIPER MOTOR AND LINK ASSEMBLY
2. REMOVE NO. 1 HEATER AIR DUCT SPLASH SHIELD SEAL
3. REMOVE OUTER COWL TOP PANEL SUB-ASSEMBLY
4. REMOVE NO. 1 ENGINE UNDER COVER ASSEMBLY
5. DRAIN ENGINE COOLANT (for Fully Sealed Type)
6. DRAIN ENGINE COOLANT (for Non-Fully Sealed Type)
7. REMOVE BATTERY
8. REMOVE FLOW SHUTTING VALVE (WATER VALVE)
|
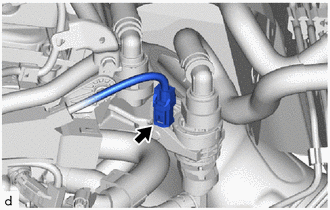
(a) Disconnect the flow shutting valve (water valve) connector. |
|
(b) Disconnect the inlet heater hose connector from the flow shutting valve (water valve).
NOTICE:
Remove any foreign matter on the flow shutting valve (water valve) and inlet heater hose connector before performing this work.
(1) Pull out the retainer to disengage the lock claws and pull off the inlet heater hose connector.
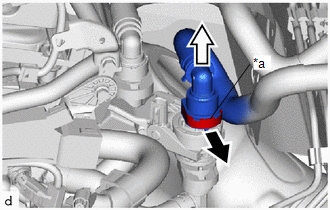
|
*a |
Retainer |

|
Pull out |

|
Pull off |
(2) Check that there is no foreign matter on the sealing surfaces of the disconnected water lines. Clean them if necessary.
(3) Cover the disconnected inlet heater hose connector with plastic bag to prevent damage and contamination.
|
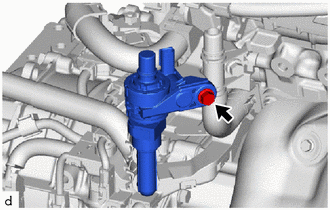
(c) Remove the bolt to disconnect the flow shutting valve (water valve). |
|
(d) Disconnect the water by-pass hose assembly connector from the flow shutting valve (water valve). (except TMC Made)
NOTICE:
Remove any foreign matter on the flow shutting valve (water valve) and water by-pass hose assembly connector before performing this work.
(1) Pull out the retainer to disengage the lock claws and pull off the water by-pass hose assembly connector.
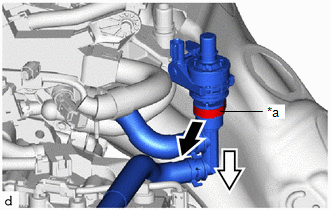
|
*a |
Retainer |

|
Pull out |

|
Pull off |
(2) Check that there is no foreign matter on the sealing surfaces of the disconnected water lines. Clean them if necessary.
(3) Cover the disconnected water by-pass hose assembly connector with plastic bag to prevent damage and contamination.
|
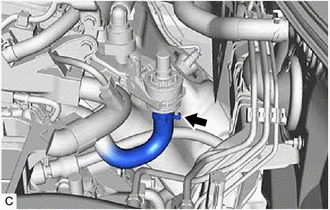
(e) Slide the clip and disconnect the water by-pass hose assembly from the flow shutting valve (water valve). (for TMC Made) |
|
|
|
|
![2023 MY Corolla Corolla Hatchback Corolla HV GR Corolla [09/2022 - 11/2022]; ADVANCED DRIVER ASSISTANCE SYSTEM: FRONT CAMERA SYSTEM (for TMC Made): INITIALIZATION](/t3Portal/stylegraphics/info.gif)
