- Poor idle, etc.
- Engine start function, etc.
| Last Modified: 05-13-2024 | 6.11:8.1.0 | Doc ID: RM1000000025P1N |
| Model Year Start: 2023 | Model: Corolla | Prod Date Range: [09/2022 - ] |
| Title: 2ZR-FXE (EMISSION CONTROL): CANISTER (w/ Canister Pump Module): REMOVAL; 2023 - 2025 MY Corolla Corolla HV [09/2022 - ] | ||
REMOVAL
CAUTION / NOTICE / HINT
The necessary procedures (adjustment, calibration, initialization or registration) that must be performed after parts are removed and installed, or replaced during canister (charcoal canister assembly) removal/installation are shown below.
Necessary Procedures After Parts Removed/Installed/Replaced
|
Replaced Part or Performed Procedure |
Necessary Procedure |
Effect/Inoperative Function when Necessary Procedure not Performed |
Link |
|---|---|---|---|
|
Gas leak from exhaust system is repaired |
Inspection After Repair |
|
|
PROCEDURE
1. REMOVE TAIL EXHAUST PIPE ASSEMBLY
Click here
![2020 - 2025 MY Corolla Corolla HV [01/2019 - ]; 2ZR-FXE (INTAKE / EXHAUST): EXHAUST PIPE: REMOVAL+](/t3Portal/stylegraphics/info.gif)
2. REMOVE REAR FLOOR SIDE MEMBER COVER LH (w/ Cover)
(a) for 2WD
Click here
3. REMOVE REAR FLOOR SIDE MEMBER COVER RH (w/ Cover)
(a) for 2WD
Click here
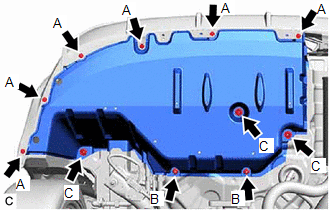
4. REMOVE NO. 2 FLOOR UNDER COVER
(a) for AWD
|
(1) Remove the No. 2 floor under cover .
NOTICE: If the 5 clips are not turned when the No. 2 floor under cover is removed, the No. 2 floor under cover or stud bolt may be damaged. HINT: Do not remove the clips from the No. 2 floor under cover. |
|
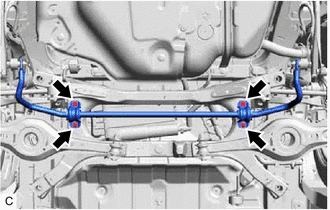
5. SEPARATE REAR STABILIZER BAR SUB-ASSEMBLY
|
(a) for 2WD (1) Remove the 4 bolts and separate the rear stabilizer bar sub-assembly from the rear suspension member sub-assembly. |
|
6. REMOVE CANISTER (CHARCOAL CANISTER ASSEMBLY)
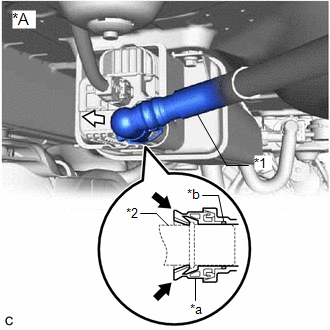
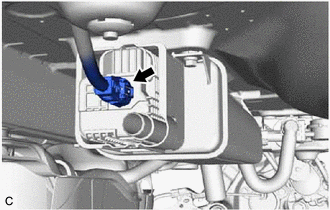
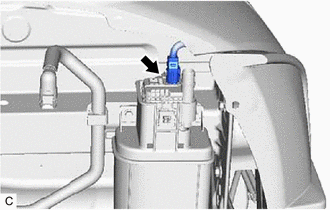
(a) Disconnect the fuel tank vent hose sub-assembly from the leak detection pump sub-assembly.
NOTICE:
- Remove any dirt or foreign matter on the tube connector before performing this work.
- Do not allow any scratches or foreign matter to get on the parts when disconnecting them as the tube connector has an O-ring that seals the pipe.
- Perform this work by hand. Do not use any tools.
- Do not forcibly bend, twist or turn the air line tube.
- Protect the disconnected parts by covering them with plastic bags after disconnecting the air line tube.
- If the tube connector and pipe are stuck, push and pull to release them.
|
*A |
for 2WD |
|
*1 |
Fuel Tank Vent Hose Sub-assembly |
|
*2 |
Pipe (Leak Detection Pump Sub-assembly) |
|
*a |
Tube Connector |
|
*b |
O-ring |

|
Pinch |

|
Pull off |
|
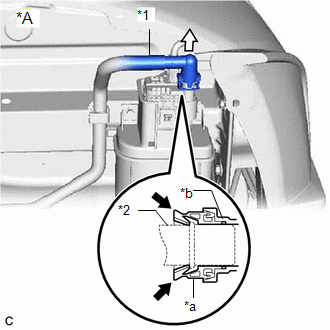
*A |
for AWD |
|
*1 |
Fuel Tank Vent Hose Sub-assembly |
|
*2 |
Pipe (Leak Detection Pump Sub-assembly) |
|
*a |
Tube Connector |
|
*b |
O-ring |
|
|
Pinch |
|
|
Pull off |
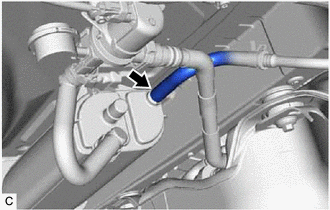
(1) Push the fuel tank vent hose sub-assembly firmly toward the leak detection pump sub-assembly.
(2) Pinch the tube connector as shown in the illustration.
(3) Pull off the fuel tank vent hose sub-assembly from the pipe (leak detection pump sub-assembly).
|
(b) for 2WD (1) Disconnect the leak detection pump sub-assembly connector. |
|
|
(c) for AWD (1) Disconnect the leak detection pump sub-assembly connector. |
|
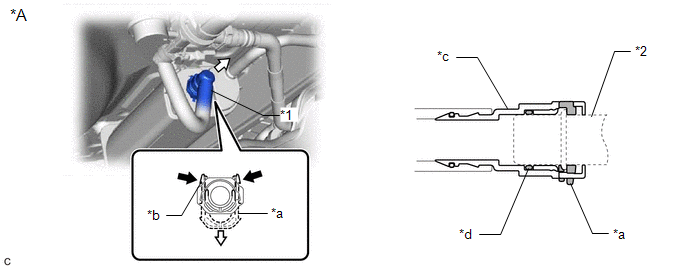
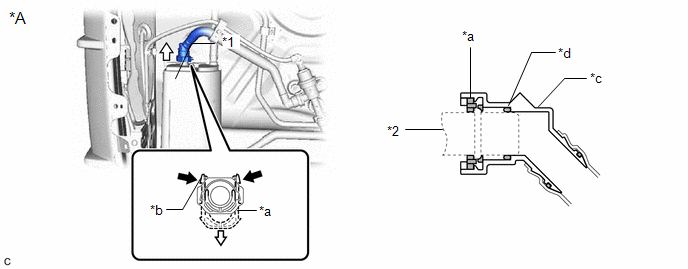
(d) Disconnect the fuel tank vent hose from the canister (charcoal canister assembly).
|
*A |
for 2WD |
||
|
*1 |
Fuel Tank Vent Hose |
*2 |
Pipe (Canister (Charcoal Canister Assembly)) |
|
*a |
Retainer |
*b |
Tab |
|
*c |
Tube Connector |
*d |
O-ring |
|
|
Pinch |
|
Pull |
|
*A |
for AWD |
- |
- |
|
*1 |
Fuel Tank Vent Hose |
*2 |
Pipe (Canister (Charcoal Canister Assembly)) |
|
*a |
Retainer |
*b |
Tab |
|
*c |
Tube Connector |
*d |
O-ring |
|
|
Pinch |
|
Pull |
NOTICE:
- Remove any dirt or foreign matter on the tube connector before performing this work.
- Do not allow any scratches or foreign matter to get on the parts when disconnecting them as the tube connector has an O-ring that seals the pipe.
- Perform this work by hand. Do not use any tools.
- Do not forcibly bend, twist or turn the fuel tank vent hose.
- Protect the disconnected parts by covering them with plastic bags after disconnecting the fuel tank vent hose.
- If the tube connector and pipe are stuck, push and pull to release them.
HINT:
Do not remove the retainer.
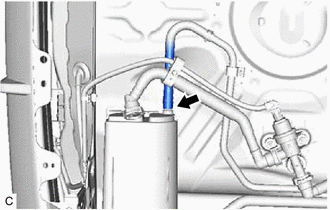
(1) Pinch the tabs of the retainer to disengage the lock claws and pull it down.
(2) Pull off the fuel tank vent hose.
|
(e) for 2WD (1) Slide the clip and disconnect the purge line hose from the canister (charcoal canister assembly). |
|
|
(f) for AWD (1) Slide the clip and disconnect the purge line hose from the canister (charcoal canister assembly). |
|
|
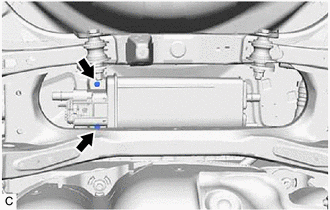
(g) for 2WD (1) Remove the 2 bolts. |
|
|
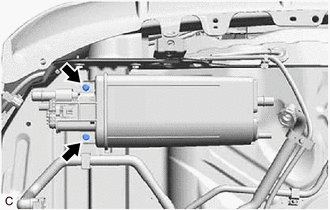
(h) for AWD (1) Remove the 2 bolts. |
|
|
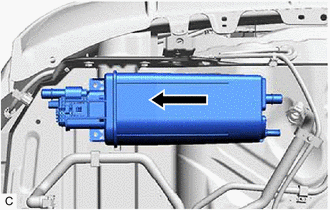
(i) for 2WD (1) Remove the canister (charcoal canister assembly) from vehicle body as shown in the illustration. |
|

|
(j) for AWD (1) Remove the canister (charcoal canister assembly) from vehicle body as shown in the illustration. |
|
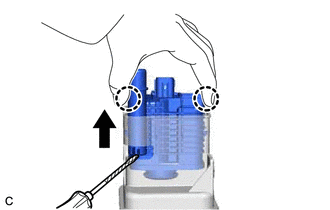
7. REMOVE LEAK DETECTION PUMP SUB-ASSEMBLY
HINT:
Only perform this procedure when replacement of the leak detection pump sub-assembly is necessary.
(a) Before removing the leak detection pump sub-assembly, clean the charcoal canister sub-assembly by blowing air into it to ensure that the charcoal canister sub-assembly is free of foreign matter.
NOTICE:
- Make sure to clean the charcoal canister sub-assembly using air only.
- Do not use gasoline, thinners or solvents.
|
(b) While disengaging the 2 claws as shown in the illustration, push the leak detection pump sub-assembly upwards using a screwdriver with its tip wrapped with protective tape to remove it. |
|
(c) Check if the charcoal canister sub-assembly contains foreign matter such as mud or water.
|
(1) Visually check that the inside of the charcoal canister sub-assembly is free of foreign matter. |
|
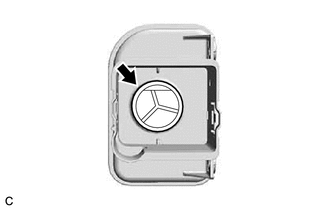
(2) Hold the charcoal canister sub-assembly upside down to make sure that it is free of foreign matter.
If the charcoal canister sub-assembly contains foreign matter, replace the canister (charcoal canister assembly).
|
|
|