| Last Modified: 05-13-2024 | 6.11:8.1.0 | Doc ID: RM1000000025OSK |
| Model Year Start: 2023 | Model: Corolla Hatchback | Prod Date Range: [09/2022 - 11/2022] |
| Title: INTERIOR PANELS / TRIM: FRONT CONSOLE BOX (except G16E-GTS): INSTALLATION; 2023 MY Corolla Corolla Hatchback Corolla HV [09/2022 - 11/2022] | ||
INSTALLATION
PROCEDURE
1. INSTALL INSTRUMENT PANEL CUP HOLDER ASSEMBLY (w/o Electric Parking Brake)
HINT:
Perform this procedure only when replacement of the instrument panel cup holder assembly.
(a) Install the instrument panel cup holder assembly with the 4 screws.
2. INSTALL INSTRUMENT PANEL CUP HOLDER ASSEMBLY (w/ Electric Parking Brake)
HINT:
Perform this procedure only when replacement of the instrument panel cup holder assembly.
(a) for Type A:
(1) Install the instrument panel cup holder assembly with the 8 screws.
(2) Install the electric parking brake switch assembly.
Click here
![2023 - 2025 MY Corolla Corolla Hatchback Corolla HV GR Corolla [09/2022 - ]; PARKING BRAKE: ELECTRIC PARKING BRAKE SWITCH: INSTALLATION+](/t3Portal/stylegraphics/info.gif)
(3) w/ Illumination:
-
Install the instrument panel under tray wall retainer.
Click here
(b) for Type B:
(1) Install the instrument panel cup holder assembly with the 7 screws.
(2) Install the electric parking brake switch assembly.
Click here
3. INSTALL CONSOLE BOX HOLE COVER
HINT:
Perform this procedure only when replacement of the console box hole cover.
(a) Engage the clip and 3 claws.
(b) Install the console box hole cover with the 4 screws.
(c) w/ Seat Heater System:
(1) Install the seat heater switch.
Click here
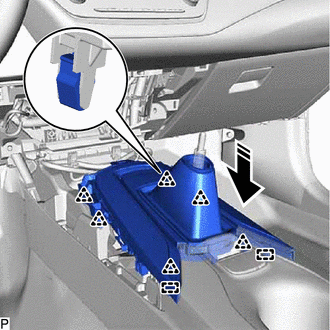
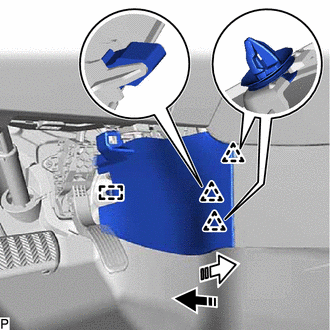
4. INSTALL CONSOLE BOX ASSEMBLY
(a) Engage the 3 guides as shown in the illustration.
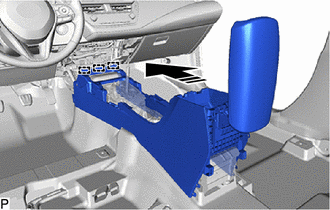

|
Install in this Direction |
(b) Install console box assembly with the 4 bolts and 2 screws.
(c) Engage the clamp.
(d) Connect each connector.
5. INSTALL CONSOLE BOX CARPET
(a) Install the console box carpet.
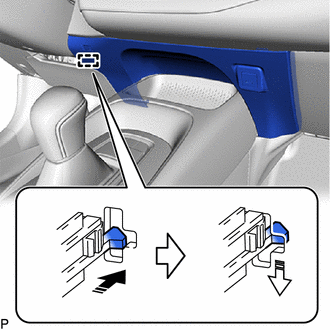
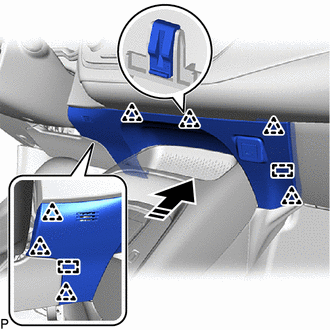
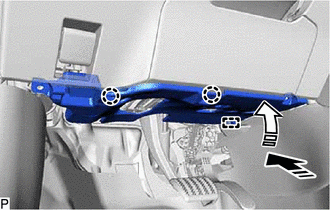
6. INSTALL CONSOLE REAR END PANEL SUB-ASSEMBLY
(a) w/ USB Charger:
(1) Connect the connector.
(2) Engage the 6 guides, 4 clips and 6 claws shown in the illustration to install the console rear end panel sub-assembly.

|
|
Install in this Direction |
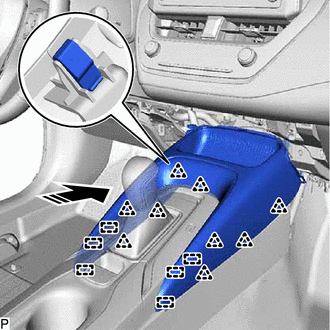
7. INSTALL CONSOLE CUP HOLDER BOX SUB-ASSEMBLY (w/o Electric Parking Brake)
(a) Engage the clamp.
(b) Connect the connector.
(c) Engage the 8 clips and 4 claws as shown in the illustration to install the console cup holder box sub-assembly.
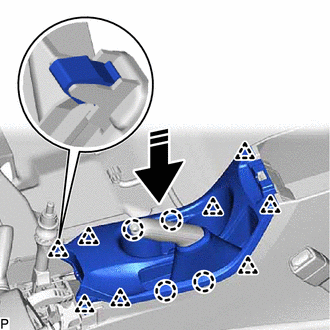
|
|
Install in this Direction |
8. INSTALL CONSOLE CUP HOLDER BOX SUB-ASSEMBLY (w/ Electric Parking Brake)
(a) for Type A:
(1) Engage the clamp.
(2) Connect the 2 connectors.
(3) Engage the 8 clips and 4 claws as shown in the illustration to install the console cup holder box sub-assembly.
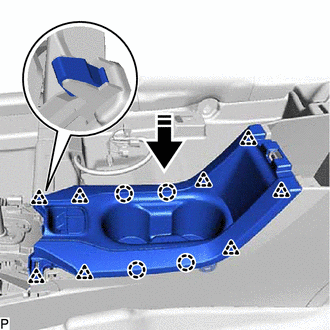
|
|
Install in this Direction |
(b) for Type B:
(1) Engage the clamp.
(2) Connect the connector.
(3) Engage the 8 clips and 4 claws as shown in the illustration to install the console cup holder box sub-assembly.

|
|
Install in this Direction |
9. INSTALL UPPER FRONT CONSOLE PANEL SUB-ASSEMBLY (for Manual Transaxle)
(a) Engage the clamp.
(b) Connect the connector.
(c) Engage the 2 guides and 6 clips as shown in the illustration to install the upper front console panel sub-assembly.
|
|
Install in this Direction |
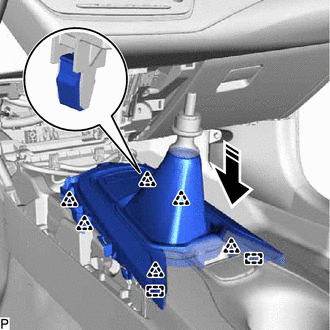
10. INSTALL POSITION INDICATOR HOUSING ASSEMBLY (except Manual Transaxle)
(a) Engage the clamp.
(b) Connect each connector.
(c) Engage the 2 guides and 6 clips as shown in the illustration to install the position indicator housing assembly.
|
|
Install in this Direction |
11. INSTALL SHIFT LEVER KNOB SUB-ASSEMBLY (for Manual Transaxle)
(a) Turn the shift lever knob sub-assembly clockwise and install the shift lever knob sub-assembly.

|
|
Install in this Direction |
12. INSTALL SHIFT LEVER KNOB SUB-ASSEMBLY (for CVT)
for K313:
Click here
for K120:
Click here
13. INSTALL SHIFT LEVER KNOB SUB-ASSEMBLY (for HV Model)
Click here
14. INSTALL FRONT CONSOLE UPPER PANEL GARNISH
(a) Engage the clamp.
(b) Connect the 3 connectors.
(c) Engage the 6 guides and 9 clips as shown in the illustration to install the front console upper panel garnish.
|
|
Install in this Direction |
15. INSTALL FRONT NO. 2 CONSOLE BOX INSERT
(a) Engage the guide and 2 clips as shown in the illustration to install the front No. 2 console box insert.

|
|
Install in this Direction (1) |

|
Install in this Direction (2) |
16. INSTALL LOWER CENTER INSTRUMENT PANEL FINISH PANEL
(a) Connect each connector.
(b) Engage the hook as shown in the illustration.
|
|
Install in this Direction (1) |
|
|
Install in this Direction (2) |
(c) Engage the 2 guides and 7 clips as shown in the illustration to install the lower center instrument panel finish panel.
|
|
Install in this Direction |
17. INSTALL FRONT NO. 1 CONSOLE BOX INSERT
(a) Engage the guide and 3 clips as shown in the illustration to install the front No. 1 console box insert.
|
|
Install in this Direction (1) |
|
|
Install in this Direction (2) |
18. INSTALL NO. 1 INSTRUMENT PANEL UNDER COVER SUB-ASSEMBLY
(a) Engage the clamp.
(b) Engage the 2 claws to connect the DLC3.
(c) Engage the guide and 2 claws as shown in the illustration.
|
|
Install in this Direction (1) |
|
|
Install in this Direction (2) |
(d) Install the No. 1 instrument panel under cover sub-assembly with the 2 screws.
|
|
|