| Last Modified: 06-05-2026 | 6.11:8.1.0 | Doc ID: RM1000000025JB0 |
| Model Year Start: 2023 | Model: GR Corolla | Prod Date Range: [09/2022 - ] |
| Title: EXTERIOR PANELS / TRIM: NAME PLATE (for Hatchback): INSTALLATION; 2023 - 2026 MY GR Corolla Corolla Corolla Hatchback Corolla HV [09/2022 - ] | ||
INSTALLATION
CAUTION / NOTICE / HINT
HINT:
When installing the name plates, heat the vehicle body, back door panel and name plates using a heat light.
Heating Temperature
|
Item |
Temperature |
|---|---|
|
Vehicle Body |
40 to 60°C (104 to 140°F) |
|
Name Plate |
20 to 30°C (68 to 86°F) |
CAUTION:
- Do not touch the heat light and heated parts, touching the heat light may result in burns.
- Touching heated parts for a long time may result in burns.
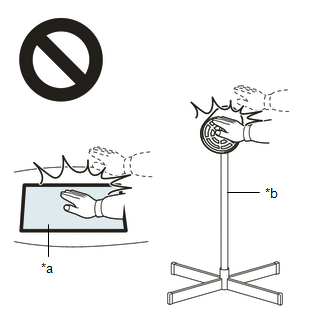
|
*a |
Heated Part |
|
*b |
Heat Light |
NOTICE:
Do not heat the vehicle body, back door panel or name plate excessively.
PROCEDURE
1. INSTALL NO. 2 FRONT FENDER NAME PLATE (for GR)
(a) Clean the vehicle body surface.
(1) Using a heat light, heat the vehicle body surface.
(2) Remove any remaining double-sided tape from the vehicle body.
(3) Wipe off any tape adhesive residue with cleaner.
(b) Using a heat light, heat the vehicle body and a new No. 2 front fender name plate as shown in the illustration.
(c) Remove the release paper from the No. 2 front fender name plate as shown in the illustration.
HINT:
After removing the release paper, keep the exposed adhesive free from foreign matter.
(d) Install the No. 2 front fender name plate as shown in the illustration.
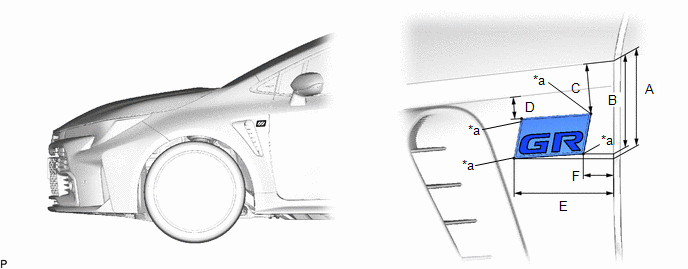
|
*a |
R End |
- |
- |
Standard Measurement
|
Area |
Measurement |
Area |
Measurement |
|---|---|---|---|
|
A |
75.2 mm (2.96 in.) |
B |
71.7 mm (2.82 in.) |
|
C |
37.6 mm (1.48 in.) |
D |
17.2 mm (0.677 in.) |
|
E |
73.3 mm (2.89 in.) |
F |
22.1 mm (0.87 in.) |
2. INSTALL NO. 1 FRONT FENDER NAME PLATE (for GR)
(a) Clean the vehicle body surface.
(1) Using a heat light, heat the vehicle body surface.
(2) Remove any remaining double-sided tape from the vehicle body.
(3) Wipe off any tape adhesive residue with cleaner.
(b) Using a heat light, heat the vehicle body and a new No. 1 front fender name plate as shown in the illustration.
(c) Remove the release paper from the No. 1 front fender name plate.
HINT:
After removing the release paper, keep the exposed adhesive free from foreign matter.
(d) Install the No. 1 front fender name plate as shown in the illustration.
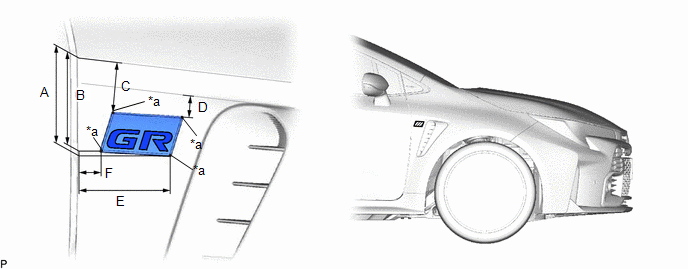
|
*a |
R End |
- |
- |
Standard Measurement
|
Area |
Measurement |
Area |
Measurement |
|---|---|---|---|
|
A |
74.7 mm (2.94 in.) |
B |
71.5 mm (2.81 in.) |
|
C |
37.3 mm (1.47 in.) |
D |
16.6 mm (0.654 in.) |
|
E |
67.4 mm (2.65 in.) |
F |
16.2 mm (0.638 in.) |
3. INSTALL BACK DOOR NAME PLATE (for GR)
(a) Clean the back door panel surface.
(1) Using a heat light, heat the back door panel surface.
(2) Remove any remaining double-sided tape from the back door panel.
(3) Wipe off any tape adhesive residue with cleaner.
(b) Using a heat light, heat the back door panel and a new back door name plate.
(c) Remove the release paper from the back door name plate.
HINT:
After removing the release paper, keep the exposed adhesive free from foreign matter.
(d) Install the back door name plate as shown in the illustration.
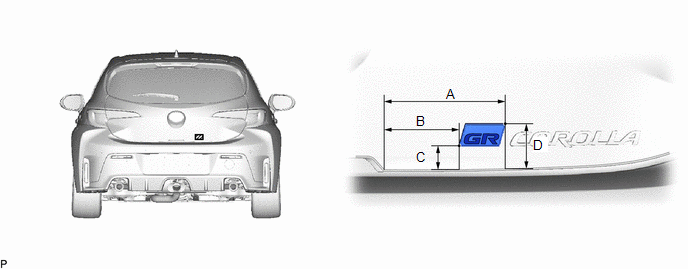
Standard Measurement
|
Area |
Measurement |
Area |
Measurement |
|---|---|---|---|
|
A |
158.7 mm (6.25 in.) |
B |
99 mm (3.9 in.) |
|
C |
31.8 mm (1.25 in.) |
D |
61.6 mm (2.43 in.) |
4. INSTALL NO. 4 BACK DOOR NAME PLATE (except GR)
(a) Clean the back door panel surface.
(1) Using a heat light, heat the vehicle body surface.
(2) Remove any remaining double-sided tape from the back door panel.
(3) Wipe off any tape adhesive residue with cleaner.
(b) Using a heat light, heat the back door panel and a new No. 4 back door name plate.
(c) Remove the release paper from the No. 4 back door name plate.
HINT:
After removing the release paper, keep the exposed adhesive free from foreign matter.
(d) for SE Plate:
(1) Install the No. 4 back door name plate as shown in the illustration.
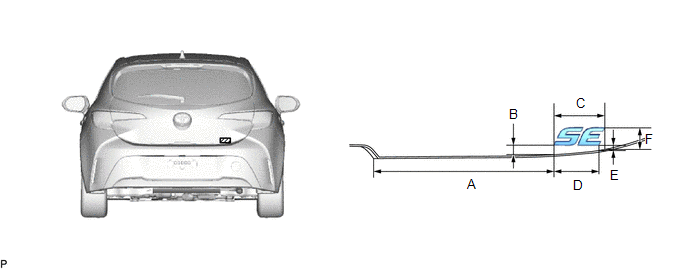
Standard Measurement
|
Area |
Measurement |
Area |
Measurement |
|---|---|---|---|
|
A |
260.5 mm (10.26 in.) |
B |
13.7 mm (0.539 in.) |
|
C |
73.6 mm (2.90 in.) |
D |
64.5 mm (2.54 in.) |
|
E |
8.6 mm (0.339 in.) |
F |
32.0 mm (1.26 in.) |
(e) for XSE Plate:
(1) Install the No. 4 back door name plate as shown in the illustration.
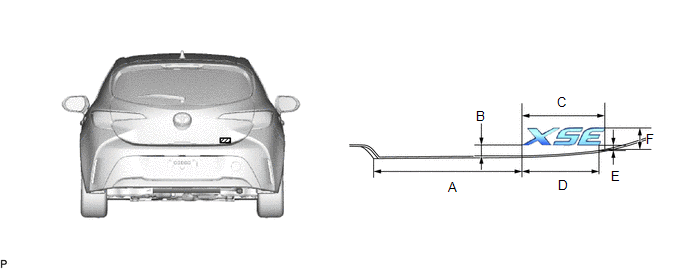
Standard Measurement
|
Area |
Measurement |
Area |
Measurement |
|---|---|---|---|
|
A |
228.1 mm (8.98 in.) |
B |
15.1 mm (0.595 in.) |
|
C |
106.2 mm (4.18 in.) |
D |
97.1 mm (3.82 in.) |
|
E |
8.3 mm (0.327 in.) |
F |
31.8 mm (1.25 in.) |
5. INSTALL NO. 2 BACK DOOR NAME PLATE
(a) Clean the back door panel surface.
(1) Using a heat light, heat the back door panel surface.
(2) Remove any remaining double-sided tape from the back door panel.
(3) Wipe off any tape adhesive residue with cleaner.
(b) Using a heat light, heat the back door panel and a new No. 2 back door name plate.
(c) Remove the release paper from the No. 2 back door name plate.
HINT:
After removing the release paper, keep the exposed adhesive free from foreign matter.
(d) except GR:
(1) Install the No. 2 back door name plate as shown in the illustration.
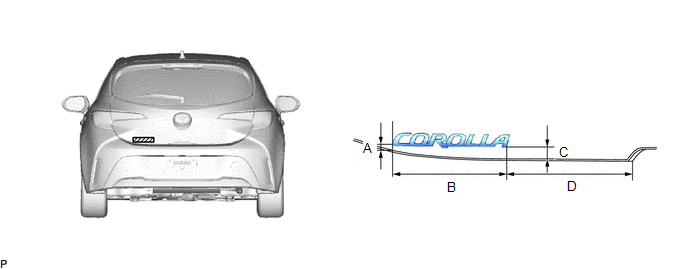
Standard Measurement
|
Area |
Measurement |
Area |
Measurement |
|---|---|---|---|
|
A |
9.1 mm (0.358 in.) |
B |
165.7 mm (6.52 in.) |
|
C |
17.1 mm (0.673 in.) |
D |
181.7 mm (7.15 in.) |
(e) for GR:
(1) Install the No. 2 back door name plate as shown in the illustration.
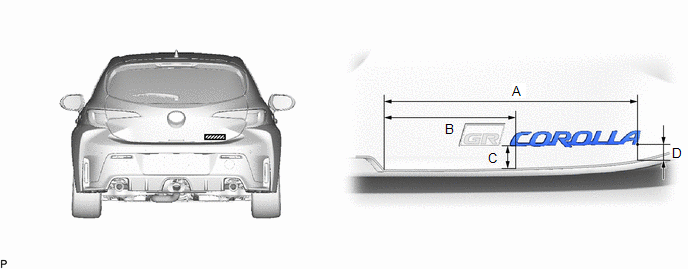
Standard Measurement
|
Area |
Measurement |
Area |
Measurement |
|---|---|---|---|
|
A |
334.1 mm (13.2 in.) |
B |
172.9 mm (6.81 in.) |
|
C |
30.8 mm (1.21 in.) |
D |
22 mm (0.866 in.) |
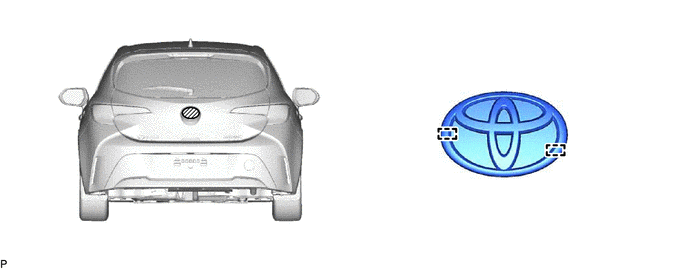
6. INSTALL SYMBOL EMBLEM
(a) Clean the back door panel surface.
(1) Using a heat light, heat the back door panel surface.
(2) Remove any remaining double-sided tape from the back door panel.
(3) Wipe off any tape adhesive residue with cleaner.
(b) Using a heat light, heat the back door panel and a new symbol emblem.
(c) Remove the release paper from the symbol emblem.
HINT:
After removing the release paper, keep the exposed adhesive free from foreign matter.
(d) Engage the 2 pins and install the symbol emblem as shown in the illustration.

|

|