| Last Modified: 05-13-2024 | 6.11:8.1.0 | Doc ID: RM100000001MGZ1 |
| Model Year Start: 2020 | Model: Corolla Hatchback | Prod Date Range: [09/2019 - ] |
| Title: M20A-FKS (COOLING): COOLING SYSTEM: ON-VEHICLE INSPECTION; 2020 - 2025 MY Corolla Corolla Hatchback [09/2019 - ] | ||
ON-VEHICLE INSPECTION
CAUTION / NOTICE / HINT
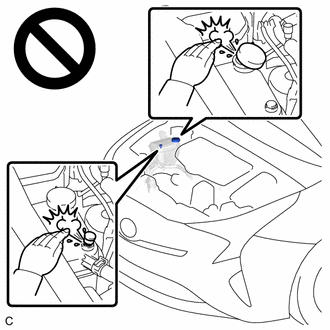
CAUTION:
Do not remove the reserve tank cap, radiator cap sub-assembly and air release valve while the engine and radiator assembly are still hot. Pressurized, hot engine coolant and steam may be released and cause serious burns.
PROCEDURE
1. INSPECT FOR COOLANT LEAK (for Fully Sealed Type)
CAUTION:
Do not remove the reserve tank cap and air release valve while the engine and radiator assembly are still hot. Pressurized, hot engine coolant and steam may be released and cause serious burns.
(a) Remove the reserve tank cap.
|
(b) Add engine coolant to the FULL line of the radiator reserve tank assembly. |
|
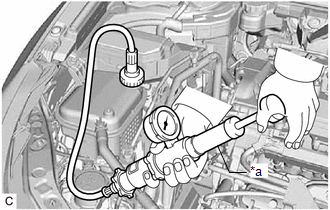
(c) Install a radiator cap tester.
(d) Warm up the engine.
(e) Pump the radiator cap tester to 122 kPa (1.2 kgf/cm2, 18 psi), and then check that the pressure does not drop.
- If the pressure drops, check the hoses, radiator assembly and engine water pump assembly for leaks.
- If there are no signs of external engine coolant leaks, check the heater core, cylinder block sub-assembly and cylinder head sub-assembly.
(f) Remove the radiator cap tester.
(g) Install the reserve tank cap.
2. INSPECT FOR COOLANT LEAK (for Non-Fully Sealed Type)
CAUTION:
Do not remove the radiator cap sub-assembly while the engine and radiator assembly are still hot. Pressurized, hot engine coolant and steam may be released and cause serious burns.
(a) Remove the radiator cap sub-assembly.
|
(b) Add engine coolant to the MAX line of the radiator reserve tank assembly. |
|
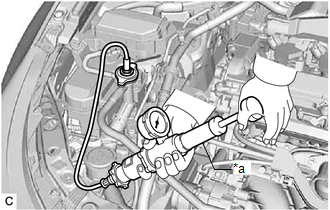
(c) Install a radiator cap tester.
(d) Warm up the engine.
(e) Pump the radiator cap tester to 103 kPa (1.1 kgf/cm2, 15 psi), and then check that the pressure does not drop.
- If the pressure drops, check the hoses, radiator assembly and engine water pump assembly for leaks.
- If there are no signs of external engine coolant leaks, check the heater core, cylinder block sub-assembly and cylinder head sub-assembly.
(f) Remove the radiator cap tester.
(g) Install the radiator cap sub-assembly.
3. INSPECT RADIATOR RESERVE TANK ENGINE COOLANT LEVEL (for Fully Sealed Type)
|
(a) Check that the engine coolant level is between the LOW line and FULL line when the engine is cold. If the engine coolant level is low, check for leaks and add engine coolant to the FULL line. NOTICE:
|
|
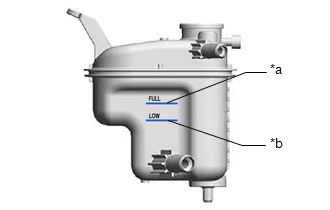
4. INSPECT RADIATOR RESERVE TANK ENGINE COOLANT LEVEL (for Non-Fully Sealed Type)
|
(a) Check that the engine coolant level is between the MIN line and MAX line when the engine is cold. If the engine coolant level is low, check for leaks and add engine coolant to the MAX line. NOTICE: Do not substitute plain water for engine coolant. |
|

5. INSPECT ENGINE COOLANT QUALITY (for Fully Sealed Type)
CAUTION:
Do not remove the reserve tank cap and air release valve while the engine or radiator assembly are still hot. Pressurized, hot engine coolant and steam may be released and cause serious burns.
(a) Remove the reserve tank cap.
(b) Check that there are no excessive deposits of rust or scale around the reserve tank cap and water filler hole. Also, the engine coolant should be free of oil.
If excessively dirty, clean the engine coolant passage and replace the engine coolant.
(c) Install the reserve tank cap.
6. INSPECT ENGINE COOLANT QUALITY (for Non-Fully Sealed Type)
CAUTION:
Do not remove the radiator cap sub-assembly while the engine or radiator assembly are still hot. Pressurized, hot engine coolant and steam may be released and cause serious burns.
(a) Remove the radiator cap sub-assembly.
(b) Check that there are no excessive deposits of rust or scale around the radiator cap sub-assembly and water filler hole. Also, the engine coolant should be free of oil.
If excessively dirty, clean the engine coolant passage and replace the engine coolant.
(c) Install the radiator cap sub-assembly.
|
|
|