- Ignition switch off.
- Connect the Techstream to the DLC3.
| Last Modified: 05-13-2024 | 6.11:8.1.0 | Doc ID: RM100000001KCZE |
| Model Year Start: 2020 | Model: GR Corolla | Prod Date Range: [09/2019 - 04/2020] |
| Title: THEFT DETERRENT / KEYLESS ENTRY: IMMOBILISER SYSTEM (w/o Smart Key System): REGISTRATION; 2020 MY Corolla Corolla Hatchback Corolla HV GR Corolla [09/2019 - 04/2020] | ||
REGISTRATION
PROCEDURE
1. REPAIR INSTRUCTION
NOTICE:
PRECAUTION WHEN REPLACING PARTS
-
Code registration is necessary when any of the following parts is replaced with a new one. After replacing a part, any part that has performed registration cannot be returned.
- Transponder key ECU assembly
- Door control transmitter assembly
PRECAUTION FOR REGISTRATION
-
The door control transmitter assembly has 2 codes: the key code (immobiliser code) and the wireless code (recognition code). Both of these codes need to be registered. For the wireless code registration procedure, refer to Wireless Door Lock Control System.
Click here
![2020 - 2022 MY Corolla Corolla Hatchback Corolla HV GR Corolla [03/2019 - 09/2022]; DOOR LOCK: WIRELESS DOOR LOCK CONTROL SYSTEM (w/o Smart Key System): REGISTRATION](/t3Portal/stylegraphics/info.gif)
- A maximum of 5 door control transmitter assembles can be registered (this includes any door control transmitter assembles registered when the vehicle was purchased).
- If any of the work times are exceeded, finish the procedure.
- If the battery is depleted during the key registration procedure, there may be cases in which the door control transmitter assembly cannot be registered again. Therefore, make sure to perform work with a sufficiently charged battery.
- Do not perform operations that create an electrical load such as operating the power windows.
- Do not disconnect the battery during registration.
HINT:
- A brief outline of the key code registration procedure is shown above. For detailed information, refer to the Techstream.
-
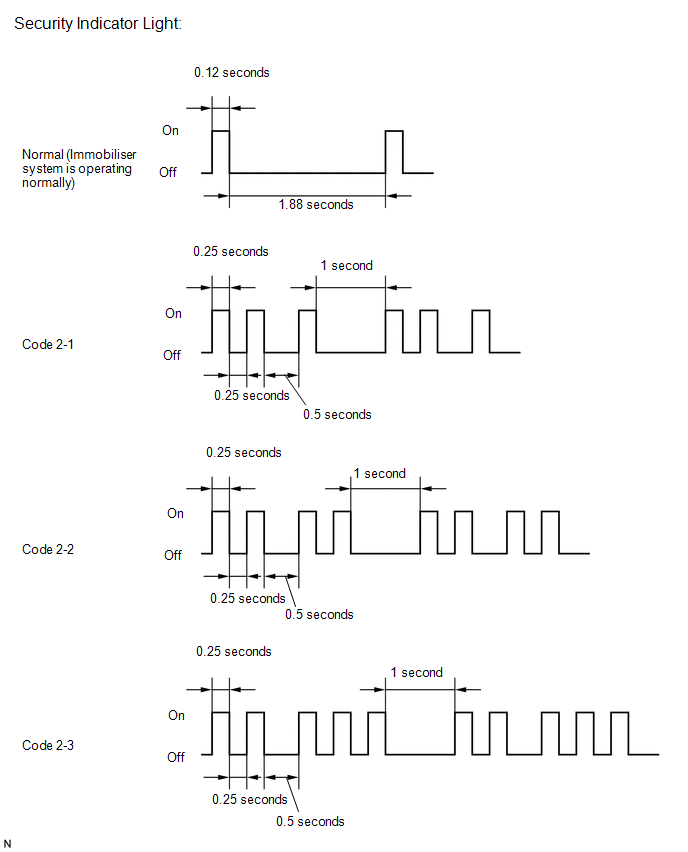
If key code registration fails during new key code registration, code 2-1 will be output through the security indicator light. Trying to re-register an already registered door control transmitter assembly will cause code 2-2 to be output when the door control transmitter assembly is inserted into the ignition switch key cylinder. If the number of registered key codes exceeds the maximum limit, code 2-3 will be output through the security indicator light. Details of code output are shown below.
2. EXPLANATION OF IMMOBILISER KEY ID REGISTRATION PROCEDURE
(a) Addressing customer requests (perform work in chart below in order starting from left)
|
Customer Request/Condition |
Undesignated key permanent erasure |
Replace transponder key ECU |
All keys ID erasure (key code reset) |
New key ID registration |
Additional key ID registration |
|---|---|---|---|---|---|
|
Refer to PROCEDURE |
"5" |
|
"6" |
"3" |
"4" |
|
All door control transmitter assembles are lost*1 |
- |

|
- |
|
- |
|
All door control transmitter assembles are lost*2 |
- |
- |
|
|
- |
|
Registering additional door control transmitter assembly |
- |
- |
- |
- |
|
|
Making a lost door control transmitter assembly unusable |
|
- |
- |
- |
- |
- *1: for Mexico
- *2: except Mexico
(b) Addressing malfunctions (perform work in chart below in order starting from left)
|
Malfunctioning parts |
Condition |
Undesignated key permanent erasure |
Replace transponder key ECU |
Replace ECM |
New key ID registration |
Additional key ID registration |
ECU communication ID registration |
Remote door lock and unlock registration |
|---|---|---|---|---|---|---|---|---|
|
Refer to PROCEDURE |
"5" |
|
for M20A-FKS:
for 2ZR-FAE:
|
"3" |
"4" |
"7" |
"8" |
|
|
Transponder key ECU |
- |
- |
|
- |
|
- |
|
- |
|
ECM |
When replacing the ECM with a new one |
- |
- |
|
- |
- |
- |
- |
|
When replacing the ECM with a used one |
- |
- |
|
- |
- |
|
- |
|
|
Door control transmitter assembly |
- |
- |
- |
- |
- |
|
- |
- |
|
DCM (telematics transceiver) (w/ Telematics Transceiver) |
When replacing the DCM (telematics transceiver) with a new one |
- |
- |
- |
- |
- |
- |
Replace DCM (telematics transceiver)
|
|
|
||||||||
|
When replacing the DCM (telematics transceiver) with a used one* |
- |
- |
- |
- |
- |
- |
- |
|
-
NOTICE:
*: Do not use a DCM (telematics transceiver) that has been registered to another vehicle.
3. NEW KEY ID REGISTRATION
NOTICE:
- Immediately after replacing the transponder key ECU assembly, the Techstream item "Transponder M-code" should change to "0". If this item does not change to "0", the transponder key ECU assembly may be registered to another vehicle. A transponder key ECU assembly which is registered to another vehicle cannot be used.
- When the transponder key ECU is replaced, register all door control transmitter assembles used by the customer.
- Registered door control transmitter assembles other than those registered during the transponder key ECU assembly replacement cannot be re-registered, and therefore they can no longer be used.
HINT:
- If key code registration fails during new key code registration, code 2-1 will be output through the security indicator light. Trying to re-register an already registered door control transmitter assembly will cause code 2-2 to be output when the door control transmitter assembly is inserted into the ignition switch key cylinder. If the number of registered key codes exceeds the maximum limit, code 2-3 will be output through the security indicator light. Details of code output are shown in "REPAIR INSTRUCTION".
-
When only one key is desired to be registered, perform following operation 1 or 2 after completing "Process 5".
Operation 1:
- Insert the door control transmitter assembly into the ignition switch key cylinder and turn the Techstream on.
- Follow the instructions on the Techstream screen to end new key code registration.
- New key code registration is ended.
Operation 2:
- Using a door control transmitter assembly that has already been registered, turn the ignition switch from ON to off 5 times within 10 seconds.
|
Process |
Procedure |
Time Limit (Seconds) |
Security Indicator Light Condition |
|---|---|---|---|
|
1. Start of registration (1st key) |
|
- |
Blinking |
|
2. Key operation |
|
- |
Blinking |
|
3. Get Pass-Code |
|
- |
Blinking |
|
4. Techstream operation |
|
120 |
Off for 1 second and then on. |
|
5. Key operation |
|
- |
On |
|
6. Start of registration (2nd key) |
|
- |
Off for 1 second and then on. |
|
7. Key operation |
|
- |
Blinking |
|
8. End of registration |
Finish new key ID code registration. |
- |
Blinking |
4. ADDITIONAL KEY ID REGISTRATION
NOTICE:
When the ignition switch key cylinder has been replaced, locking and unlocking of doors is possible with the new door control transmitter assembly's transmitter module (removed from the original key). However, the new key will not be able to lock and unlock doors through the door key cylinder. Keep the original key. If the battery in the new door control transmitter assembly's transmitter module fails, the original door control transmitter assembly can be used to lock and unlock doors through the door key cylinder.
HINT:
If key code registration fails during additional key code registration, code 2-1 will be output through the security indicator light. Trying to re-register an already registered door control transmitter assembly will cause code 2-2 to be output when the door control transmitter assembly is inserted into the ignition switch key cylinder. If the number of registered key codes exceeds the maximum limit, code 2-3 will be output through the security indicator light. Details of code output are shown in "REPAIR INSTRUCTION".
|
Process |
Procedure |
Time Limit (Seconds) |
Security Indicator Light Condition |
|---|---|---|---|
|
1. Start of registration |
|
- |
Blinking |
|
2. Key operation |
|
- |
Off |
|
3. Get Pass-Code |
|
- |
Off |
|
4. Techstream operation |
|
120 |
On |
|
5. Key operation |
|
20 |
On |
|
6. Key operation |
|
10 |
Blinking during registration |
|
7. Key registration |
|
- |
Off |
|
8. Key operation |
HINT: Repeat "Process 2" to "Process 8" for all door control transmitter assembly to register. |
Blinking |
|
|
9. End of registration |
Finish new key ID code registration. |
- |
Blinking |
5. UNDESIGNATED KEY PERMANENT ERASURE
HINT:
- If key code registration fails during additional key code registration, code 2-1 will be output through the security indicator light. Details of code output are shown in procedure "REPAIR INSTRUCTION".
- Undesignated Key Permanent Erasure can be used to delete and disable all key IDs other than the door control transmitter assembles selected during "confirmation of registered electrical door control transmitter assembles to keep (process No. 5 and No. 6)".
|
Process |
Procedure |
Time Limit (Seconds) |
Security Indicator Light Condition |
|---|---|---|---|
|
1. Start of erasure |
|
- |
Blinking |
|
2. Key operation |
|
- |
Off |
|
3. Get Pass-Code |
|
- |
Off |
|
4. Techstream operation |
|
120 |
On |
|
5. Key operation |
|
20 |
On |
|
6. Key operation |
HINT: Repeat "Process 5" and "Process 6" with the all registered keys except the key to be unregistered. |
10 |
On for 1 second and then off. |
|
7. Techstream operation |
|
20 |
On |
|
8. Key operation |
|
- |
Blinking |
|
9. End of erasure |
Finish key ID erasure. |
- |
Blinking |
6. ALL KEYS ID ERASURE (KEY CODE RESET)
HINT:
- To perform this procedure, at least 1 door control transmitter assembly should be registered to the transponder key ECU assembly.
- This procedure can be performed using either a registered or unregistered door control transmitter assembly.
|
Process |
Procedure |
Time Limit (Seconds) |
Time Limit (Minutes) |
Security Indicator Light Condition |
|---|---|---|---|---|
|
1. Start of erasure |
|
- |
- |
Blinking |
|
2. Key operation |
|
10 |
10 |
Off or On |
|
3. Get Pass-Code |
|
- |
Off or On |
|
|
4. Techstream operation |
|
120 |
On for 1 second and then off. |
|
|
5. Key erasure |
|
- |
- |
On |
|
6. Key operation |
|
- |
- |
Blinking |
|
7. End of erasure |
Finish key ID erasure. |
- |
- |
Blinking |
7. ECU COMMUNICATION ID REGISTRATION
|
Process |
Procedure |
Security Indicator Light Condition |
|---|---|---|
|
1. Start of registration |
|
Off |
|
2 Techstream operation |
|
Off |
|
3. ECU communication ID registration |
|
Off |
|
4. Key operation |
|
Blinking |
|
5. Confirmation of registration |
|
Off |
|
6. Clear DTC |
|
Off |
|
7. End of registration |
Finish ECU communication ID registration. |
Off |
- *1: for 2ZE-FAE
- *2: for M20A-FKS
8. REMOTE DOOR LOCK AND UNLOCK REGISTRATION PROCEDURE GUIDANCE
|
Process |
Procedure |
|---|---|
|
1. Start of registration |
|
|
2. Registration of remote door lock and unlock |
Type A:
Type B:
|
|
3. End of registration |
|
|
|
|