- Reset memory
- Deceleration sensor zero point calibration
- CVT oil pressure calibration
| Last Modified: 05-13-2024 | 6.11:8.1.0 | Doc ID: RM100000001I1JF |
| Model Year Start: 2020 | Model: Corolla | Prod Date Range: [03/2019 - 09/2022] |
| Title: 2ZR-FAE (LUBRICATION): OIL PUMP: REMOVAL; 2020 - 2022 MY Corolla [03/2019 - 09/2022] | ||
REMOVAL
CAUTION / NOTICE / HINT
The necessary procedures (adjustment, calibration, initialization, or registration) that must be performed after parts are removed and installed, or replaced during oil pump assembly removal/installation are shown below.
Necessary Procedures After Parts Removed/Installed/Replaced
|
Replaced Part or Performed Procedure |
Necessary Procedure |
Effect/Inoperative Function when Necessary Procedure not Performed |
Link |
|---|---|---|---|
|
*1: w/ Smart Key System
*2: w/o Smart Key System |
|||
|
Battery terminal is disconnected/reconnected |
Perform steering sensor zero point calibration |
Lane Control System |
|
|
Pre-collision System |
|||
|
Lighting System (w/ AFS)(EXT) |
|||
|
Replacement of ECM |
Vehicle Identification Number (VIN) registration |
MIL comes on |
|
|
ECU communication ID registration (Immobiliser system) |
Engine start function |
||
|
|
|
||
|
Replacement of ECM*1 |
Code registration (Smart Key System (for Gasoline Model, Start Function)) |
|
|
|
Replacement of ECM*2 |
Code registration (Immobiliser system) |
Engine start |
|
|
Inspection After Repair |
|
|
|
Suspension, tires, etc. (The vehicle height changes because of suspension or tire replacement) |
Perform headlight ECU sub-assembly LH initialization |
Lighting system (w/ AFS)(EXT) |
|
|
Front wheel alignment adjustment |
|
|
|
|
CVT fluid |
ATF thermal degradation estimate reset |
The value of the Data List item "ATF Thermal Degradation Estimate" is not estimated correctly |
|
NOTICE:
After the ignition switch is turned off, the radio and display receiver assembly records various types of memory and settings. As a result, after turning the ignition switch off, make sure to wait at least 85 seconds before disconnecting the cable from the negative (-) battery terminal. (for Navigation System and Audio and Visual System (for Gasoline Model))
PROCEDURE
1. INSTALL ENGINE TO ENGINE STAND
2. REMOVE ENGINE HANGERS
3. REMOVE THROTTLE BODY ASSEMBLY
4. REMOVE THROTTLE BODY GASKET
5. REMOVE PURGE VALVE (PURGE VSV)
6. REMOVE INTAKE MANIFOLD
7. DISCONNECT FUEL TUBE SUB-ASSEMBLY
8. REMOVE FUEL DELIVERY PIPE SUB-ASSEMBLY
9. REMOVE NO. 1 DELIVERY PIPE SPACER
10. REMOVE INJECTOR VIBRATION INSULATOR
11. REMOVE FUEL INJECTOR ASSEMBLY
12. REMOVE ENGINE OIL LEVEL DIPSTICK GUIDE
13. REMOVE NO. 1 EXHAUST MANIFOLD HEAT INSULATOR
14. REMOVE DRIVE SHAFT HEAT INSULATOR SUB-ASSEMBLY
15. REMOVE MANIFOLD STAY
16. REMOVE EXHAUST MANIFOLD
17. REMOVE VENTILATION HOSE
18. DISCONNECT NO. 3 WATER BY-PASS HOSE
19. REMOVE WATER BY-PASS HOSE
20. REMOVE WATER INLET HOSE
21. REMOVE IGNITION COIL ASSEMBLY
22. REMOVE VACUUM PUMP ASSEMBLY
23. REMOVE NO. 1 VACUUM PUMP BRACKET
24. REMOVE V-RIBBED BELT TENSIONER ASSEMBLY
25. REMOVE CYLINDER HEAD COVER SUB-ASSEMBLY
26. REMOVE CYLINDER HEAD COVER GASKET
27. SET NO. 1 CYLINDER TO TDC/COMPRESSION
28. REMOVE CRANKSHAFT PULLEY
29. REMOVE NO. 1 CHAIN TENSIONER ASSEMBLY
30. REMOVE TIMING CHAIN COVER SUB-ASSEMBLY
31. REMOVE TIMING CHAIN COVER OIL SEAL
32. REMOVE CHAIN TENSIONER SLIPPER
33. REMOVE NO. 1 CHAIN VIBRATION DAMPER
34. REMOVE CHAIN SUB-ASSEMBLY
35. REMOVE CRANKSHAFT TIMING SPROCKET
36. REMOVE NO. 2 CHAIN SUB-ASSEMBLY
37. REMOVE NO. 2 OIL PAN SUB-ASSEMBLY
38. REMOVE OIL PUMP ASSEMBLY
|
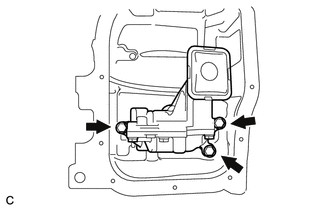
(a) Remove the 3 bolts and oil pump assembly from the stiffening crankcase assembly. |
|
|
|
|
![2019 - 2022 MY Corolla Corolla Hatchback GR Corolla [06/2018 - 09/2022]; PRE-COLLISION: PRE-COLLISION SYSTEM (for Gasoline Model): INITIALIZATION](/t3Portal/stylegraphics/info.gif)
