- Perform reset memory
- CVT oil pressure calibration
- Perform road test to allow TCM to learn
| Last Modified: 05-13-2024 | 6.11:8.1.0 | Doc ID: RM100000001HZE4 |
| Model Year Start: 2020 | Model: Corolla Hatchback | Prod Date Range: [03/2019 - 09/2022] |
| Title: K120 / K121 (CVT): K120 PARK / NEUTRAL POSITION SWITCH: REMOVAL; 2020 - 2022 MY Corolla Corolla Hatchback [03/2019 - 09/2022] | ||
REMOVAL
CAUTION / NOTICE / HINT
The necessary procedures (adjustment, calibration, initialization, or registration) that must be performed after parts are removed, installed, or replaced during park/neutral position switch assembly removal/installation are shown below.
Necessary Procedure After Parts Removed/Installed/Replaced
|
Replacement Part or Procedure |
Necessary Procedure |
Effect/Inoperative when not Performed |
Link |
|---|---|---|---|
|
*1: for Hatchback
*2: w/o Smart Key System *3: w/ Smart Key System |
|||
|
Disconnect cable from negative battery terminal |
Perform steering sensor zero point calibration |
Lane Control System (for Gasoline Model) |
|
|
Pre-collision System (for Gasoline Model) |
|||
|
Lighting System (w/ AFS)(EXT) |
|||
|
Initialize back door lock*1 |
Power Door Lock Control System (for Hatchback, Gasoline Model) |
||
|
Replacement of ECM |
Vehicle Identification Number (VIN) registration |
MIL comes on |
|
|
ECU communication ID registration (Immobiliser system) |
Engine start function |
||
|
|
|
||
|
Replacement of ECM*3 |
Code registration (Smart Key System (for Gasoline Model, Start Function)) |
|
|
|
Replacement of ECM*2 |
Code registration (Immobiliser system) |
Engine start |
|
NOTICE:
After the ignition switch is turned off, the radio and display receiver assembly records various types of memory and settings. As a result, after turning the ignition switch off, make sure to wait at least 85 seconds before disconnecting the cable from the negative (-) battery terminal. (for Navigation System and Audio and Visual System (for Gasoline Model))
PROCEDURE
1. REMOVE BATTERY
2. REMOVE ECM
3. REMOVE BATTERY CLAMP SUB-ASSEMBLY
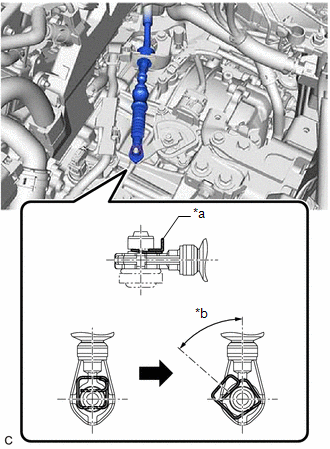
4. DISCONNECT FLOOR SHIFT TRANSMISSION CONTROL SELECT CABLE
|
(a) While disengaging the clip as shown in the illustration, disconnect the floor shift transmission control select cable from the transmission control shaft lever together with the clip. |
|
|
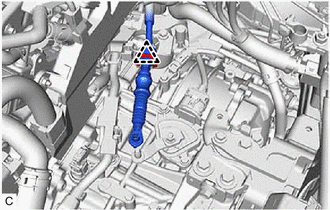
(b) Remove the clip and disconnect the floor shift transmission control select cable from the No. 1 transmission control cable bracket. |
|
5. REMOVE PARK/NEUTRAL POSITION SWITCH ASSEMBLY
|
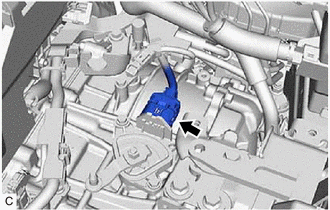
(a) Disconnect the park/neutral position switch assembly connector. |
|
(b) Using a piece of wood or equivalent to secure the transmission control shaft lever to prevent it from rotating, remove the nut, washer and transmission control shaft lever from the manual valve lever shaft.
NOTICE:
If the transmission control shaft lever is not secured when loosening the nut, the manual valve link lever sub-assembly may separate from the manual valve.
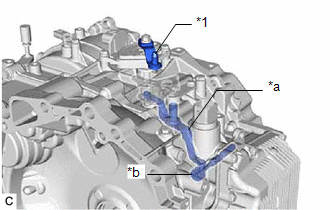
|
*1 |
Transmission Control Shaft Lever |
|
*a |
Manual Valve Link Lever Sub-assembly |
|
*b |
Manual Valve |
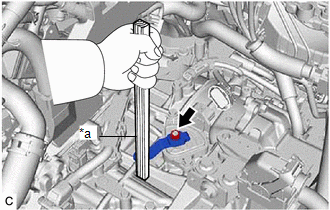
|
*a |
Piece of Wood or Equivalent |
|
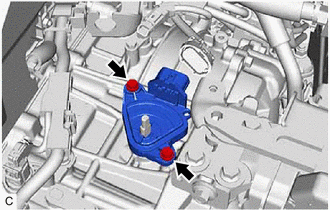
(c) Remove the 2 bolts and park/neutral position switch assembly from the transaxle case sub-assembly. NOTICE: Before removing the park/neutral position switch assembly, remove any dirt or rust on the installation portion of the manual valve lever shaft. Be sure to remove the park/neutral position switch assembly straight along the manual valve lever shaft while being careful not to deform the plate spring that supports the manual valve lever shaft. If the plate spring is deformed, the park/neutral position switch assembly cannot be reinstalled correctly. |
|
|
|
|
![2019 - 2022 MY Corolla Corolla Hatchback GR Corolla [06/2018 - 09/2022]; PRE-COLLISION: PRE-COLLISION SYSTEM (for Gasoline Model): INITIALIZATION](/t3Portal/stylegraphics/info.gif)
