| Last Modified: 07-31-2024 | 6.11:8.1.0 | Doc ID: RM100000001HS3S |
| Model Year Start: 2020 | Model: Corolla Hatchback | Prod Date Range: [03/2019 - 09/2022] |
| Title: EG60 (MANUAL TRANSMISSION / TRANSAXLE): TRANSMISSION CONTROL CABLE (except TMC Made): INSTALLATION; 2020 - 2022 MY Corolla Corolla Hatchback [03/2019 - 09/2022] | ||
INSTALLATION
PROCEDURE
1. INSTALL TRANSMISSION CONTROL CABLE ASSEMBLY
(a) Pass the transmission control cable assembly into the vehicle and install the transmission control cable assembly to the vehicle body with the 2 nuts.
Torque:
6.0 N·m {61 kgf·cm, 53 in·lbf}
(b) Engage the guide and connect the transmission control cable assembly to the vehicle body.
(c) Install the nut.
Torque:
6.0 N·m {61 kgf·cm, 53 in·lbf}
|
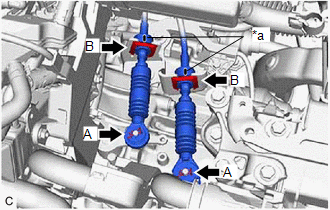
(d) Install the transmission control cable assembly to the control cable bracket assembly with 2 new clips (B). NOTICE: Make sure that the paint marks on the transmission control cable assembly are aligned with the slits in the control cable bracket assembly before installing the clips. |
|
(e) Connect the transmission control cable assembly to the manual transaxle assembly with the 2 clips (A).
|
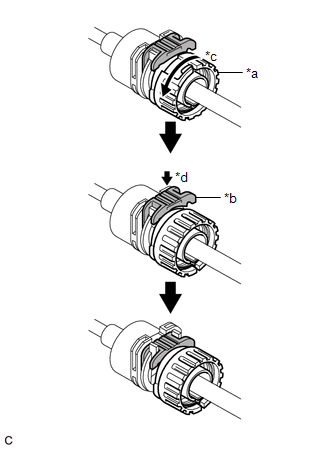
(f) Rotate the nut counterclockwise approximately 180° and, while holding the nut in that position, press in the stopper until it makes 2 "click" sounds. |
|
|
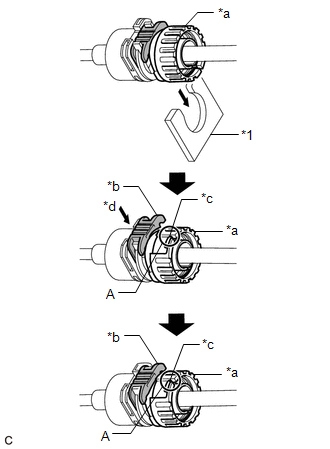
(g) Install the transmission control shift cable to the shift lever retainer, check that the position of the spring is the same as (A) shown in the illustration, and press in the stopper. NOTICE: Do not forcibly pull the transmission control cable assembly into the cabin. HINT: If the stopper cannot be pressed in, slightly rotate the nut clockwise and then press in the stopper. |
|
(h) Install the transmission control select cable to the shift lever retainer, check that the position of the spring is the same as (A) shown in the illustration, and press in the stopper.
NOTICE:
Do not forcibly pull the transmission control cable assembly into the cabin.
HINT:
If the stopper cannot be pressed in, slightly rotate the nut clockwise and then press in the stopper.
(i) Connect the transmission control shift cable to the floor shift shift lever assembly.
(j) Connect the transmission control select cable to the floor shift shift lever assembly with the clip.
2. ADJUST TRANSMISSION CONTROL CABLE ASSEMBLY
3. INSTALL FRONT NO. 1 FLOOR HEAT INSULATOR
(a) Install the front No. 1 floor heat insulator to the vehicle body with the 3 nuts.
Torque:
5.0 N·m {51 kgf·cm, 44 in·lbf}
4. INSTALL FRONT EXHAUST PIPE ASSEMBLY (TWC: Rear Catalyst)
5. INSTALL FRONT FLOOR CENTER BRACE
6. INSTALL FRONT FLOOR COVER RH (w/ Cover)
7. INSTALL FRONT FLOOR COVER LH (w/ Cover)
8. INSTALL BATTERY CLAMP SUB-ASSEMBLY
9. INSTALL ECM
10. INSTALL AIR CLEANER CASE SUB-ASSEMBLY
11. INSTALL AIR CLEANER FILTER ELEMENT SUB-ASSEMBLY
12. INSTALL AIR CLEANER CAP WITH AIR CLEANER HOSE
13. INSTALL INLET NO. 1 AIR CLEANER
14. INSTALL RADIATOR SUPPORT OPENING COVER
15. INSTALL CONSOLE BOX ASSEMBLY
16. INSTALL BATTERY
17. CONNECT CABLE TO NEGATIVE BATTERY TERMINAL
18. INSPECT FOR EXHAUST GAS LEAK
|
|
|


![2020 - 2022 MY Corolla Corolla Hatchback [03/2019 - 09/2022]; EG60 (MANUAL TRANSMISSION / TRANSAXLE): TRANSMISSION CONTROL CABLE (except TMC Made): ADJUSTMENT+](/t3Portal/stylegraphics/info.gif)