- Front door glass sub-assembly
- Front door glass run
- Front door belt moulding
- Front door inner glass weatherstrip
| Last Modified: 05-13-2024 | 6.11:8.1.0 | Doc ID: RM100000001HEAM |
| Model Year Start: 2020 | Model: GR Corolla | Prod Date Range: [01/2019 - 03/2019] |
| Title: EXTERIOR PANELS / TRIM: FRONT DOOR WINDOW FRAME MOULDING: REMOVAL; 2020 MY Corolla Corolla Hatchback Corolla HV GR Corolla [01/2019 - 03/2019] | ||
REMOVAL
CAUTION / NOTICE / HINT
The necessary procedures (adjustment, calibration, initialization, or registration) that must be performed after parts are removed and installed, or replaced during front door window frame moulding removal/installation are shown below.
Necessary Procedure After Parts Removed/Installed/Replaced (for Gasoline Model)
|
Replaced Part or Performed Procedure |
Necessary Procedure |
Effect/Inoperative Function when Necessary Procedures are not Performed |
Link |
|---|---|---|---|
| *1: for Hatchback | |||
|
Disconnect cable from negative battery terminal |
Perform steering sensor zero point calibration |
Lane Control System |
|
|
Pre-collision System |
|||
|
Lighting System (w/ AFS)(EXT) |
|||
|
Initialize back door lock*1 |
Power Door Lock Control System |
||
|
|
Initialize power window control system |
|
|
NOTICE:
- After the ignition switch is turned off, the radio and display receiver assembly records various types of memory and settings. As a result, after turning the ignition switch off, make sure to wait at least 85 seconds before disconnecting the cable from the negative (-) battery terminal. (for Audio and Visual System (for Gasoline Model))
- After the engine switch is turned off, the radio and display receiver assembly records various types of memory and settings. As a result, after turning the engine switch off, make sure to wait at least 85 seconds before disconnecting the cable from the negative (-) battery terminal. (for Navigation System)
Necessary Procedure After Parts Removed/Installed/Replaced (for HV Model)
|
Replaced Part or Performed Procedure |
Necessary Procedure |
Effect/Inoperative Function when Necessary Procedures are not Performed |
Link |
|---|---|---|---|
|
Disconnect cable from negative (-) auxiliary battery terminal |
Perform steering sensor zero point calibration |
Lane Control System |
|
|
Pre-collision System |
|||
|
Initialize power window control system |
|
NOTICE:
After the power switch is turned off, the radio and display receiver assembly records various types of memory and settings. As a result, after turning the power switch off, make sure to wait at least 85 seconds before disconnecting the cable from the negative (-) auxiliary battery terminal. (for Audio and Visual System (for HV Model))
HINT:
- Use the same procedure for the RH side and LH side.
- The following procedure is for the LH side.
PROCEDURE
1. REMOVE FRONT DOOR BELT MOULDING
2. REMOVE FRONT DOOR WINDOW FRAME MOULDING (CENTER PILLAR SIDE)
HINT:
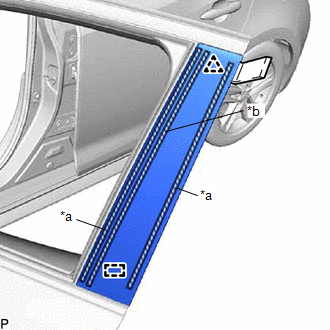
When removing the front door window frame moulding (center pillar side), heat the vehicle body and front door window frame moulding (center pillar side) using a heat light.
Heating Temperature
|
Item |
Temperature |
|---|---|
|
Vehicle Body |
40 to 60°C (104 to 140°F) |
|
Front Door Window Frame Moulding (Center Pillar Side) |
20 to 30°C (68 to 86°F) |
CAUTION:
- Do not touch the heat light and heated parts, touching the heat light may result in burns.
- Touching heated parts for a long time may result in burns.
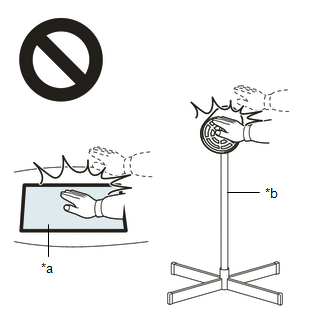
|
*a |
Heated Part |
|
*b |
Heat Light |
NOTICE:
Do not heat the vehicle body or moulding excessively.
(a) Using a heat light, heat the front door window frame moulding (center pillar side).
|
(b) Using a moulding remover, disengage the clip and guide, and separate the double-sided tape and caulking sponge to remove the front door window frame moulding (center pillar side). |
|
3. DISCONNECT FRONT DOOR WEATHERSTRIP
|
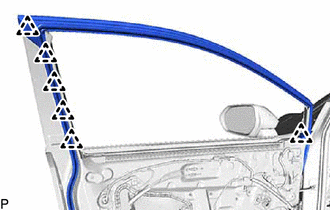
(a) Disengage the 6 clips and disconnect the front door weatherstrip. |
|
4. REMOVE FRONT DOOR WINDOW FRAME MOULDING (FRONT PILLAR SIDE)
(a) Disconnect each connector.
(b) Disengage each clamp.
|
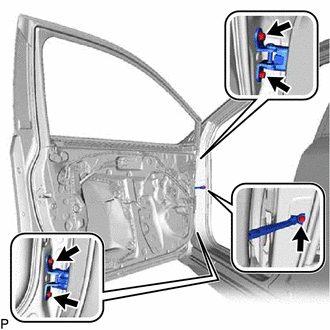
(c) Remove the 5 bolts and front door panel sub-assembly. NOTICE: To prevent damage, when removing the front door panel sub-assembly, make sure that there are enough people available to hold it securely. |
|
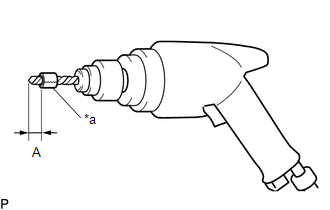
(d) Insert a 4.0 mm (0.157 in.) drill bit into a drill.
|
(e) Tape the 4.0 mm (0.157 in.) drill bit 5.0 mm (0.197 in.) from the tip as shown in the illustration. Standard Measurement:
NOTICE: Tape the 4.0 mm (0.157 in.) drill bit to prevent the drill bit from going too deep. |
|
(f) Lightly press the drill bit against the rivets to drill off the rivet flanges, and remove the 2 rivets and front door window frame moulding (front pillar side).
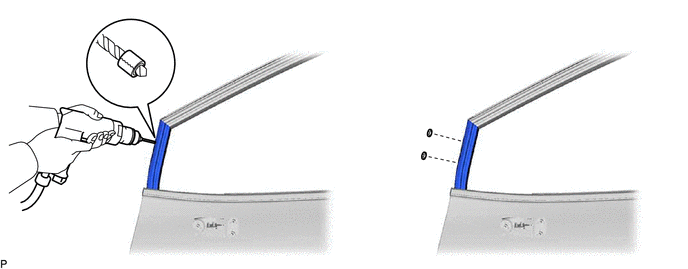
CAUTION:
Be careful of the drilled rivets, as they may be hot.
NOTICE:
- Pressing the drill too firmly will cause the rivet to turn and result in the rivet not being drilled through.
- Prying the rivets with the drill may damage the rivet installation holes or drill bit.
(g) Using a vacuum cleaner, remove the rivet fragments and shavings from the drilled areas.
5. REMOVE FRONT DOOR UPPER WINDOW FRAME MOULDING
(a) Insert a 4.0 mm (0.157 in.) drill bit into a drill.
|
(b) Tape the 4.0 mm (0.157 in.) drill bit 5.0 mm (0.197 in.) from the tip as shown in the illustration. Standard Measurement:
NOTICE: Tape the 4.0 mm (0.157 in.) drill bit to prevent the drill bit from going too deep. |
|
(c) Lightly press the drill bit against the rivets to drill off the rivet flanges, and remove the 6 rivets.
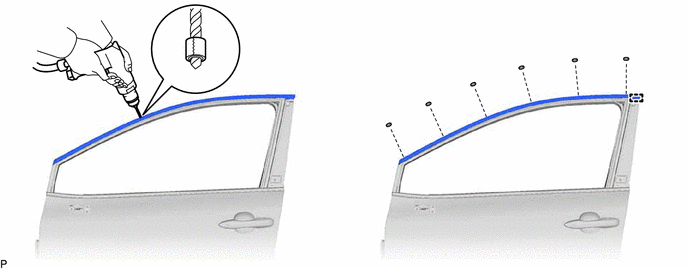
CAUTION:
Be careful of the drilled rivets, as they may be hot.
NOTICE:
- Pressing the drill too firmly will cause the rivet to turn and result in the rivet not being drilled through.
- Prying the rivets with the drill may damage the rivet installation holes or drill bit.
(d) Using a vacuum cleaner, remove the rivet fragments and shavings from the drilled areas.
(e) Disengage the guide to remove the front door upper window frame moulding from the door frame.
|
|
|
![2019 - 2022 MY Corolla Corolla Hatchback GR Corolla [06/2018 - 09/2022]; PRE-COLLISION: PRE-COLLISION SYSTEM (for Gasoline Model): INITIALIZATION](/t3Portal/stylegraphics/info.gif)
