| Last Modified: 05-13-2024 | 6.11:8.1.0 | Doc ID: RM100000001GVWK |
| Model Year Start: 2020 | Model: Corolla Hatchback | Prod Date Range: [01/2019 - 09/2022] |
| Title: K313 (CVT): PARK / NEUTRAL POSITION SWITCH: INSTALLATION; 2020 - 2022 MY Corolla Corolla Hatchback [01/2019 - 09/2022] | ||
INSTALLATION
PROCEDURE
1. INSTALL PARK/NEUTRAL POSITION SWITCH ASSEMBLY
(a) Temporarily install the park/neutral position switch assembly to the continuously variable transaxle assembly with the 2 bolts.
(b) Install the lock nut and lock plate to the park/neutral position switch assembly.
Torque:
6.9 N·m {70 kgf·cm, 61 in·lbf}
|
(c) Temporarily install the control shaft lever. |
|
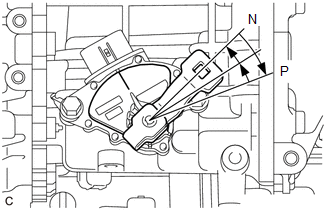
(d) Turn the control shaft lever clockwise until it stops, and then from that position turn it counterclockwise by 2 notches to set it to the N position.
(e) Remove the control shaft lever.
|
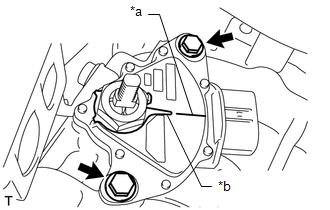
(f) Align the protrusion with the neutral basic line. |
|
(g) Hold the park/neutral position switch assembly in that position and tighten the 2 bolts.
Torque:
5.4 N·m {55 kgf·cm, 48 in·lbf}
|
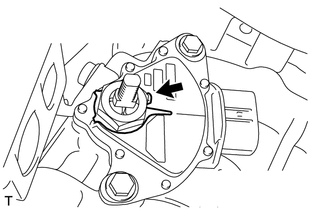
(h) Using a screwdriver, bend down the tabs of the lock plate. |
|
(i) Install the control shaft lever to the park/neutral position switch assembly with the nut and washer.
Torque:
12.7 N·m {130 kgf·cm, 9 ft·lbf}
(j) Connect the park/neutral position switch assembly connector.
2. CONNECT FLOOR SHIFT TRANSMISSION CONTROL SELECT CABLE
(a) Connect the floor shift transmission control select cable to the No. 1 transmission control cable bracket with a new clip.
(b) Connect the floor shift transmission control select cable to the control shaft lever with the nut.
Torque:
12 N·m {122 kgf·cm, 9 ft·lbf}
NOTICE:
Before connecting the floor shift transmission control select cable, check that the park/neutral position switch assembly and shift lever are in N.
3. INSTALL BATTERY CLAMP SUB-ASSEMBLY
4. CONNECT ENGINE WIRE
(a) Connect the engine wire to the battery clamp sub-assembly with the bolt and nut.
Torque:
7.0 N·m {71 kgf·cm, 62 in·lbf}
5. INSTALL BATTERY
6. INSTALL ECM
7. INSTALL AIR CLEANER CASE SUB-ASSEMBLY
8. INSTALL AIR CLEANER FILTER ELEMENT SUB-ASSEMBLY
9. INSTALL AIR CLEANER CAP WITH AIR CLEANER HOSE
10. INSTALL INLET NO. 1 AIR CLEANER
11. INSTALL RADIATOR SUPPORT OPENING COVER
12. CONNECT CABLE TO NEGATIVE BATTERY TERMINAL
13. INSPECT SHIFT LEVER POSITION
14. ADJUST SHIFT LEVER POSITION
15. INSPECT PARK/NEUTRAL POSITION SWITCH ASSEMBLY
16. ADJUST PARK/NEUTRAL POSITION SWITCH ASSEMBLY
|
|
|


![2020 MY Corolla [01/2019 - 03/2019]; 2ZR-FAE (ENGINE MECHANICAL): ENGINE ASSEMBLY: INSTALLATION+](/t3Portal/stylegraphics/info.gif)