| Last Modified: 07-31-2024 | 6.11:8.1.0 | Doc ID: RM100000001G459 |
| Model Year Start: 2020 | Model: Corolla | Prod Date Range: [01/2019 - 11/2022] |
| Title: 2ZR-FAE (ENGINE MECHANICAL): CYLINDER HEAD GASKET: INSTALLATION; 2020 - 2023 MY Corolla [01/2019 - 11/2022] | ||
INSTALLATION
CAUTION / NOTICE / HINT
HINT:
Perform "Inspection After Repair" after replacing the cylinder head sub-assembly.
PROCEDURE
1. INSTALL CYLINDER HEAD GASKET
(a) Remove any oil from the contact surfaces.
(b) Apply seal packing to the cylinder block sub-assembly as shown in the illustration.
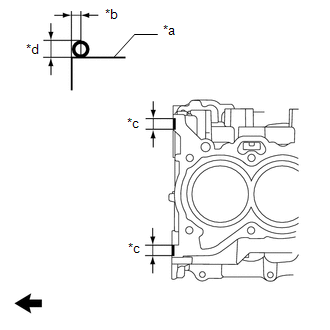
|
*a |
Cylinder Block Sub-assembly |
|
*b |
2.0 to 4.0 mm (0.0787 to 0.157 in.) |
|
*c |
10 to 15 mm (0.394 to 0.591 in.) |
|
*d |
Diameter 4.0 mm (0.157 in.) |

|
Front of Engine |
Seal Packing:
Toyota Genuine Seal Packing Black, Three Bond 1207B or equivalent
NOTICE:
Install the cylinder head gasket within 3 minutes and tighten the cylinder head set bolts within 15 minutes of applying seal packing.
(c) Place a new cylinder head gasket on the cylinder block sub-assembly as shown in the illustration.
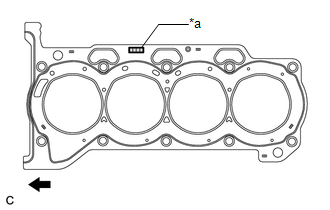
|
*a |
Lot No. |

|
Front of Engine |
NOTICE:
Make sure to install the cylinder head gasket in the correct direction.
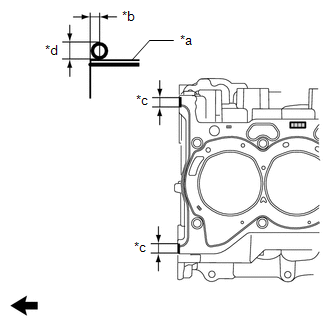
(d) Apply seal packing to the cylinder head gasket as shown in the illustration.
|
*a |
Cylinder Head Gasket |
|
*b |
0 to 2.0 mm (0 to 0.0787 in.) |
|
*c |
10 to 15 mm (0.394 to 0.591 in.) |
|
*d |
Diameter 4.0 mm (0.157 in.) |

|
Front of Engine |
Seal Packing:
Toyota Genuine Seal Packing Black, Three Bond 1207B or equivalent
2. INSTALL CYLINDER HEAD SUB-ASSEMBLY
HINT:
The cylinder head set bolts are tightened in 3 progressive steps.
(a) Clean the cylinder block sub-assembly and cylinder head sub-assembly with solvent.
(b) Place the cylinder head sub-assembly on the cylinder block sub-assembly.
NOTICE:
- Remove any oil from the contact surface of the cylinder head sub-assembly.
- Place the cylinder head sub-assembly on the cylinder block sub-assembly gently in order not to damage the gasket with the bottom of the cylinder head sub-assembly.
(c) Install the 10 cylinder head set plate washers to the 10 cylinder head set bolts.
(d) Apply a light coat of engine oil to the threads and under the heads of the cylinder head set bolts.
|
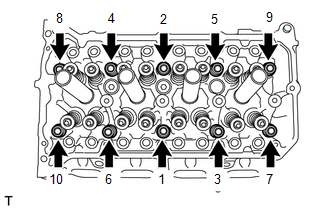
(e) Step 1: (1) Using a 10 mm bi-hexagon socket wrench, install and uniformly tighten the 10 cylinder head set bolts in several steps in the order shown in the illustration. Torque: 49 N·m {500 kgf·cm, 36 ft·lbf} NOTICE: Do not drop the cylinder head set plate washers for the cylinder head set bolts into the cylinder head sub-assembly. |
|
(f) Step 2:
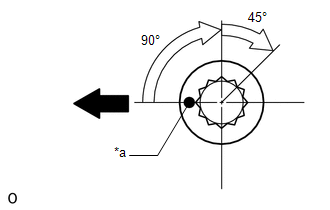
|
*a |
Paint Mark |

|
Front of Engine |
(1) Mark each cylinder head set bolt head with paint as shown in the illustration.
(2) Tighten the cylinder head set bolts 90° in the order shown in step 1.
(g) Step 3:
(1) Tighten the cylinder head set bolts another 45° in the order shown in step 1.
(h) Check that the paint marks are now at a 135° angle.
NOTICE:
Do not add engine oil for at least 2 hours after installing the cylinder head sub-assembly.
|
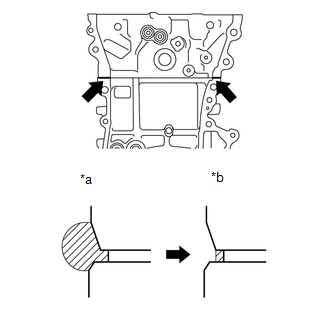
(i) After tightening the cylinder head set bolts, wipe off any seal packing that seeped out from the contact surfaces between the cylinder head sub-assembly and cylinder block sub-assembly. NOTICE:
|
|
3. INSTALL NO. 1 WATER BY-PASS PIPE
4. INSTALL CAMSHAFT HOUSING SUB-ASSEMBLY
|
|
|
![2020 - 2023 MY Corolla [01/2019 - 11/2022]; 2ZR-FAE (ENGINE CONTROL): SFI SYSTEM: INITIALIZATION](/t3Portal/stylegraphics/info.gif)
