| Last Modified: 05-13-2024 | 6.11:8.1.0 | Doc ID: RM100000001D0U2 |
| Model Year Start: 2019 | Model: GR Corolla | Prod Date Range: [06/2018 - ] |
| Title: DOOR / HATCH: BACK DOOR: DISASSEMBLY; 2019 - 2025 MY Corolla Corolla Hatchback Corolla HV GR Corolla [06/2018 - ] | ||
DISASSEMBLY
PROCEDURE
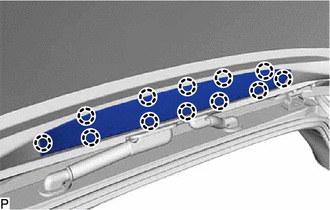
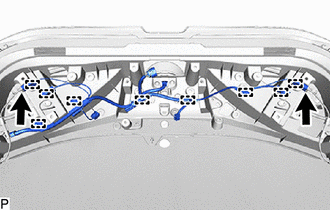
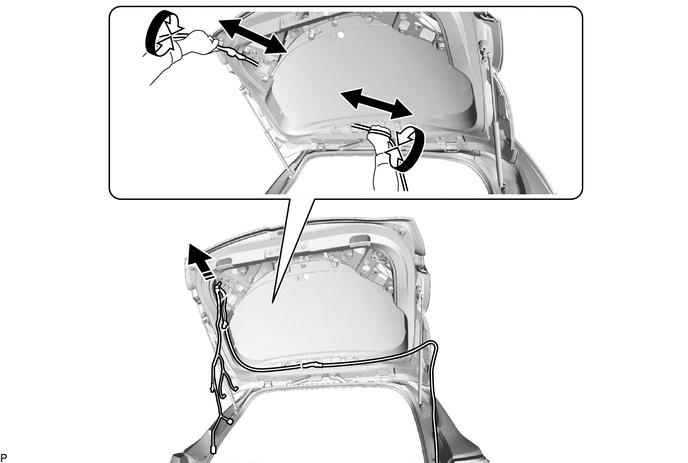
1. REMOVE BACK DOOR TRIM PANEL ASSEMBLY
(a) Using a moulding remover, disengage the 12 clips to remove the back door trim panel assembly as shown in the illustration.


|
Place Hand Here |

|
Remove in this Direction |
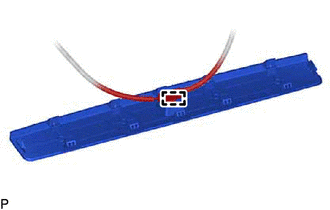
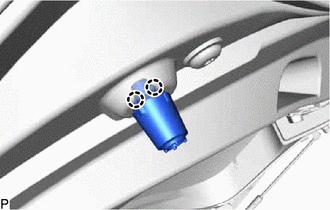
2. REMOVE NO. 2 BACK DOOR SERVICE HOLE COVER
|
(a) Disengage the 12 claws. |
|
|
(b) Disengage the clamp to remove the No. 2 back door service hole cover. |
|
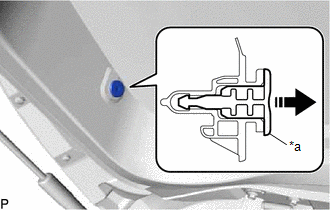
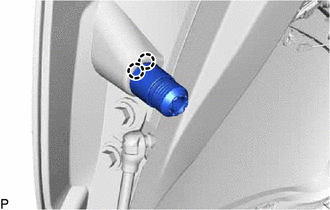
3. REMOVE PACKAGE TRAY TRIM GARNISH HOOK LH
(a) Disengage the pin as shown in the illustration.
|
*a |
Pin |
|
|
Remove in this Direction |
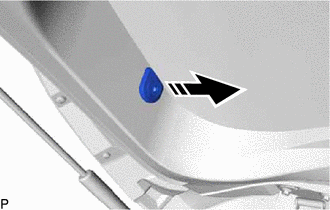
(b) Remove the package tray trim garnish hook LH as shown in the illustration.
|
|
Remove in this Direction |
4. REMOVE PACKAGE TRAY TRIM GARNISH HOOK RH
HINT:
Use the same procedure as for the LH side.
5. REMOVE CENTER STOP LIGHT ASSEMBLY
Click here
![2019 - 2025 MY Corolla Corolla Hatchback Corolla HV GR Corolla [06/2018 - ]; LIGHTING (EXT): HIGH MOUNTED STOP LIGHT ASSEMBLY: REMOVAL+](/t3Portal/stylegraphics/info.gif)
6. REMOVE REAR WASHER NOZZLE
Click here
7. REMOVE BACK DOOR LOCK ASSEMBLY WITH COURTESY LIGHT SWITCH
Click here
8. REMOVE REAR WIPER ARM HEAD CAP
Click here
9. REMOVE REAR WIPER ARM AND BLADE ASSEMBLY
Click here
10. REMOVE REAR WIPER MOTOR ASSEMBLY
Click here
11. REMOVE REAR WIPER MOTOR GROMMET
Click here
12. REMOVE BACK DOOR OPENER SWITCH SUB-ASSEMBLY
Click here
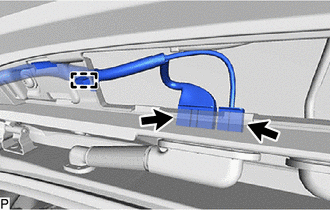
13. REMOVE NO. 3 BACK DOOR WIRE
|
(a) Disconnect the connector. |
|
(b) Disengage the 2 clamps to remove the No. 3 back door wire.
14. REMOVE BACK DOOR GARNISH ASSEMBLY
Click here
15. REMOVE REAR TELEVISION CAMERA ASSEMBLY
Click here
16. REMOVE REAR LIGHT ASSEMBLY LH
Click here
17. REMOVE REAR LIGHT ASSEMBLY RH
HINT:
Use the same procedure as for the LH side.
18. REMOVE REAR SIDE SPOILER SUB-ASSEMBLY LH
Click here
19. REMOVE REAR SIDE SPOILER SUB-ASSEMBLY RH
HINT:
Use the same procedure as for the LH side.
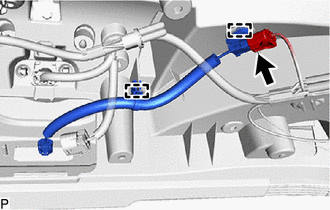
20. REMOVE NO. 2 BACK DOOR WIRE
|
(a) Disconnect the 2 connectors. |
|
(b) Disengage the clamp.
|
(c) Disconnect the 2 connectors. |
|
(d) Disengage each clamp.
(e) Secure a rope with a diameter of 9.0 mm (0.354 in.) to the No. 2 back door wire with nonwoven tape as shown in the illustration.
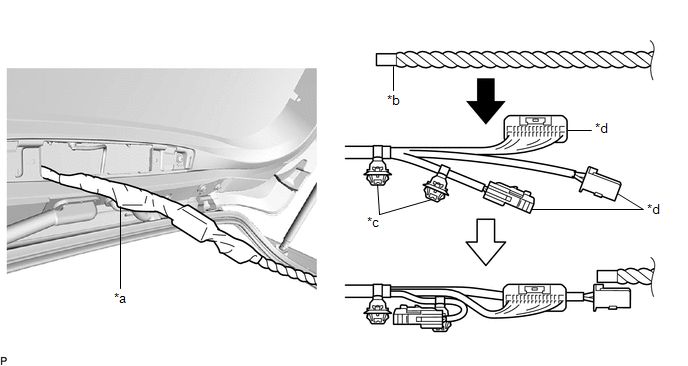
|
*a |
Nonwoven Tape |
*b |
Rope |
|
*c |
Clamp |
*d |
Connector |
NOTICE:
- As conduction performance may degrade if adhesive from the nonwoven tape contacts the connecting parts of the connectors, cover the connectors with a plastic bag or similar before applying the nonwoven tape.
- Make sure that the rope is secured with nonwoven tape to prevent the rope from separating from the No. 2 back door wire when removing it.
HINT:
- As the No. 2 back door wire is likely to be caught in the narrow areas inside the back door panel sub-assembly, make sure to align the clamp and connectors in a straight line and cover the edges of the connectors with nonwoven tape.
- A rope with a diameter of 8.0 mm (0.315 in.) or less may be caught in the gaps on the inside of the back door panel sub-assembly. Make sure to use a rope with a diameter of 9.0 mm (0.354 in.).
(f) Remove the No. 2 back door wire as shown in the illustration.
|
|
Remove in this Direction |
- |
- |
NOTICE:
- The rope will be used when installing the No. 2 back door wire. Leave the rope inside the back door panel sub-assembly.
- This step should not be performed with the back door panel sub-assembly removed from the vehicle.
21. REMOVE BACK DOOR UPPER STOPPER CUSHION
|
(a) Disengage the 2 claws to remove the back door upper stopper cushion. HINT: Use the same procedure for the LH side and RH side. |
|
22. REMOVE BACK DOOR PANEL CUSHION
|
(a) Disengage the 2 claws to remove the back door panel cushion. HINT: Use the same procedure for the LH side and RH side. |
|
23. REMOVE BACK DOOR STAY ASSEMBLY LH
Click here
24. REMOVE BACK DOOR STAY ASSEMBLY RH
HINT:
Use the same procedure as for the LH side.
25. REMOVE BACK DOOR DAMPER STAY LOWER BRACKET LH
Click here
26. REMOVE BACK DOOR DAMPER STAY LOWER BRACKET RH
HINT:
Use the same procedure as for the LH side.
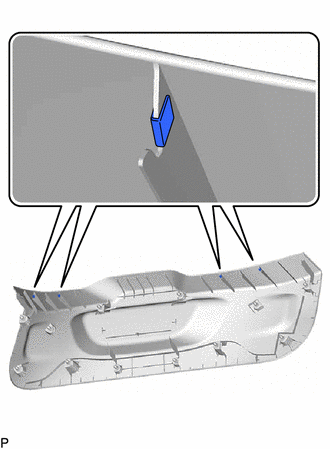
27. REMOVE BACK DOOR TRIM PAD (for GR)
HINT:
Perform this procedure only when replacement of the back door trim pads is necessary.
|
(a) Remove the 4 back door trim pads. |
|
|
|
|