| Last Modified: 05-13-2024 | 6.11:8.1.0 | Doc ID: RM100000001D0L0 |
| Model Year Start: 2019 | Model: Corolla Hatchback | Prod Date Range: [06/2018 - 01/2019] |
| Title: K120 / K121 (CVT): OIL PAN: REMOVAL; 2019 MY Corolla Corolla Hatchback [06/2018 - 01/2019] | ||
REMOVAL
CAUTION / NOTICE / HINT
The necessary procedures (adjustment, calibration, initialization, or registration) that must be performed after parts are removed, installed, or replaced during transaxle side cover sub-assembly removal/installation are shown below.
Necessary Procedure After Parts Removed/Installed/Replaced
|
Replacement Part or Procedure |
Necessary Procedure |
Effect/Inoperative when not Performed |
Link |
|---|---|---|---|
|
Replacement of CVT fluid |
ATF thermal degradation estimate reset |
The value of the Data List item "ATF Thermal Degradation Estimate" is not estimated correctly |
|
PROCEDURE
1. REMOVE NO. 1 ENGINE UNDER COVER ASSEMBLY
Click here
![2019 MY Corolla Corolla Hatchback [06/2018 - 01/2019]; M20A-FKS (ENGINE MECHANICAL): ENGINE ASSEMBLY: REMOVAL+](/t3Portal/stylegraphics/info.gif)
2. REMOVE REAR ENGINE UNDER COVER LH
Click here
3. DRAIN CONTINUOUSLY VARIABLE TRANSAXLE FLUID
|
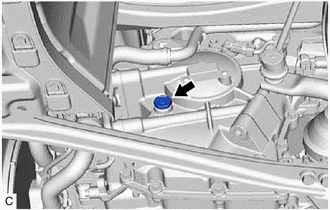
(a) Remove the refill plug and gasket from the rear transaxle case sub-assembly. |
|
|
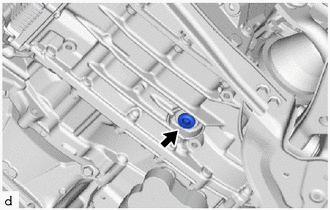
(b) Using a 10 mm hexagon socket wrench, remove the overflow plug and gasket from the transaxle case sub-assembly, and drain the fluid. |
|
|
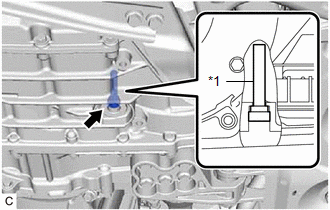
(c) Using a 6 mm hexagon socket wrench, remove the overflow (CVT) tube from the transaxle case sub-assembly. HINT: Removing the overflow (CVT) tube will drain all fluid in the transaxle case sub-assembly. |
|
(d) Using a 6 mm hexagon socket wrench, install the overflow (CVT) tube to the transaxle case sub-assembly.
Torque:
0.8 N·m {8 kgf·cm, 7 in·lbf}
(e) Using a 10 mm hexagon socket wrench, temporarily install the gasket and overflow plug to the transaxle case sub-assembly.
HINT:
Reuse the old gasket as the overflow plug will be removed again to adjust the fluid level.
(f) Temporarily install the gasket and refill plug to the rear transaxle case sub-assembly.
HINT:
Reuse the old gasket as the refill plug will be removed again to adjust the fluid level.
4. REMOVE RADIATOR SUPPORT OPENING COVER
Click here
5. REMOVE INLET NO. 1 AIR CLEANER
Click here
6. REMOVE AIR CLEANER CAP WITH AIR CLEANER HOSE
Click here
7. REMOVE AIR CLEANER FILTER ELEMENT SUB-ASSEMBLY
Click here
8. REMOVE AIR CLEANER CASE SUB-ASSEMBLY
Click here
9. REMOVE TRANSAXLE SIDE COVER SUB-ASSEMBLY
|
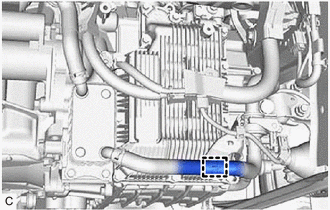
(a) Disconnect the flow shutting valve (water valve) connector. |
|
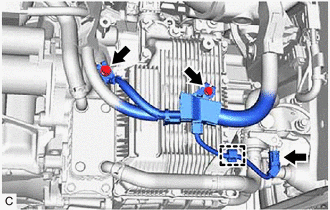
(b) Disengage the clamp to disconnect the engine wire from the No. 1 water hose clamp bracket.
(c) Remove the 2 bolts to disconnect the engine wire from the continuously variable transaxle assembly.
|
(d) Disengage the hose clamp to disconnect the No. 4 water by-pass hose from the No. 1 water hose clamp bracket. |
|
|
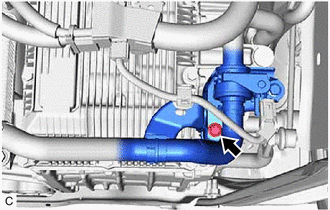
(e) Remove the bolt to disconnect the No. 1 water hose clamp bracket from the continuously variable transaxle assembly. |
|
|
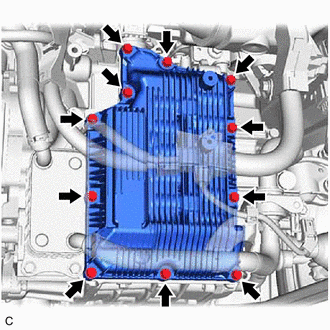
(f) Remove the 11 bolts and transaxle side cover sub-assembly from the transaxle case sub-assembly. |
|
|
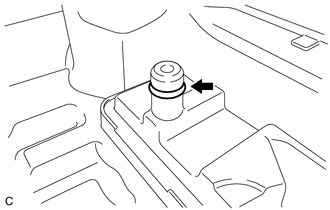
(g) Remove the O-ring from the transaxle side cover sub-assembly. |
|
|
|
|