| Last Modified: 05-13-2024 | 6.11:8.1.0 | Doc ID: RM100000001CPXE |
| Model Year Start: 2019 | Model: Corolla Hatchback | Prod Date Range: [06/2018 - 01/2019] |
| Title: INTERIOR PANELS / TRIM: FRONT CONSOLE BOX (except G16E-GTS): REMOVAL; 2019 MY Corolla Corolla Hatchback Corolla HV [06/2018 - 01/2019] | ||
REMOVAL
PROCEDURE
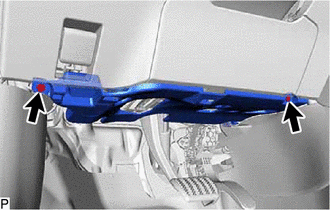
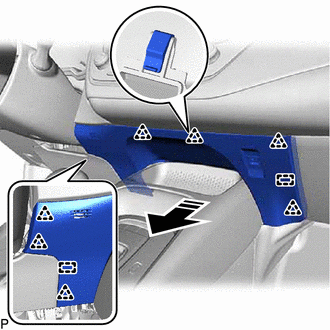
1. REMOVE NO. 1 INSTRUMENT PANEL UNDER COVER SUB-ASSEMBLY
|
(a) Remove the 2 screws. |
|
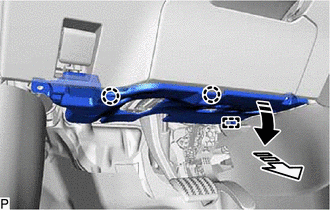
(b) Pull the No. 1 instrument panel under cover sub-assembly in the direction indicated by the arrow (1) shown in the illustration to disengage the 2 claws.

|
Remove in this Direction (1) |

|
Remove in this Direction (2) |
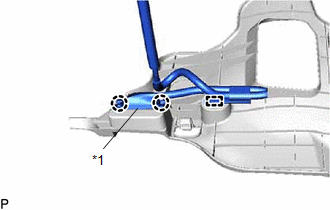
(c) Pull the No. 1 instrument panel under cover sub-assembly in the direction indicated by the arrow (2) shown in the illustration to disengage the guide.
|
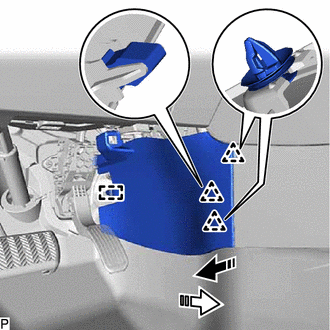
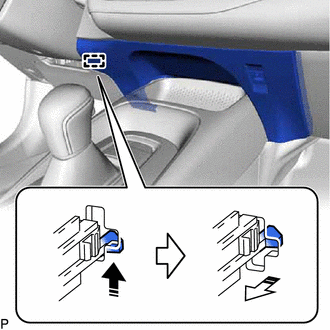
(d) Disengage the 2 claws to disconnect the DLC3. |
|
(e) Disengage the clamp to remove the No. 1 instrument panel under cover sub-assembly.
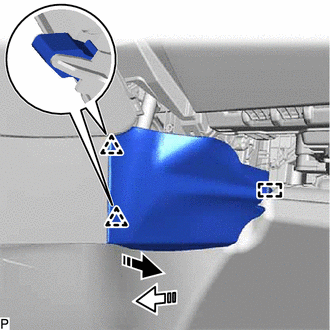
2. REMOVE FRONT NO. 1 CONSOLE BOX INSERT
(a) Pull the front No. 1 console box insert in the direction indicated by the arrow (1) shown in the illustration to disengage the 3 clips.
|
|
Remove in this Direction (1) |
|
|
Remove in this Direction (2) |
(b) Pull the front No. 1 console box insert in the direction indicated by the arrow (2) shown in the illustration to disengage the guide and remove it.
3. REMOVE LOWER CENTER INSTRUMENT PANEL FINISH PANEL
(a) Disengage the 7 clips and 2 guides as shown in the illustration.
|
|
Remove in this Direction |
(b) Disengage the hook as shown in the illustration.
|
|
Remove in this Direction (1) |
|
|
Remove in this Direction (2) |
(c) Disconnect the connector to remove the lower center instrument panel finish panel.
4. REMOVE FRONT NO. 2 CONSOLE BOX INSERT
(a) Pull the front No. 2 console box insert in the direction indicated by the arrow (1) shown in the illustration to disengage the 2 clips.
|
|
Remove in this Direction (1) |
|
|
Remove in this Direction (2) |
(b) Pull the front No. 2 console box insert in the direction indicated by the arrow (2) shown in the illustration to disengage the guide and remove it.
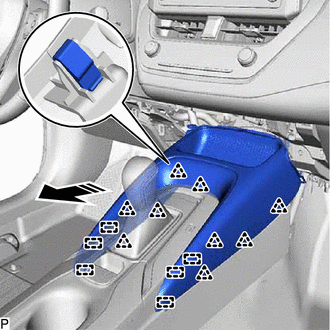
5. REMOVE FRONT CONSOLE UPPER PANEL GARNISH
(a) Disengage the 9 clips and 6 guides as shown in the illustration.
|
|
Remove in this Direction |
|
(b) Disconnect the 3 connectors. |
|
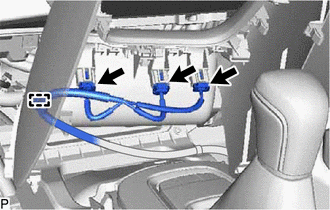
(c) Disengage the clamp to remove the front console upper panel garnish.
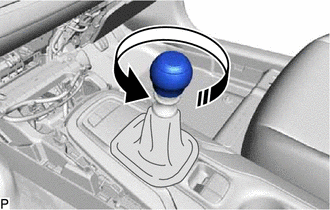
6. REMOVE SHIFT LEVER KNOB SUB-ASSEMBLY (for Manual Transaxle)
(a) Turn the shift lever knob sub-assembly counterclockwise and remove the shift lever knob sub-assembly.
|
|
Remove in this Direction |
7. REMOVE SHIFT LEVER KNOB SUB-ASSEMBLY (for CVT)
Click here
![2019 - 2025 MY Corolla Corolla Hatchback [06/2018 - ]; K120 / K121 (CVT): SHIFT LEVER KNOB: REMOVAL+](/t3Portal/stylegraphics/info.gif)
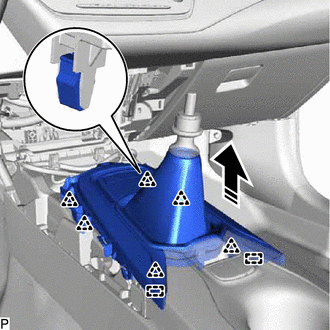
8. REMOVE UPPER FRONT CONSOLE PANEL SUB-ASSEMBLY (for Manual Transaxle)
(a) Disengage the 6 clips and 2 guides as shown in the illustration.
|
|
Remove in this Direction |
(b) Disconnect each connector to remove the upper front console panel sub-assembly.
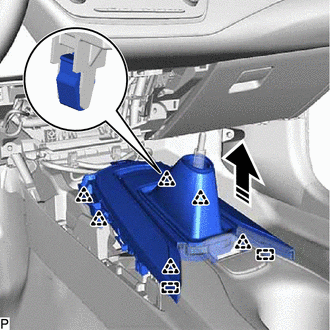
9. REMOVE POSITION INDICATOR HOUSING ASSEMBLY (for CVT)
(a) Disengage the 6 clips and 2 guides as shown in the illustration.
|
|
Remove in this Direction |
(b) Disconnect each connector to remove the position indicator housing assembly.
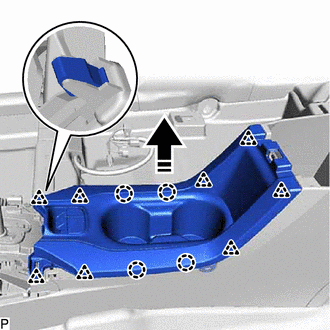
10. REMOVE CONSOLE CUP HOLDER BOX SUB-ASSEMBLY
(a) Disengage the 4 claws and 8 clips as shown in the illustration.
|
|
Remove in this Direction |
|
(b) Disconnect the 2 connectors. |
|
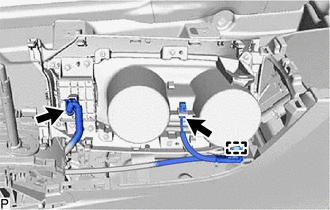
(c) Disengage the clamp to remove the console cup holder box sub-assembly.
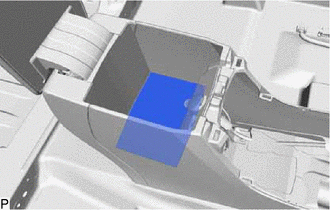
11. REMOVE CONSOLE BOX CARPET
|
(a) Remove the console box carpet. |
|
12. REMOVE CONSOLE BOX ASSEMBLY
|
(a) Disconnect the 2 connectors. |
|
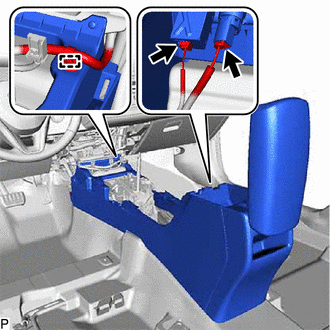
(b) Disengage the clamp.
(c) Remove the 4 bolts and 2 screws.
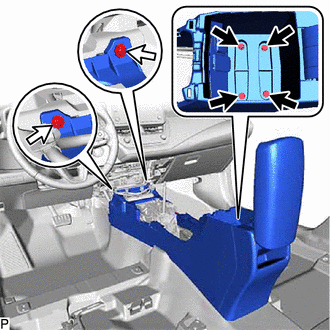

|
Bolt |

|
Screw |
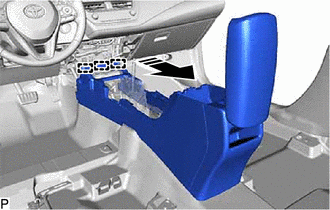
(d) Disengage the 3 guides as shown in the illustration to remove the console box assembly.
|
|
Remove in this Direction |
|
|
|