|
Last Modified: 08-22-2025 |
6.11:8.1.0 |
Doc ID: RM0000003TPCPVP |
|
Model Year Start: 2026 |
Model: GR Corolla |
Prod Date Range: [08/2025 -
] |
|
Title: AUDIO / VIDEO: ACTIVE NOISE CONTROL ECU (w/ Stereo Component Amplifier): REMOVAL; 2026 MY Corolla Corolla Hatchback Corolla HV GR Corolla [08/2025 - ] |
REMOVAL
CAUTION / NOTICE / HINT
The necessary procedures (adjustment, calibration, initialization or registration) that must be performed after parts are removed and installed, or replaced during stereo component equalizer assembly removal/installation are shown below.
Necessary Procedures After Parts Removed/Installed/Replaced
|
Replaced Part or Performed Procedure
|
Necessary Procedure
|
Effect/Inoperative Function when Necessary Procedure not Performed
|
Link
|
|
Stereo Component Equalizer Assembly
|
ECU configuration
|
-
|
![2023 - 2026 MY Corolla Corolla Hatchback Corolla HV GR Corolla [09/2022 - ]; SETUP: WHEN REPLACING OR REMOVING/INSTALLING PARTS: ECU CONFIGURATION](/t3Portal/stylegraphics/info.gif)
|
w/ Occupant Classification System:
|
Zero point calibration (Occupant classification system)
|
-
Occupant Classification System
-
Passenger airbag ON/OFF indicator
-
Airbag System (Front passenger side)
-
Seat Belt Warning System (Front passenger)
|
|
CAUTION:
Be sure to read Precaution thoroughly before servicing.
Click here
NOTICE:
After the ignition switch is turned off, there may be a waiting time before disconnecting the negative (-) auxiliary battery terminal.
Click here
HINT:
When the cable is disconnected / reconnected to the auxiliary battery terminal, systems temporarily stop operating. However, each system has a function that completes learning the first time the system is used.
Learning completes when vehicle is driven
|
Effect/Inoperative Function when Necessary Procedure not Performed
|
Necessary Procedure
|
Link
|
|
Front Camera System
|
Drive the vehicle straight ahead at 35 km/h (22 mph) or more for 5 seconds or more.
|
|
Learning completes when vehicle is operated normally
|
Effect/Inoperative Function when Necessary Procedure not Performed
|
Necessary Procedure
|
Link
|
|
Power Door Lock Control System
|
Perform door unlock operation with door control switch or electrical key transmitter sub-assembly switch.
|
|
PROCEDURE
1. REMOVE FRONT SEAT ASSEMBLY RH
HINT:
Use the same procedure as for the LH side.
Click here
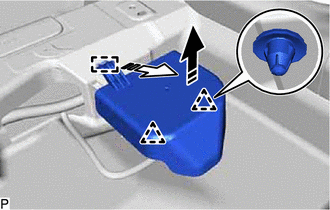
2. REMOVE AUDIO AMPLIFIER COVER
(a) Pull the audio amplifier cover in the direction indicated by the arrow (1) shown in the illustration to disengage the 2 clips.

|
Remove in this Direction (1)
|

|
Remove in this Direction (2)
|
(b) Pull the audio amplifier cover in the direction indicated by the arrow (2) shown in the illustration to disengage the guide and remove the audio amplifier cover.
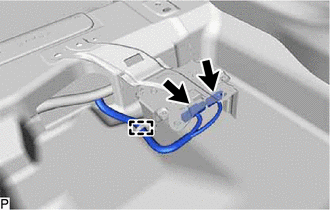
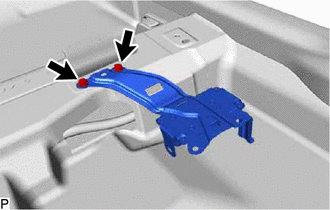
3. REMOVE STEREO COMPONENT EQUALIZER ASSEMBLY
(b) Disconnect the 2 connectors.
|
(c) Remove the 2 bolts and stereo component equalizer assembly.
|
|
|