| Last Modified: 01-30-2024 | 6.11:8.1.0 | Doc ID: RM100000002EKH8 |
| Model Year Start: 2024 | Model: RAV4 | Prod Date Range: [10/2023 - ] |
| Title: SUPPLEMENTAL RESTRAINT SYSTEMS: CURTAIN SHIELD AIRBAG ASSEMBLY: REMOVAL; 2024 MY RAV4 RAV4 HV [10/2023 - ] | ||
REMOVAL
CAUTION / NOTICE / HINT
The necessary procedures (adjustment, calibration, initialization or registration) that must be performed after parts are removed and installed, or replaced during curtain shield airbag assembly removal/installation are shown below.
Necessary Procedures After Parts Removed/Installed/Replaced (for Gasoline Model)
|
Replaced Part or Performed Procedures |
Necessary Procedures |
Effect/Inoperative Function When Necessary Procedures are not Performed |
Link |
|---|---|---|---|
|
*1: When performing learning using the Techstream.
*2: w/o Power Back Door System |
|||
|
Disconnect cable from negative (-) auxiliary battery terminal |
Drive the vehicle until stop and start control is permitted (approximately 5 to 60 minutes) |
Stop and start system |
|
|
Perform steering sensor zero point calibration |
Lane control system |
||
|
Parking support brake system (for Gasoline model)*1 |
|||
|
Pre-collision system |
|||
|
Reset back door close position |
Power back door system (for Gasoline model) |
||
|
Back door lock initialization*2 |
Power door lock control system |
||
NOTICE:
- After the ignition switch is turned off, the audio and visual system records various types of memory and settings. As a result, after turning the ignition switch off, make sure to wait at least 2 minutes before disconnecting the cable from the negative (-) auxiliary battery terminal.
- When the cable is disconnected from the negative (-) auxiliary battery terminal and the security lock setting has been enabled, multi-display operations will be disabled upon next startup unless the password is entered. Be sure to check the security lock setting before disconnecting the cable from the negative (-) auxiliary battery terminal.
Necessary Procedures After Parts Removed/Installed/Replaced (for HV Model)
|
Replaced Part or Performed Procedures |
Necessary Procedures |
Effect/Inoperative Function When Necessary Procedures are not Performed |
Link |
|---|---|---|---|
| *: When performing learning using the Techstream. | |||
|
Disconnect cable from negative (-) auxiliary battery terminal |
Perform steering sensor zero point calibration |
Lane control system |
|
|
Parking support brake system (for HV model)* |
|||
|
Pre-collision system |
|||
|
Reset back door close position |
Power back door system (for HV model) |
||
|
Back door lock initialization |
Power door lock control system |
||
NOTICE:
- After the ignition switch is turned off, the audio and visual system records various types of memory and settings. As a result, after turning the ignition switch off, make sure to wait at least 2 minutes before disconnecting the cable from the negative (-) auxiliary battery terminal.
- When the cable is disconnected from the negative (-) auxiliary battery terminal and the security lock setting has been enabled, multi-display operations will be disabled upon next startup unless the password is entered. Be sure to check the security lock setting before disconnecting the cable from the negative (-) auxiliary battery terminal.
HINT:
- Use the same procedure for the RH and LH sides.
- The procedure listed below is for the LH side.
PROCEDURE
1. PRECAUTION
CAUTION:
Be sure to read precaution thoroughly before servicing.
NOTICE:
After turning the ignition switch off, waiting time may be required before disconnecting the cable from the negative (-) auxiliary battery terminal. Therefore, make sure to read the disconnecting the cable from the negative (-) auxiliary battery terminal notices before proceeding with work.
2. REMOVE DECK BOARD ASSEMBLY (for HV Model)
3. REMOVE REAR NO. 2 FLOOR BOARD (for HV Model)
4. REMOVE BATTERY HOLE COVER (for HV Model)
5. DISCONNECT CABLE FROM NEGATIVE AUXILIARY BATTERY TERMINAL
CAUTION:
- Wait at least 90 seconds after disconnecting the cable from the negative (-) auxiliary battery terminal to disable the SRS system.
- If the airbag deploys for any reason, it may cause a serious accident.
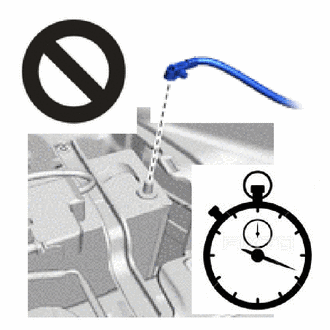
NOTICE:
When disconnecting the cable, some systems need to be initialized after the cable is reconnected.
6. REMOVE ROOF HEADLINING ASSEMBLY
7. REMOVE CURTAIN SHIELD AIRBAG ASSEMBLY LH (for Rollover Type)

|
Deployment Side |
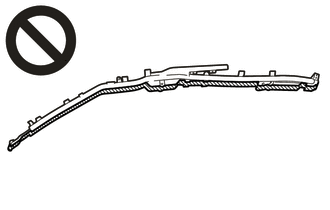
- When storing the curtain shield airbag assembly LH, keep the airbag deployment side facing upward.
- If the airbag deploys for any reason, it may cause a serious accident.
(a) Check that the ignition switch is off.
(b) Check that the cable is disconnected from the negative (-) auxiliary battery terminal.
CAUTION:
- Wait at least 90 seconds after disconnecting the cable from the negative (-) auxiliary battery terminal to disable the SRS system.
- If the airbag deploys for any reason, it may cause a serious accident.

(c) Using a screwdriver, release the lock button and disconnect the airbag connector.
NOTICE:
When disconnecting any airbag connector, take care not to damage the airbag wire harness.
HINT:
Tape the screwdriver tip before use.
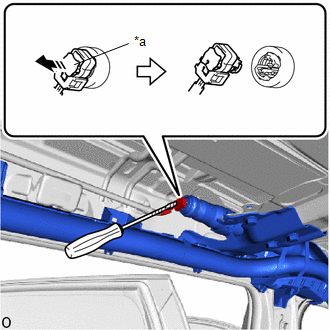
|
*a |
Lock Button |

|
Protective Tape |

|
Release in this Direction |
|
(d) for LH Side: Detach the wire harness clamp. |
|
(e) Remove the curtain shield airbag assembly LH deployment portion in the following order.
CAUTION:
Do not reuse the clip A and roof side inner garnish clip.
- Using No. 2 needle-nose pliers, remove the 4 pins from the 3 clips A and roof side inner garnish clip.
- Using 2 thin-bladed screwdrivers, detach the claw and remove the 3 clips A and roof side inner garnish clip together with the curtain shield airbag assembly LH deployment portion.
- Detach the claw.
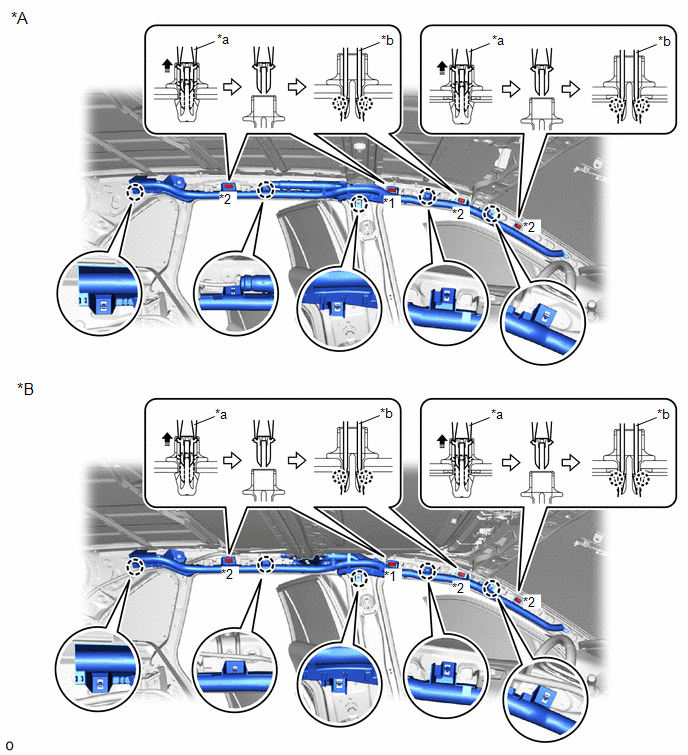
|
*A |
except Moon Roof |
*B |
for Moon Roof |
|
*1 |
Roof Side Inner Garnish Clip |
*2 |
Clip A |
|
*a |
No. 2 Needle-Nose Pliers |
*b |
Thin-Bladed Screwdriver |

|
Remove in this Direction |
- |
- |
(f) Remove the curtain shield airbag assembly LH inflator in the following order.
CAUTION:
The bolt and clip B must not be reused.
except Moon Roof:
- Remove the bolt and detach the hook to remove the curtain shield airbag assembly LH strap.
- Remove the bolt and rear side of the curtain shield airbag assembly LH deployment portion.
- Pull down the curtain shield airbag assembly LH deployment portion and remove the 2 bolts.
- Detach the hook to remove the curtain shield airbag assembly LH inflator.
for Moon Roof:
- Remove the bolt and detach the hook to remove the curtain shield airbag assembly LH strap.
- Remove the bolt and rear side of the curtain shield airbag assembly LH deployment portion.
- Remove the 4 bolts from the bracket.
-
Using a clip remover, detach the clip B to remove the bracket.
HINT:
Tape the clip remover tip before use.
- Pull down the curtain shield airbag assembly LH deployment portion and remove the 2 bolts and curtain shield airbag assembly LH inflator.
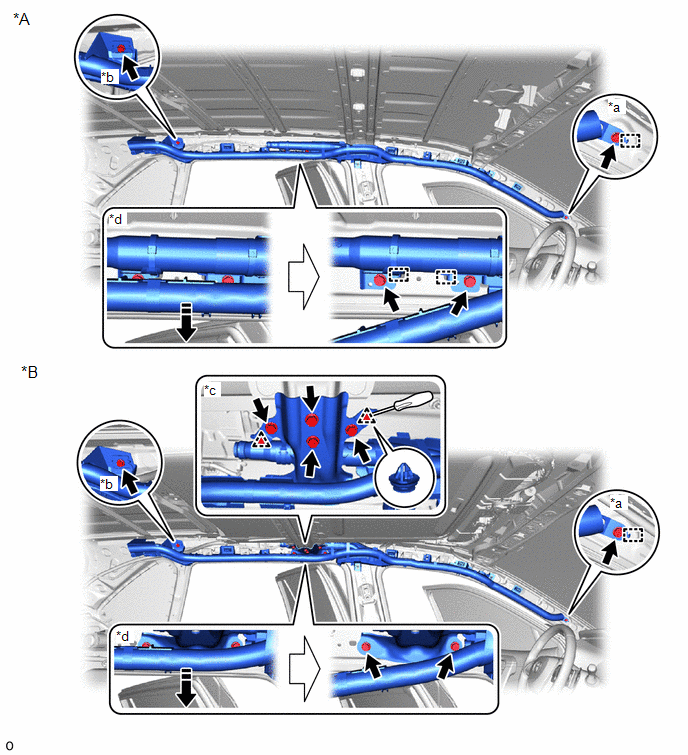
|
*A |
except Moon Roof |
*B |
for Moon Roof |
|
*a |
Strap |
*b |
Rear Side Bolt |
|
*c |
Bracket |
*d |
Curtain Shield Airbag Assembly LH Inflator |

|
Pull Down in this Direction |

|
Protective Tape |
(g) When reusing the curtain shield airbag assembly LH:
CAUTION:
Do not reuse the clip A, clip B, roof side inner garnish clip and curtain shield airbag clip spacer.
(1) Detach the claw and remove the clip A and curtain shield airbag clip spacer from the front side of the curtain shield airbag assembly LH.
(2) Detach the claw and remove the 2 clips A and roof side inner garnish clip.
(3) for Moon Roof:
Remove the 2 clips B.
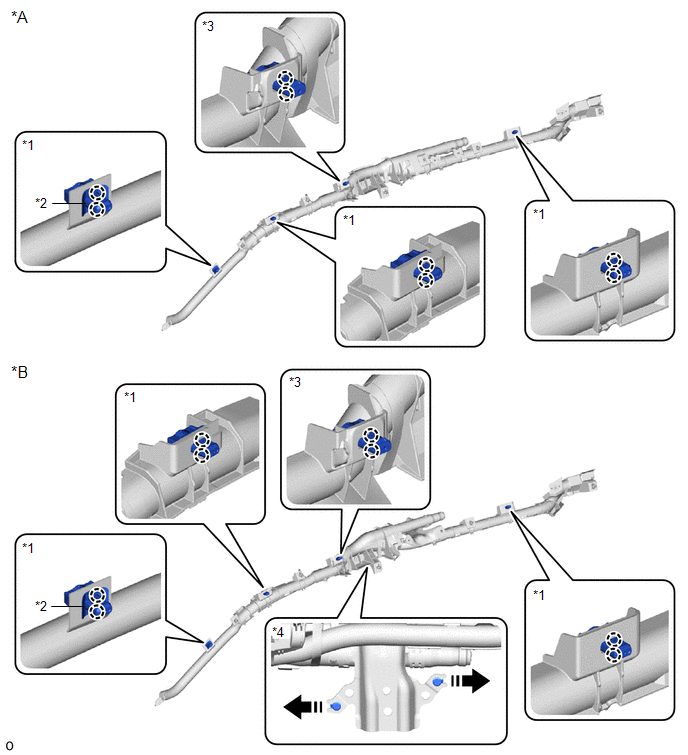
|
*A |
except Moon Roof |
*B |
for Moon Roof |
|
*1 |
Clip A |
*2 |
Curtain Shield Airbag Clip Spacer |
|
*3 |
Roof Side Inner Garnish Clip |
*4 |
Clip B |

|
Remove in this Direction |
- |
- |
8. REMOVE CURTAIN SHIELD AIRBAG ASSEMBLY LH (except Rollover Type)


|
Deployment Side |
- When storing the curtain shield airbag assembly LH, keep the airbag deployment side facing upward.
- If the airbag deploys for any reason, it may cause a serious accident.
(a) Check that the ignition switch is off.
(b) Check that the cable is disconnected from the negative (-) auxiliary battery terminal.
CAUTION:
- Wait at least 90 seconds after disconnecting the cable from the negative (-) auxiliary battery terminal to disable the SRS system.
- If the airbag deploys for any reason, it may cause a serious accident.

(c) Using a screwdriver, release the lock button and disconnect the airbag connector.
NOTICE:
When disconnecting any airbag connector, take care not to damage the airbag wire harness.
HINT:
Tape the screwdriver tip before use.
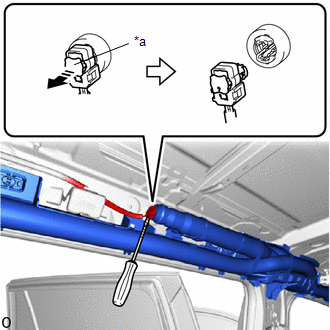
|
*a |
Lock Button |

|
Protective Tape |

|
Release in this Direction |
|
(d) for LH Side: Detach the wire harness clamp. |
|
(e) Remove the curtain shield airbag assembly LH deployment portion in the following order.
CAUTION:
Do not reuse the clip and roof side inner garnish clip.
- Using No. 2 needle-nose pliers, remove the 4 pins from the 3 clips and roof side inner garnish clip.
- Using 2 thin-bladed screwdrivers, detach the claw and remove the 3 clips and roof side inner garnish clip together with the curtain shield airbag assembly LH deployment portion.
- Detach the claw.
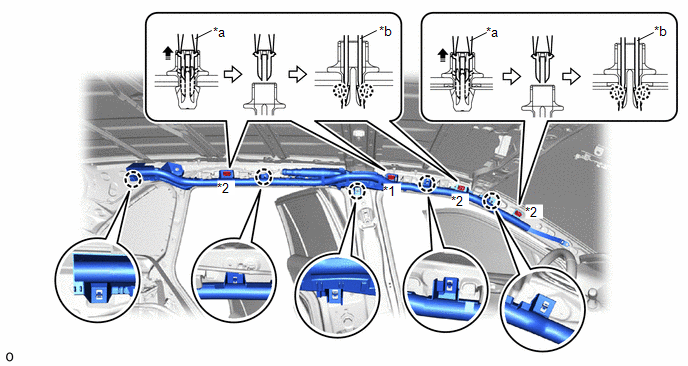
|
*1 |
Roof Side Inner Garnish Clip |
*2 |
Clip |
|
*a |
No. 2 Needle-Nose Pliers |
*b |
Thin-Bladed Screwdriver |

|
Remove in this Direction |
- |
- |
(f) Remove the curtain shield airbag assembly LH inflator in the following order.
CAUTION:
The bolt must not be reused.
- Remove the bolt and detach the hook to remove the curtain shield airbag assembly LH strap.
- Remove the bolt and rear side of the curtain shield airbag assembly LH deployment portion.
- Pull down the curtain shield airbag assembly LH deployment portion and remove the 2 bolts.
- Detach the hook to remove the curtain shield airbag assembly LH inflator.
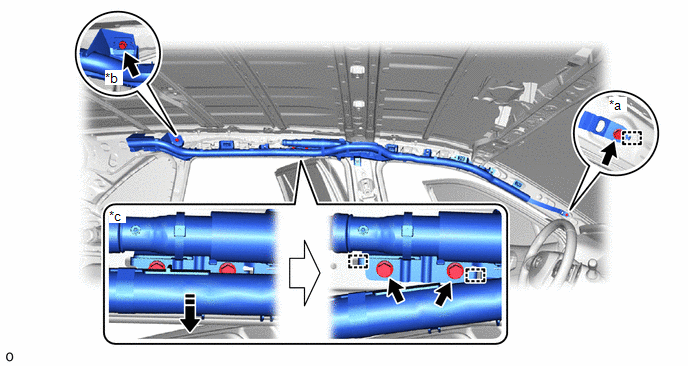
|
*a |
Strap |
*b |
Rear Side Bolt |
|
*c |
Curtain Shield Airbag Assembly LH Inflator |
- |
- |

|
Pull Down in this Direction |
- |
- |
(g) When reusing the curtain shield airbag assembly LH:
CAUTION:
Do not reuse the clip, roof side inner garnish clip and curtain shield airbag clip spacer.
(1) Detach the claw and remove the clip and curtain shield airbag clip spacer from the front side of the curtain shield airbag assembly LH.
(2) Detach the claw and remove the 2 clips and roof side inner garnish clip.
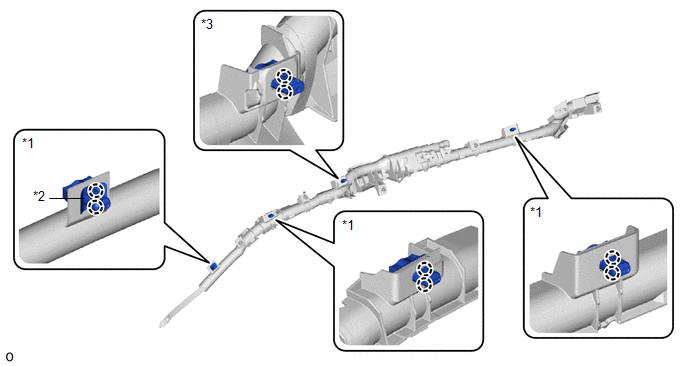
|
*1 |
Clip |
*2 |
Curtain Shield Airbag Clip Spacer |
|
*3 |
Roof Side Inner Garnish Clip |
- |
- |
|
|
|
![2024 MY RAV4 [10/2023 - ]; PARK ASSIST / MONITORING: PARKING SUPPORT BRAKE SYSTEM (for Gasoline Model): CALIBRATION](/t3Portal/stylegraphics/info.gif)
