- Reclining motor (Front seatback frame sub-assembly (driver seat)) (Including removal and installation)
- Slide motor (Front seat adjuster assembly (driver seat)) (Including removal and installation)
- Power seat lifter motor assembly (driver seat) (Including removal and installation)
- Power seat tilt motor assembly (driver seat) (Including removal and installation)
| Last Modified: 01-30-2024 | 6.11:8.1.0 | Doc ID: RM100000002EKF3 |
| Model Year Start: 2024 | Model: RAV4 | Prod Date Range: [10/2023 - ] |
| Title: SEAT: FRONT POWER SEAT MOTOR ASSEMBLY: REMOVAL; 2024 MY RAV4 RAV4 HV [10/2023 - ] | ||
REMOVAL
CAUTION / NOTICE / HINT
CAUTION:
Wear protective gloves. Sharp areas on the parts may injure your hands.
The necessary procedures (adjustment, calibration, initialization, or registration) that must be performed after parts are removed and installed, or replaced during power seat lifter motor assembly and power seat tilt motor assembly removal/installation are shown below.
Necessary Procedures After Parts Removed/Installed/Replaced (for HV Model)
|
Replaced Part or Performed Procedure |
Necessary Procedure |
Effect/Inoperative Function when Necessary Procedure not Performed |
Link |
|---|---|---|---|
| *: When performing learning using the Techstream. | |||
|
Disconnect cable from negative (-) auxiliary battery terminal |
Perform steering sensor zero point calibration |
Lane control system |
|
|
Parking support brake system (for HV model)* |
|||
|
Pre-collision system |
|||
|
Reset back door close position |
Power back door system |
||
|
Back door lock initialization |
Power door lock control system |
||
|
|
Initialize position control ECU |
Front power seat control system (for HV model with memory) |
|
Necessary Procedures After Parts Removed/Installed/Replaced (for Gasoline Model)
|
Replaced Part or Performed Procedure |
Necessary Procedure |
Effect/Inoperative Function when Necessary Procedure not Performed |
Link |
|---|---|---|---|
|
*1: When performing learning using the Techstream.
*2: w/o Power Back Door System |
|||
|
Disconnect cable from negative (-) auxiliary battery terminal |
Drive the vehicle until stop and start control is permitted (approximately 5 to 60 minutes) |
Stop and start system |
|
|
Perform steering sensor zero point calibration |
Lane control system |
||
|
Parking support brake system (for Gasoline model)*1 |
|||
|
Pre-collision system |
|||
|
Reset back door close position |
Power back door system |
||
|
Back door lock initialization*2 |
Power door lock control system |
||
|
Initialize position control ECU |
Front power seat control system (for Gasoline model with memory) |
|
HINT:
- Use the same procedure for the RH and LH sides.
- The following procedure is for the LH side.
PROCEDURE
1. PRECAUTION
CAUTION:
Be sure to read Precaution thoroughly before servicing.
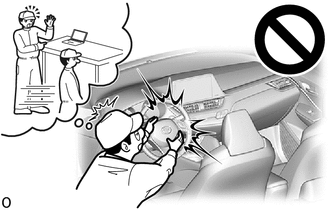
NOTICE:
After turning the ignition switch off, waiting time may be required before disconnecting the cable from the negative (-) auxiliary battery terminal. Therefore, make sure to read the disconnecting the cable from the negative (-) auxiliary battery terminal notices before proceeding with work.
2. REMOVE FRONT SEAT ASSEMBLY LH
3. REMOVE FRONT SEAT FRONT CUSHION SHIELD LH
4. REMOVE FRONT SEAT CUSHION SHIELD LH
5. REMOVE FRONT SEAT INNER CUSHION SHIELD LH
6. REMOVE SEPARATE TYPE FRONT SEATBACK ASSEMBLY
7. REMOVE SEPARATE TYPE FRONT SEAT CUSHION COVER WITH PAD
8. REMOVE LH SEAT RECLINING ADJUSTER INSIDE COVER
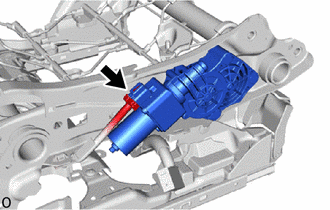
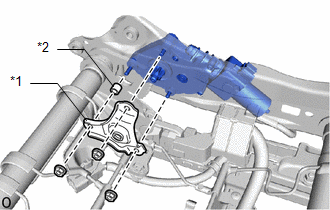
9. REMOVE POWER SEAT LIFTER MOTOR ASSEMBLY LH
|
(a) Disconnect the connector. |
|
|
(b) Remove the 3 nuts, front seat adjuster plate LH and vertical adjuster spacer. |
|
(c) Remove the power seat lifter motor assembly LH.
NOTICE:
Do not damage or dirty the gears of the power seat lifter motor assembly LH and front seat adjuster assembly LH.
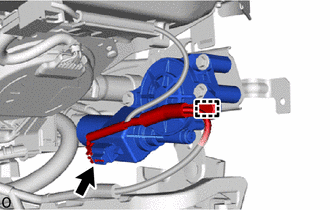
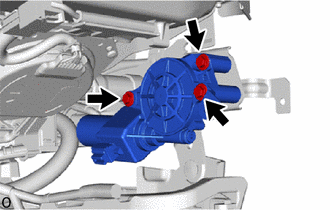
10. REMOVE POWER SEAT TILT MOTOR ASSEMBLY LH
|
(a) Disconnect the connector. |
|
(b) Detach the clamp.
|
(c) Remove the 3 bolts and power seat tilt motor assembly LH. NOTICE: Do not damage or dirty the gears of the power seat tilt motor assembly LH and front seat adjuster assembly LH. |
|
|
|
|
![2024 MY RAV4 HV [10/2023 - ]; PARK ASSIST / MONITORING: PARKING SUPPORT BRAKE SYSTEM (for HV Model): CALIBRATION](/t3Portal/stylegraphics/info.gif)
