| Last Modified: 01-30-2024 | 6.11:8.1.0 | Doc ID: RM100000002EKCZ |
| Model Year Start: 2024 | Model: RAV4 | Prod Date Range: [10/2023 - ] |
| Title: EXTERIOR PANELS / TRIM: REAR BUMPER: REMOVAL; 2024 MY RAV4 RAV4 HV [10/2023 - ] | ||
REMOVAL
CAUTION / NOTICE / HINT
The necessary procedures (adjustment, calibration, initialization, or registration) that must be performed after parts are removed, installed, or replaced during the rear bumper assembly removal/installation are shown below.
Necessary Procedure After Parts Removed/Installed/Replaced (for HV Model)
|
Replaced Part or Performed Procedures |
Necessary Procedures |
Effect/Inoperative Function when Necessary Procedures are not Performed |
Link |
|---|---|---|---|
|
*: When performing learning using the Techstream.
Click here
|
|||
|
w/ Hands Free Power Back Door: Removal and installation of auxiliary battery terminal |
Perform steering sensor zero point calibration |
Lane control system |
|
|
Parking support brake system (for HV Model)* |
|||
|
Pre-collision system |
|||
|
Reset back door close position |
Power back door system |
|
|
|
Back door lock initialization |
Power door lock control system |
|
|
|
Kick door control sensor |
Reset connection history |
There are cases where the connection history display differs from the vehicle condition |
|
NOTICE:
- After the ignition switch is turned off, the audio and visual system records various types of memory and settings. As a result, after turning the ignition switch off, make sure to wait at least 2 minutes before disconnecting the cable from the negative (-) auxiliary battery terminal.
- When the cable is disconnected from the negative (-) auxiliary battery terminal and the security lock setting has been enabled, multi-display operations will be disabled upon next startup unless the password is entered. Be sure to check the security lock setting before disconnecting the cable from the negative (-) auxiliary battery terminal.
Necessary Procedure After Parts Removed/Installed/Replaced (for Gasoline Model)
|
Replaced Part or Performed Procedures |
Necessary Procedures |
Effect/Inoperative Function when Necessary Procedures are not Performed |
Link |
|---|---|---|---|
|
*1: When performing learning using the Techstream.
Click here
*2: w/o Power Back Door System |
|||
|
w/ Hands Free Power Back Door: Removal and installation of auxiliary battery terminal |
Drive the vehicle until stop and start control is permitted (approximately 5 to 60 minutes) |
Stop and start system |
|
|
Perform steering sensor zero point calibration |
Lane control system |
|
|
|
Parking support brake system (for Gasoline Model)*1 |
|||
|
Pre-collision system |
|||
|
Reset back door close position |
Power back door system |
|
|
|
Back door lock initialization*2 |
Power door lock control system |
|
|
|
Kick door control sensor |
Reset connection history |
There are cases where the connection history display differs from the vehicle condition |
|
NOTICE:
- After the ignition switch is turned off, the audio and visual system records various types of memory and settings. As a result, after turning the ignition switch off, make sure to wait at least 2 minutes before disconnecting the cable from the negative (-) auxiliary battery terminal.
- When the cable is disconnected from the negative (-) auxiliary battery terminal and the security lock setting has been enabled, multi-display operations will be disabled upon next startup unless the password is entered. Be sure to check the security lock setting before disconnecting the cable from the negative (-) auxiliary battery terminal.
HINT:
-
If the bumper is damaged, there is a possibility that the installation area of the blind spot monitor sensor may be deformed and the blind spot monitor system may not operate correctly, so visually inspect the blind spot monitor sensor installation area (frame, stud bolt) to make sure it is not dented or bent.
Click here
![2019 - 2024 MY RAV4 RAV4 HV [11/2018 - ]; PARK ASSIST / MONITORING: BLIND SPOT MONITOR SENSOR: ADJUSTMENT](/t3Portal/stylegraphics/info.gif)
- If the visual inspection finds a problem, check the installation condition of the blind spot monitor sensor, and adjust the installation position of the blind spot monitor sensor as necessary.
-
When the rear bumper is damaged or deformed due to an accident or contact with other objects, etc., or the bumper installation area on the body is repaired, it is necessary to perform ultrasonic sensor detection angle measurement.
-
for HV Model:
Click here
-
for Gasoline Model:
Click here
-
for HV Model:
PROCEDURE
1. PRECAUTION (w/ Hands Free Power Back Door)
NOTICE:
After turning the ignition switch off, waiting time may be required before disconnecting the cable from the negative (-) auxiliary battery terminal. Therefore, make sure to read the disconnecting the cable from the negative (-) auxiliary battery terminal notices before proceeding with work.
Click here
2. REMOVE DECK BOARD ASSEMBLY (for HV Model, w/ Hands Free Power Back Door)
Click here
3. REMOVE REAR NO. 2 FLOOR BOARD (for HV Model, w/ Hands Free Power Back Door)
Click here
4. REMOVE BATTERY HOLE COVER (for HV Model, w/ Hands Free Power Back Door)
Click here
5. REMOVE REAR BUMPER PROTECTOR (w/ Bumper Protector)
HINT:
- Perform the following procedure only when replacement of a rear bumper protector is necessary.
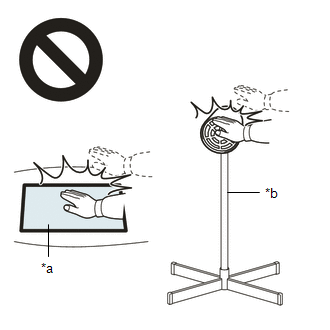
- When removing the rear bumper protector, if the double-sided tape is difficult to remove, heat the adhesive of the rear bumper protector and rear bumper assembly using a heat light.
Standard:
|
Item |
Temperature |
|---|---|
|
Rear Bumper Assembly |
20 to 30°C (68 to 86°F) |
|
Rear Bumper Protector |
20 to 30°C (68 to 86°F) |
CAUTION:
- Do not touch the heat light and heated parts.
- Touching the heat light may result in burns.
- Touching heated parts for a long time may result in burns.
|
*a |
Heated Part |
|
*b |
Heat Light |
NOTICE:
Do not heat the rear bumper assembly and rear bumper protector excessively.
(a) Remove the rear bumper protector.
6. DISCONNECT CABLE FROM NEGATIVE AUXILIARY BATTERY TERMINAL (w/ Hands Free Power Back Door)
(a) for A25A-FXS:
Click here
(b) for A25A-FKS:
Click here
NOTICE:
When disconnecting the cable, some systems need to be initialized after the cable is reconnected.
Click here
7. REMOVE REAR QUARTER PANEL MUDGUARD LH (w/ Mudguard)
(a) for Short Type:
Click here
(b) for Long Type:
Click here
8. REMOVE REAR QUARTER PANEL MUDGUARD RH (w/ Mudguard)
HINT:
Use the same procedure for the RH and LH side.
9. REMOVE REAR BUMPER SIDE SEAL LH
(a) w/o Mudguard:

|
Clip |

|
Screw |
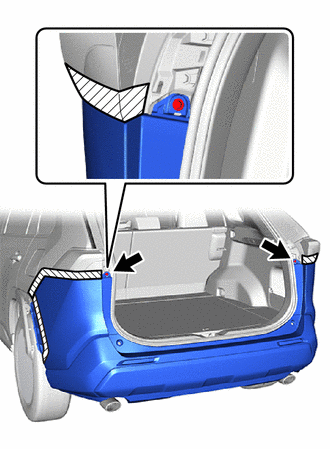
(1) Remove the 3 clips.
(2) Remove the screw and rear bumper side seal LH.
|
(b) w/ Mudguard: (1) for Short Type: Remove the 3 clips and rear bumper side seal LH. (2) for Long Type: Remove the 2 clips and rear bumper side seal LH. |
|
10. REMOVE REAR BUMPER SIDE SEAL RH
(a) w/o Mudguard:
|
|
Clip |
|
|
Screw |
(1) Remove the 4 clips.
(2) Remove the screw and rear bumper side seal RH.
|
(b) w/ Mudguard: (1) for Short Type: Remove the 4 clips and rear bumper side seal RH. (2) for Long Type: Remove the 3 clips and rear bumper side seal RH. |
|
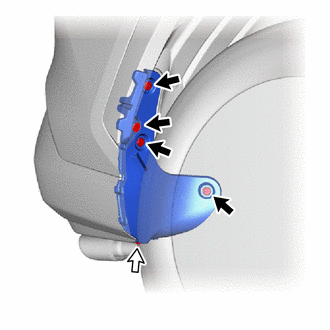
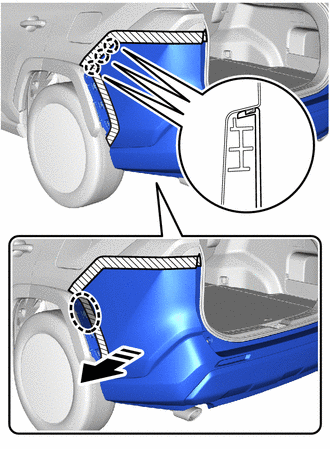
11. REMOVE QUARTER OUTSIDE MOULDING SUB-ASSEMBLY LH
(a) except Off Road Package:
(1) Apply protective tape around the quarter outside moulding sub-assembly LH.
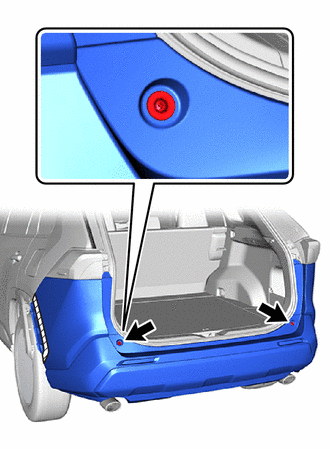
(2) Remove the screw.
|
|
Screw |
|
|
Clip |
(3) Remove the clip.
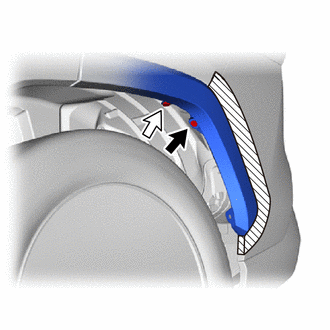
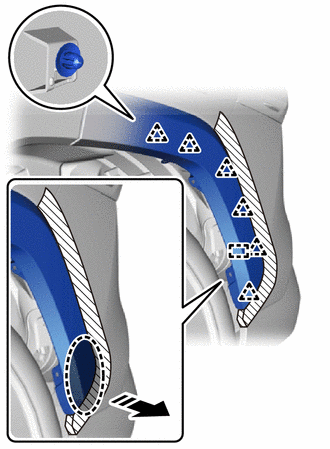
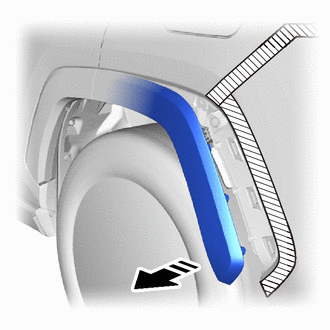
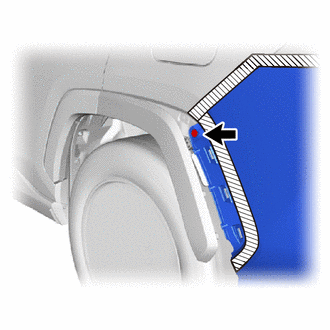
(4) Pull back the edge of the rear wheel house liner LH and detach the claw by pushing the area indicated by the arrow in the illustration with a finger.
NOTICE:
- Do not apply excessive force when pulling back the rear wheel house liner LH.
- To avoid damaging the claw, do not forcibly pull the rear quarter outside moulding sub-assembly LH.

|
Place Hand Here |

|
Remove in this Direction (1) |

|
Remove in this Direction (2) |
(5) Detach the clip and disconnect the rear quarter outside moulding sub-assembly LH.
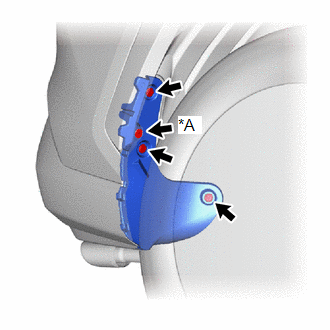
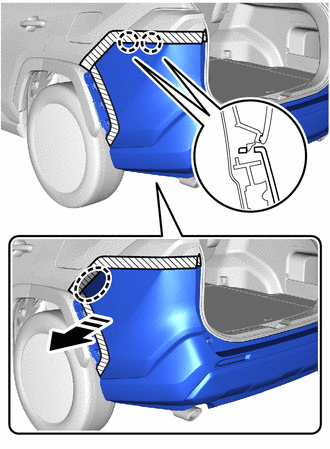
(b) for Off Road Package:
(1) Apply protective tape around the quarter outside moulding sub-assembly LH.
(2) Remove the screw.

|
|
Screw |
|
|
Clip |
(3) Remove the clip.
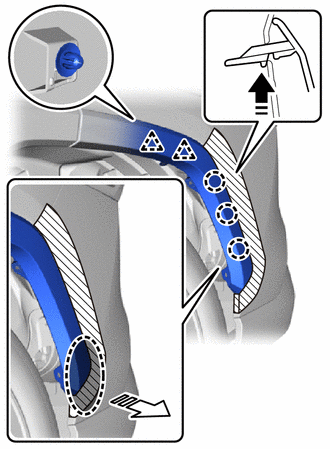
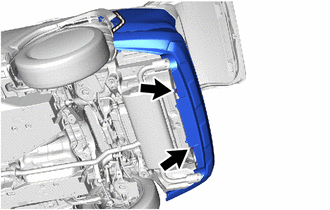
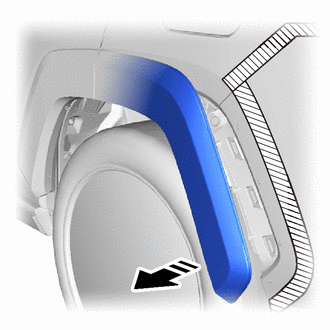
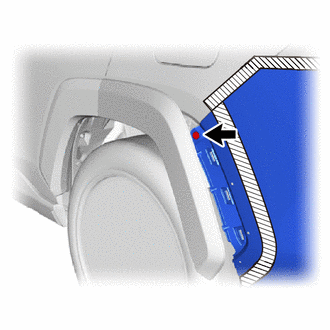
(4) Pull back the edge of the rear wheel house liner LH and detach the clip and guide.
|
|
Place Hand Here |
|
|
Remove in this Direction |
NOTICE:
- Do not apply excessive force when pulling back the rear wheel house liner LH.
- To avoid damaging the clips, do not forcibly pull the rear quarter outside moulding sub-assembly LH.
(5) Disconnect the rear quarter outside moulding sub-assembly LH.
12. REMOVE QUARTER OUTSIDE MOULDING SUB-ASSEMBLY RH
HINT:
Use the same procedure for the RH and LH side.
13. REMOVE REAR COMBINATION LIGHT COVER LH
Click here
14. REMOVE REAR COMBINATION LIGHT COVER RH
HINT:
Use the same procedure for the RH and LH side.
15. REMOVE REAR BUMPER UPPER STOPPER
|
(a) Remove the 2 rear bumper upper stoppers. |
|
16. REMOVE REAR BUMPER ASSEMBLY
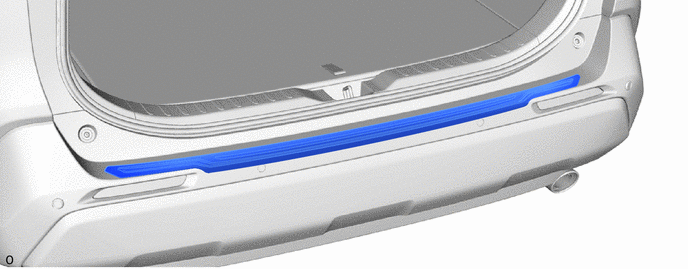
(a) Apply protective tape around the rear bumper assembly.


|
Protective Tape |
|
(b) Remove the 2 screws. |
|
|
(c) Remove the 2 clips. |
|
(d) except Off Road Package:
(1) Pull the rear quarter outside moulding sub-assembly LH toward the outside as shown in the illustration.
|
|
Remove in this Direction |
|
(2) Remove the clip. HINT: Use the same procedure for the RH and LH side. |
|
(e) for Off Road Package:
(1) Pull the rear quarter outside moulding sub-assembly LH toward the outside as shown in the illustration.
|
|
Remove in this Direction |
|
(2) Remove the clip. HINT: Use the same procedure for the RH and LH side. |
|
(f) Detach the claw as shown in the illustration.
|
|
Place Hand Here |
|
|
Remove in this Direction |
HINT:
Use the same procedure for the RH and LH side.
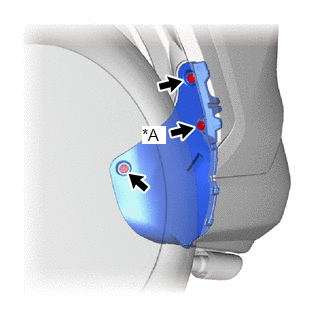
(g) Detach the claw as shown in the illustration.
|
|
Place Hand Here |
|
|
Remove in this Direction |
HINT:
Use the same procedure for the RH and LH side.
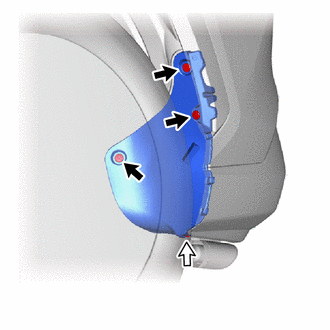
(h) w/ Intuitive Parking Assist System, w/ hands Free Power Back Door:
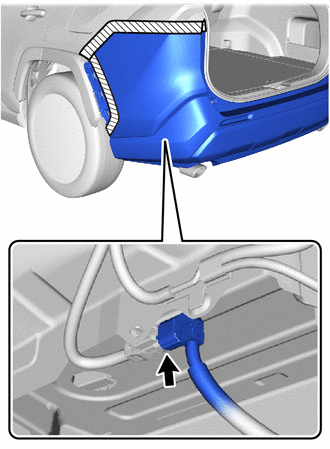
(1) Disconnect the connector.
(2) Detach the claw and back door garnish retainer to remove the rear bumper assembly as shown in the illustration.
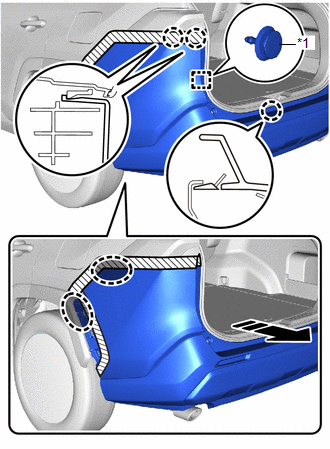
|
*1 |
Back Door Garnish Retainer |
|
|
Place Hand Here |
|
|
Remove in this Direction |
HINT:
Use the same procedure for the RH and LH side.
17. REMOVE REAR COMBINATION LIGHT ASSEMBLY LH
HINT:
Perform the following procedure only when replacement of a rear bumper upper retainer LH is necessary.
Click here
18. REMOVE REAR COMBINATION LIGHT ASSEMBLY RH
HINT:
- Perform the following procedure only when replacement of a rear bumper upper retainer RH is necessary.
- Use the same procedure for the RH and LH side.
19. REMOVE REAR BUMPER UPPER RETAINER LH
HINT:
Perform the following procedure only when replacement of a rear bumper upper retainer LH is necessary.
|
(a) Remove the 2 screws and rear bumper upper retainer LH. |
|
20. REMOVE REAR BUMPER UPPER RETAINER RH
HINT:
- Perform the following procedure only when replacement of a rear bumper upper retainer RH is necessary.
- Use the same procedure for the RH and LH side.
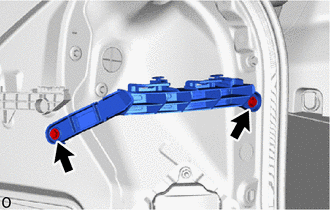
21. REMOVE REAR BUMPER SIDE SUPPORT LH
HINT:
Perform the following procedure only when replacement of a rear bumper side support LH is necessary.
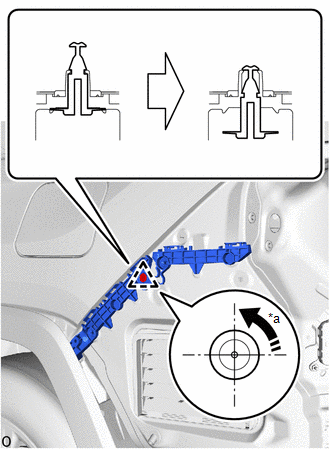
(a) Using a screwdriver, turn the clip 90° and detach the clip as shown in the illustration.
|
*a |
90° |
|
|
Remove in this Direction |
|
(b) Remove the 2 screws. |
|

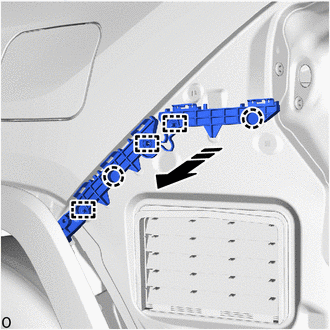
(c) Detach the guide and claw to remove the rear bumper side support LH as shown in the illustration.
|
|
Remove in this Direction |
22. REMOVE REAR BUMPER SIDE SUPPORT RH
HINT:
- Perform the following procedure only when replacement of a rear bumper side support RH is necessary.
- Use the same procedure for the RH and LH side.
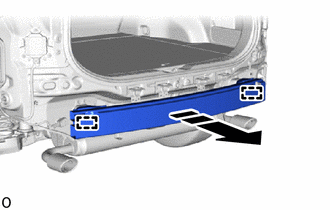
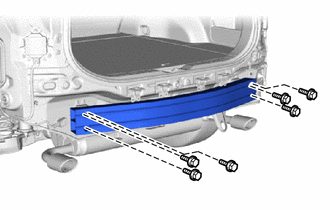
23. REMOVE REAR BUMPER REINFORCEMENT SUB-ASSEMBLY (for Type A)
HINT:
Perform the following procedure only when replacement of a rear bumper reinforcement sub-assembly is necessary.
|
(a) Remove the 6 bolts. |
|
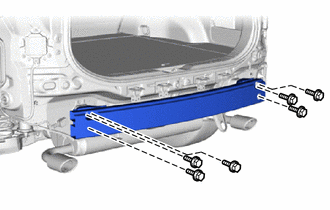
(b) Detach the guide and remove the rear bumper reinforcement sub-assembly as shown in the illustration.
|
|
Remove in this Direction |
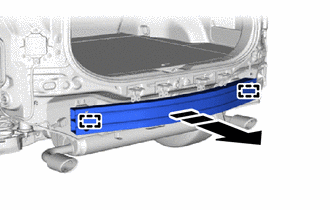
24. REMOVE REAR BUMPER REINFORCEMENT SUB-ASSEMBLY (for Type B)
HINT:
Perform the following procedure only when replacement of a rear bumper reinforcement sub-assembly is necessary.
|
(a) Remove the 6 bolts. |
|
(b) Detach the guide and remove the rear bumper reinforcement sub-assembly as shown in the illustration.
|
|
Remove in this Direction |
|
|
|