|
Last Modified: 01-30-2024 |
6.11:8.1.0 |
Doc ID: RM1000000026PS7 |
|
Model Year Start: 2023 |
Model: RAV4 |
Prod Date Range: [10/2022 -
] |
|
Title: THEFT DETERRENT / KEYLESS ENTRY: IMMOBILISER SYSTEM (for Gasoline Model without Smart Key System): Security Indicator Light Does not Blink; 2023 - 2024 MY RAV4 [10/2022 - ] |
|
Security Indicator Light Does not Blink
|
DESCRIPTION
-
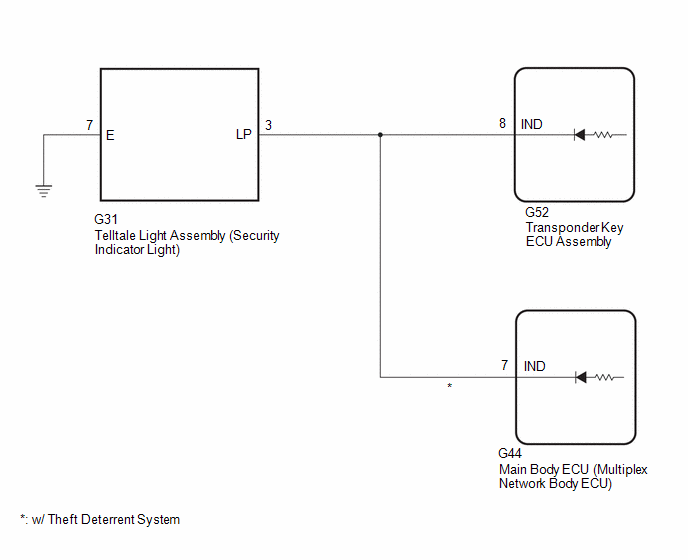
The main body ECU (multiplex network body ECU) blinks the telltale light assembly (security indicator light) when the theft deterrent system is in the arming preparation state or alarm sounding state.*
-
The transponder key ECU assembly blinks the telltale light assembly (security indicator light) when the immobiliser is set (no key is in the ignition key cylinder).
-
*: w/ Theft Deterrent System
WIRING DIAGRAM

CAUTION / NOTICE / HINT
NOTICE:
-
Before replacing the transponder key ECU assembly, refer to the Registration.
Click here
![2023 - 2024 MY RAV4 [10/2022 - ]; THEFT DETERRENT / KEYLESS ENTRY: IMMOBILISER SYSTEM (for Gasoline Model without Smart Key System): REGISTRATION](/t3Portal/stylegraphics/info.gif)
-
Make sure that no DTCs are output. If any DTCs are output, proceed to the Diagnostic Trouble Code Chart.
-
After completing repairs, confirm that the problem does not recur.
-
After repair, confirm that no DTCs are output by performing "DTC Output Confirmation Operation".
PROCEDURE
|
1.
|
PERFORM ACTIVE TEST USING TECHSTREAM (SECURITY INDICATOR)
|
(a) Connect the Techstream to the DLC3.
(b) Turn the ignition switch to ON.
(c) Turn the Techstream on.
(d) Enter the following menus: Body Electrical / Immobiliser or Main Body* / Active Test.
-
*: w/ Theft Deterrent System
(e) Perform the Active Test according to the display on the Techstream.
Body Electrical > Immobiliser > Active Test
|
Tester Display
|
Measurement Item
|
Control Range
|
Diagnostic Note
|
|
Security Indicator
|
Telltale light assembly (security indicator light)
|
ON/OFF
|
-
|
Body Electrical > Immobiliser > Active Test
|
Tester Display
|
|
Security Indicator
|
Body Electrical > Main Body > Active Test
|
Tester Display
|
Measurement Item
|
Control Range
|
Diagnostic Note
|
|
Security Indicator
|
Telltale light assembly (security indicator light)
|
ON/OFF
|
w/ Theft Deterrent System
|
Body Electrical > Main Body > Active Test
|
Tester Display
|
|
Security Indicator
|
|
Result
|
Proceed to
|
|
Telltale light assembly (security indicator light) operation is normal when performing the "Main Body" and "Immobiliser"* Active Test
|
A
|
w/ Theft Deterrent System:
-
Telltale light assembly (security indicator light) operation is not normal when performing the "Immobiliser" Active Test
-
Telltale light assembly (security indicator light) operation is normal when performing the "Main Body" Active Test
|
B
|
w/ Theft Deterrent System:
-
Telltale light assembly (security indicator light) operation is normal when performing the "Immobiliser" Active Test
-
Telltale light assembly (security indicator light) operation is not normal when performing the "Main Body" Active Test
|
C
|
|
Telltale light assembly (security indicator light) operation is not normal when performing the "Main Body" and "Immobiliser"* Active Test
|
D
|
-
*: w/ Theft Deterrent System
|
A
|

|
|
|
2.
|
CHECK TELLTALE LIGHT ASSEMBLY (SECURITY INDICATOR LIGHT) OPERATION
|
(a) When the immobiliser is set, check that the telltale light assembly (security indicator light) blinks.*1
OK:
The telltale light assembly (security indicator light) blinks normally.
(b) When the theft deterrent system is in the arming preparation state, check that the telltale light assembly (security indicator light) is on.*2
Click here
![2021 - 2024 MY RAV4 RAV4 HV [08/2020 - ]; THEFT DETERRENT / KEYLESS ENTRY: THEFT DETERRENT SYSTEM: SYSTEM DESCRIPTION](/t3Portal/stylegraphics/info.gif)
OK:
The telltale light assembly (security indicator light) is on.
|
Result
|
Proceed to
|
|
Both *1 and *2 are OK
|
A
|
|
*1 is NG (*2 is OK)
|
B
|
|
*2 is NG (*1 is OK)
|
C
|
|
Both *1 and *2 are NG
|
D
|
|
3.
|
CHECK HARNESS AND CONNECTOR (TELLTALE LIGHT ASSEMBLY (SECURITY INDICATOR LIGHT) - TRANSPONDER KEY ECU ASSEMBLY)
|
(a) Disconnect the G31 telltale light assembly (security indicator light) connector.
(b) Disconnect the G44 main body ECU (multiplex network body ECU) connector.
(c) Disconnect the G52 transponder key ECU assembly connector.
(d) Measure the resistance according to the value(s) in the table below.
Standard Resistance:
|
Tester Connection
|
Condition
|
Specified Condition
|
|
G52-8 (IND) - G31-3 (LP)
|
Always
|
Below 1 Ω
|
|
G52-8 (IND) or G31-3 (LP) - Other terminals and body ground
|
Always
|
10 kΩ or higher
|
| NG |

|
REPAIR OR REPLACE HARNESS OR CONNECTOR
|
|
4.
|
CHECK HARNESS AND CONNECTOR (TELLTALE LIGHT ASSEMBLY (SECURITY INDICATOR LIGHT) - MAIN BODY ECU (MULTIPLEX NETWORK BODY ECU))
|
(a) Disconnect the G31 telltale light assembly (security indicator light) connector.
(b) Disconnect the G44 main body ECU (multiplex network body ECU) connector.
(c) Disconnect the G52 transponder key ECU assembly connector.
(d) Measure the resistance according to the value(s) in the table below.
Standard Resistance:
|
Tester Connection
|
Condition
|
Specified Condition
|
|
G44-7 (IND) - G31-3 (LP)
|
Always
|
Below 1 Ω
|
|
G44-7 (IND) or G31-3 (LP) - Other terminals and body ground
|
Always
|
10 kΩ or higher
|
| NG |

|
REPAIR OR REPLACE HARNESS OR CONNECTOR
|
|
5.
|
CHECK HARNESS AND CONNECTOR (TELLTALE LIGHT ASSEMBLY (SECURITY INDICATOR LIGHT) - MAIN BODY ECU (MULTIPLEX NETWORK BODY ECU))
|
(a) Disconnect the G31 telltale light assembly (security indicator light) connector.
(b) Disconnect the G44 main body ECU (multiplex network body ECU) connector.*
-
*: w/ Theft Deterrent System
(c) Disconnect the G52 transponder key ECU assembly connector.
(d) Measure the resistance according to the value(s) in the table below.
Standard Resistance:
|
Tester Connection
|
Condition
|
Specified Condition
|
|
G44-7 (IND) - G31-3 (LP)
|
Always
|
Below 1 Ω
|
|
G44-7 (IND) or G31-3 (LP) - Other terminals and body ground
|
Always
|
10 kΩ or higher
|
| NG |

|
REPAIR OR REPLACE HARNESS OR CONNECTOR
|
|
OK
|

|
|
|
6.
|
CHECK HARNESS AND CONNECTOR (TELLTALE LIGHT ASSEMBLY (SECURITY INDICATOR LIGHT) - BODY GROUND)
|
|
(a) Measure the resistance according to the value(s) in the table below.
Standard Resistance:
|
Tester Connection
|
Condition
|
Specified Condition
|
|
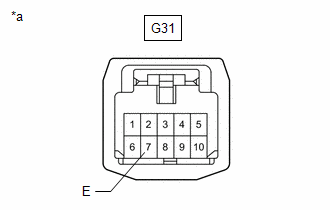
G31-7 (E) - Body ground
|
Always
|
Below 1 Ω
|
|

|
|
*a
|
Front view of wire harness connector (to Telltale Light Assembly)
|
|
|
| NG |

|
REPAIR OR REPLACE HARNESS OR CONNECTOR
|
|

![2023 - 2024 MY RAV4 [10/2022 - ]; THEFT DETERRENT / KEYLESS ENTRY: IMMOBILISER SYSTEM (for Gasoline Model without Smart Key System): REGISTRATION](/t3Portal/stylegraphics/info.gif)


