| Last Modified: 01-30-2024 | 6.11:8.1.0 | Doc ID: RM1000000026OLM |
| Model Year Start: 2023 | Model: RAV4 | Prod Date Range: [10/2022 - ] |
| Title: AUDIO / VIDEO: AUDIO AND VISUAL SYSTEM: B1ACA71; Front Right Speaker Cable Actuator Stuck; 2023 - 2024 MY RAV4 RAV4 HV [10/2022 - ] | ||
|
DTC |
B1ACA71 |
Front Right Speaker Cable Actuator Stuck |
DESCRIPTION
This DTC is stored when the stereo component amplifier assembly detects an open in the front speaker RH circuit by energizing the speaker line.
|
DTC No. |
Detection Item |
DTC Detection Condition |
Trouble Area |
DTC Output from |
Priority |
|---|---|---|---|---|---|
|
B1ACA71 |
Front Right Speaker Line Cable Actuator Stuck |
Open in the front speaker RH circuit is detected. (1 trip detection logic) |
|
Navigation System |
A |
- *: w/ Manual (SOS) Switch
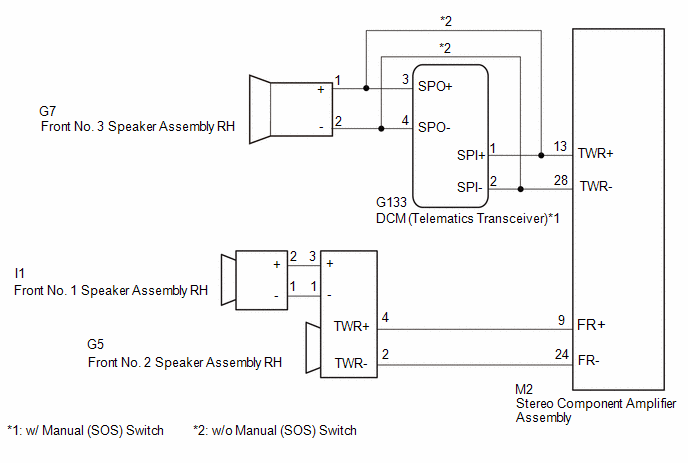
WIRING DIAGRAM
PROCEDURE
|
1. |
CHECK PROBLEM SYMPTOM |
(a) Confirm the problem symptoms and proceed to the respective link.
|
Result |
Proceed to |
|---|---|
|
No sound is output from the front No. 1 speaker assembly RH or front No. 2 speaker assembly RH |
A |
|
No sound is output from the front No. 3 speaker assembly RH (w/ Manual [SOS] Switch) |
B |
|
No sound is output from the front No. 3 speaker assembly RH (w/o Manual [SOS] Switch) |
C |
| B |

|
| C |
|
|

|
2. |
CHECK HARNESS AND CONNECTOR (STEREO COMPONENT AMPLIFIER ASSEMBLY - FRONT NO. 2 SPEAKER ASSEMBLY RH) |
Pre-procedure1
(a) Disconnect the M2 stereo component amplifier assembly connector.
(b) Disconnect the G5 front No. 2 speaker assembly RH connector.
Procedure1
(c) Measure the resistance according to the value(s) in the table below.
Standard Resistance:
|
Tester Connection |
Condition |
Specified Condition |
|---|---|---|
|
M2-9 (FR+) - G5-4 (TWR+) |
Always |
Below 1 Ω |
|
M2-24 (FR-) - G5-2 (TWR-) |
Always |
Below 1 Ω |
Post-procedure1
(d) None
| NG |
|
REPAIR OR REPLACE HARNESS OR CONNECTOR |
|
|
3. |
CHECK HARNESS AND CONNECTOR (FRONT NO. 2 SPEAKER ASSEMBLY RH - FRONT NO. 1 SPEAKER ASSEMBLY RH) |
Pre-procedure1
(a) Disconnect the G5 front No. 2 speaker assembly RH connector.
(b) Disconnect the I1 front No. 1 speaker assembly RH connector.
Procedure1
(c) Measure the resistance according to the value(s) in the table below.
Standard Resistance:
|
Tester Connection |
Condition |
Specified Condition |
|---|---|---|
|
G5-3 (+) - I1-2 (+) |
Always |
Below 1 Ω |
|
G5-1 (-) - I1-1 (-) |
Always |
Below 1 Ω |
Post-procedure1
(d) None
| NG |
|
REPAIR OR REPLACE HARNESS OR CONNECTOR |
|
|
4. |
INSPECT FRONT NO. 1 SPEAKER ASSEMBLY RH |
Click here
![2019 - 2024 MY RAV4 RAV4 HV [11/2018 - ]; AUDIO / VIDEO: FRONT DOOR SPEAKER: INSPECTION](/t3Portal/stylegraphics/info.gif)
| NG |
|
|
|
5. |
REPLACE FRONT NO. 2 SPEAKER ASSEMBLY RH |
(a) Replace the front No. 2 speaker assembly with a new or known good one.
HINT:
Click here
|
|
6. |
CLEAR DTC |
(a) Clear the DTCs.
Body Electrical > Navigation System > Clear DTCs
|
|
7. |
SPEAKER LINE ELECTRICITY CHECK |
(a) In accordance with the display of the GTS, perform a speaker line electricity check.
Body Electrical > Navigation System > Utility
|
Tester Display |
|---|
|
Speaker Line Electricity Check |
|
|
8. |
CHECK FOR DTC |
(a) Check for DTCs and proceed to the following step.
Body Electrical > Navigation System > Trouble Codes
|
Result |
Proceed to |
|---|---|
|
DTCs are not output |
A |
|
DTC B1ACA71 is output |
B |
| A |
|
END (FRONT NO. 2 SPEAKER ASSEMBLY RH IS DEFECTIVE) |
| B |
|
|
9. |
CHECK HARNESS AND CONNECTOR (STEREO COMPONENT AMPLIFIER ASSEMBLY - FRONT NO. 3 SPEAKER ASSEMBLY RH, DCM [TELEMATICS TRANSCEIVER]) |
Pre-procedure1
(a) Disconnect the M2 stereo component amplifier assembly connector.
(b) Disconnect the G7 front No. 3 speaker assembly RH connector.
(c) Disconnect the G133 DCM (telematics transceiver) connector.*
Procedure1
(d) Measure the resistance according to the value(s) in the table below.
Standard Resistance:
|
Tester Connection |
Condition |
Specified Condition |
|---|---|---|
|
M2-13 (TWR+) - G133-1 (SPI+) |
Always |
Below 1 Ω |
|
M2-28 (TWR-) - G133-2 (SPI-) |
Always |
Below 1 Ω |
|
G133-3 (SPO+) - G7-1 (+) |
Always |
Below 1 Ω |
|
G133-4 (SPO-) - G7-2 (-) |
Always |
Below 1 Ω |
Post-procedure1
(e) None
| NG |
|
REPAIR OR REPLACE HARNESS OR CONNECTOR |
|
|
10. |
INSPECT DCM (TELEMATICS TRANSCEIVER) (SPO+, SPO-, SPI+, SPI-) |
Pre-procedure1
|
(a) Remove the DCM (telematics transceiver). HINT: Click here
|
|

Procedure1
(b) Measure the resistance according to the value(s) in the table below.
Standard Resistance:
|
Tester Connection |
Condition |
Specified Condition |
|---|---|---|
|
3 (SPO+) - 1 (SPI+) |
Always |
Below 1 Ω |
|
4 (SPO-) - 2 (SPI-) |
Always |
Below 1 Ω |
|
1 (SPI+) - 2 (SPI-) |
Always |
10 kΩ or higher |
|
3 (SPO+) - 4 (SPO-) |
Always |
10 kΩ or higher |
Post-procedure1
(c) None
| OK |
|
| NG |
|
|
11. |
CHECK HARNESS AND CONNECTOR (STEREO COMPONENT AMPLIFIER ASSEMBLY - FRONT NO. 3 SPEAKER ASSEMBLY RH) |
Pre-procedure1
(a) Disconnect the M2 stereo component amplifier assembly connector.
(b) Disconnect the G7 front No. 3 speaker assembly RH connector.
Procedure1
(c) Measure the resistance according to the value(s) in the table below.
Standard Resistance:
|
Tester Connection |
Condition |
Specified Condition |
|---|---|---|
|
M2-13 (TWR+) - G7-1 (+) |
Always |
Below 1 Ω |
|
M2-28 (TWR-) - G7-2 (-) |
Always |
Below 1 Ω |
Post-procedure1
(d) None
| NG |
|
REPAIR OR REPLACE HARNESS OR CONNECTOR |
|
|
12. |
INSPECT FRONT NO. 3 SPEAKER ASSEMBLY RH |
Click here
| NG |
|
|
|
13. |
CLEAR DTC |
(a) Clear the DTCs.
Body Electrical > Navigation System > Clear DTCs
|
|
14. |
SPEAKER LINE ELECTRICITY CHECK |
(a) In accordance with the display of the GTS, perform a speaker line electricity check.
Body Electrical > Navigation System > Utility
|
Tester Display |
|---|
|
Speaker Line Electricity Check |
|
|
15. |
CHECK FOR DTC |
(a) Check for DTCs and proceed to the following step.
Body Electrical > Navigation System > Trouble Codes
|
Result |
Proceed to |
|---|---|
|
DTCs are not output |
A |
|
DTC B1ACA71 is output |
B |
| A |
|
END (FRONT NO. 3 SPEAKER ASSEMBLY RH IS DEFECTIVE) |
| B |
|
|
|
|