| Last Modified: 01-30-2024 | 6.11:8.1.0 | Doc ID: RM100000002591W |
| Model Year Start: 2023 | Model: RAV4 | Prod Date Range: [10/2022 - ] |
| Title: GF2A (TRANSFER / 4WD / AWD): TRANSFER ASSEMBLY: INSTALLATION; 2023 - 2024 MY RAV4 [10/2022 - ] | ||
INSTALLATION
PROCEDURE
1. INSTALL WIRING HARNESS CLAMP BRACKET
|
(a) Install the 3 wiring harness clamp brackets and connect the clutch control solenoid wire with the 3 bolts. HINT: Tighten the ground of the clutch control solenoid wire together with bolt A. Torque: 19.6 N·m {200 kgf·cm, 14 ft·lbf} |
|
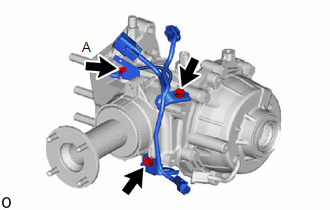
|
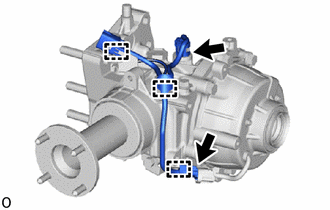
(b) Connect the 3 clamps and 2 connectors and install the clutch control solenoid wire. |
|
2. INSTALL TRANSFER AND TRANSAXLE SETTING STUD BOLT
Click here
![2019 - 2024 MY RAV4 [11/2018 - ]; UB80F (AUTOMATIC TRANSMISSION / TRANSAXLE): AUTOMATIC TRANSAXLE ASSEMBLY: INSTALLATION+](/t3Portal/stylegraphics/info.gif)
3. INSTALL TRANSFER ASSEMBLY
|
(a) Clean the bolt holes. |
|
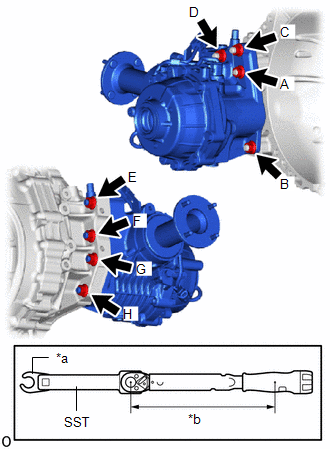
(b) Temporarily install the transfer assembly to the transaxle with the 8 nuts.
NOTICE:
- Push the transfer assembly by hand until it is in close contact with the mating surface of the transaxle assembly.
- If the entire mating surface does not come into close contact, tighten the nuts alternately in the order of nut A and nut B, and bring the mating surfaces into close contact little by little.
- Make sure the mating surfaces of nut A and nut B are in close contact. Then temporarily tighten the nuts in order as follows and bring the entire circumference of the mating surface in close contact.
HINT:
Temporarily install order: Temporarily install nut (A) → Temporarily install nut (B) → Temporarily install nut (C) → Temporarily install nut (D) → Temporarily install nut (E) → Temporarily install nut (F) → Temporarily install nut (G) → Temporarily install nut (H)
(c) Using SST and union nut wrench, tighten the 8 nuts.
SST: 09961-00950
Torque:
Specified tightening torque :
68.6 N·m {700 kgf·cm, 51 ft·lbf}
HINT:
- Tightening order: Tighten nut (A) → Tighten nut (B) → Tighten nut (C) → Tighten nut (D) → Tighten nut (E) → Tighten nut (F) → Tighten nut (G) → Tighten nut (H)
- This torque value is effective when SST is straight to a torque wrench.
-
Calculate the torque wrench reading when changing the fulcrum length of the torque wrench.
Click here
- When using a union nut wrench (fulcrum length of 30 mm (1.181 in.)) + SST (fulcrum length of 150 mm (5.906 in.)) + torque wrench (fulcrum length of 255 mm (10.039 in.)): 40.2 N*m (410 kgf*cm, 30 ft.*lbf)
4. INSTALL REAR ENGINE MOUNTING BRACKET SUB-ASSEMBLY
Click here
5. INSTALL REAR ENGINE MOUNTING INSULATOR
Click here
6. INSTALL NO. 1 PROPELLER SHAFT HEAT INSULATOR BRACKET SUB-ASSEMBLY
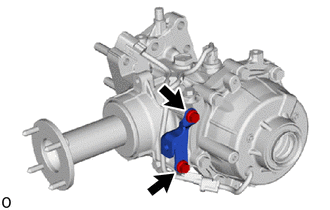
|
(a) Install the No. 1 propeller shaft heat insulator bracket sub-assembly with the 2 bolts. Torque: 25 N·m {255 kgf·cm, 18 ft·lbf} |
|
7. INSTALL PROPELLER SHAFT HEAT INSULATOR
Click here
8. INSTALL TRANSAXLE ASSEMBLY
Click here
9. DYNAMIC TORQUE VECTORING 4WD/AWD SYSTEM CALIBRATION
(a) When the electro magnetic control coupling sub-assembly is replaced, Learning Value Initialization must be performed.
Click here
|
|
|