| Last Modified: 01-30-2024 | 6.11:8.1.0 | Doc ID: RM1000000021J1Q |
| Model Year Start: 2022 | Model: RAV4 | Prod Date Range: [12/2021 - ] |
| Title: BRAKE CONTROL / DYNAMIC CONTROL SYSTEMS: BRAKE PEDAL STROKE SENSOR (w/o Vacuum Brake Booster): INSTALLATION; 2022 - 2024 MY RAV4 RAV4 HV [12/2021 - ] | ||
INSTALLATION
PROCEDURE
1. INSPECT AND ADJUST BRAKE PEDAL HEIGHT
Click here
![2022 - 2024 MY RAV4 RAV4 HV [12/2021 - ]; BRAKE SYSTEM (OTHER): BRAKE PEDAL (w/o Vacuum Brake Booster): ADJUSTMENT](/t3Portal/stylegraphics/info.gif)
2. INSTALL BRAKE PEDAL STROKE SENSOR ASSEMBLY
NOTICE:
- Do not drop the brake pedal stroke sensor assembly.
- If the brake pedal stroke sensor assembly has been dropped, replace the brake pedal stroke sensor assembly with a new one.
(a) When installing a new brake pedal stroke sensor assembly:
NOTICE:
Do not break the brake pedal stroke sensor assembly lever set pin before installing the brake pedal stroke sensor assembly with the 2 nuts.
|
(1) Install a new brake pedal stroke sensor assembly to the brake pedal support assembly and temporarily tighten the 2 nuts. Torque: 8.5 N·m {87 kgf·cm, 75 in·lbf} NOTICE:
|
|
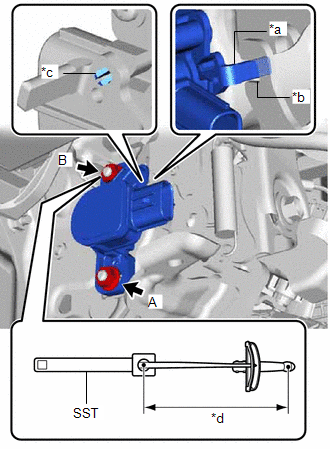
(2) Using SST, fully tighten the 2 nuts.
SST: 09961-00950
Torque:
Specified tightening torque :
8.5 N·m {87 kgf·cm, 75 in·lbf}
HINT:
-
Calculate the torque wrench reading when changing the fulcrum length of the torque wrench.
Click here
-
When using SST (fulcrum length of 150 mm (5.91 in.)) + torque wrench (fulcrum length of 185 mm (7.28 in.)):
4.7 N*m (48 kgf*cm, 42 in.*lbf)
(3) Connect the connector.
(4) Firmly depress the brake pedal to break the brake pedal stroke sensor assembly lever set pin.
(5) Remove the broken lever set pin.
(b) When reusing the brake pedal stroke sensor assembly:
|
(1) Install the brake pedal stroke sensor assembly to the brake pedal support assembly and temporarily tighten the 2 nuts. NOTICE:
|
|
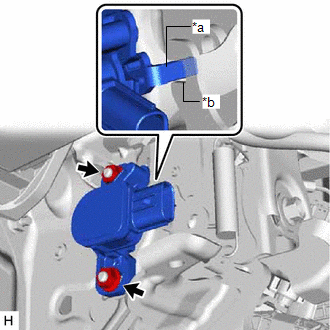
(2) Connect the connector.
3. CONNECT CABLE TO NEGATIVE AUXILIARY BATTERY TERMINAL
Click here
NOTICE:
When disconnecting the cable, some systems need to be initialized after the cable is reconnected.
Click here
4. ADJUST BRAKE PEDAL STROKE SENSOR ASSEMBLY
NOTICE:
When the brake pedal stroke sensor assembly is being reused, perform the following procedure to adjust it.
(a) Read the stroke sensor value in the Data List, and turn the brake pedal stroke sensor assembly slowly to the right or left to adjust the output voltage so that it is within the following range.
Chassis > Brake Booster > Data List
|
Tester Display |
|---|
|
Stroke Sensor |
|
(b) Read the stroke sensor value in the Data List, and turn the brake pedal stroke sensor assembly slowly to the right or left to adjust the output voltage so that it is within the following range. Standard Voltage (without the brake pedal depressed): 0.8 to 1.2 V |
|
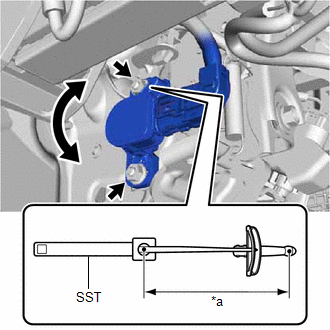
(c) Using SST, fully tighten the 2 nuts.
SST: 09961-00950
Torque:
Specified tightening torque :
8.5 N·m {87 kgf·cm, 75 in·lbf}
HINT:
-
Calculate the torque wrench reading when changing the fulcrum length of the torque wrench.
Click here
-
When using SST (fulcrum length of 150 mm (5.91 in.)) + torque wrench (fulcrum length of 185 mm (7.28 in.)):
4.7 N*m (48 kgf*cm, 42 in.*lbf)
(d) Turn the GTS off and turn the power switch off.
(e) Disconnect the GTS from the DLC3.
5. INSTALL NO. 1 INSTRUMENT PANEL UNDER COVER SUB-ASSEMBLY
Click here
6. INSTALL COWL SIDE TRIM BOARD LH
Click here
7. INSTALL FRONT DOOR SCUFF PLATE LH
Click here
8. PERFORM CALIBRATION
Click here
9. INITIALIZATION AFTER RECONNECTING AUXILIARY BATTERY TERMINAL
Click here
10. CHECK AND CLEAR DTC
Click here
|
|
|