| Last Modified: 09-02-2025 | 6.11:8.1.0 | Doc ID: RM1000000021J19 |
| Model Year Start: 2022 | Model: RAV4 HV | Prod Date Range: [12/2021 - ] |
| Title: HEATING / AIR CONDITIONING: REFRIGERANT LINE (for HV Model): REMOVAL; 2022 - 2025 MY RAV4 HV [12/2021 - ] | ||
REMOVAL
PROCEDURE
PROCEDURE
1. RECOVER REFRIGERANT FROM REFRIGERATION SYSTEM
2. DISCONNECT INVERTER RESERVE TANK ASSEMBLY
|
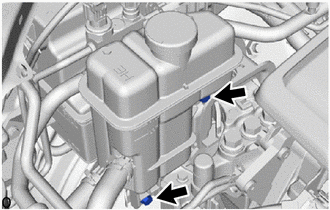
(a) Remove the 2 bolts. |
|
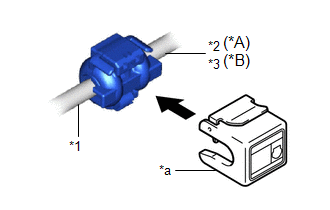
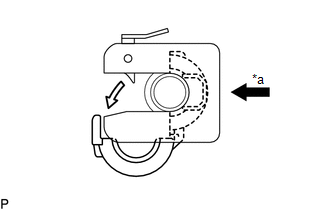
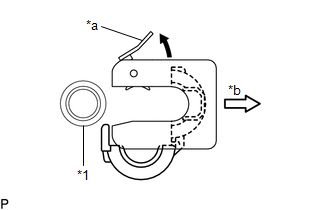
(b) Pull out the pin of the grommet and move the inverter reserve tank assembly as shown in the illustration.
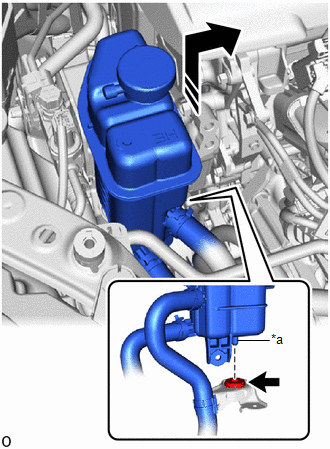
|
*a |
Pin |

|
Grommet |

|
Movement Direction |
3. REMOVE PIPING CLAMP (for Suction Hose Sub-assembly Side)
(a) for TMC Made:
(1) Press the suction hose sub-assembly to the suction pipe sub-assembly, and then release the piping clamp lock.
NOTICE:
Do not apply excessive force to the suction hose sub-assembly and suction pipe sub-assembly.
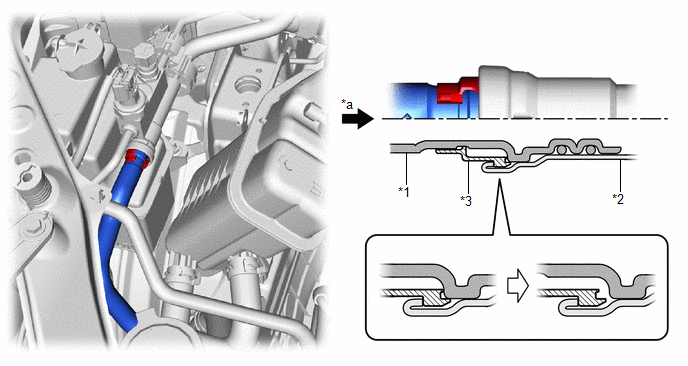
|
*1 |
Suction Hose Sub-assembly |
*2 |
No. 2 Air Conditioning Tube and Accessory Assembly |
|
*3 |
Piping Clamp |
- |
- |
|
*a |
Press In |
- |
- |
(2) While releasing the piping clamp lock, use pliers or another tool to pinch near the rear end of the piping clamp, and then disconnect the suction hose sub-assembly as you buckle it.
NOTICE:
- If any foreign matter is attached to the connecting parts, brush it off or use compressed air to remove it before disconnecting the parts.
- Make sure that fragments of the piping clamp do not enter the piping.
- When the piping clamp is buckled, cracks form. Therefore, make sure to replace it with a new one.
- Remove any foreign matter from the connecting parts of the suction hose sub-assembly and suction pipe sub-assembly.
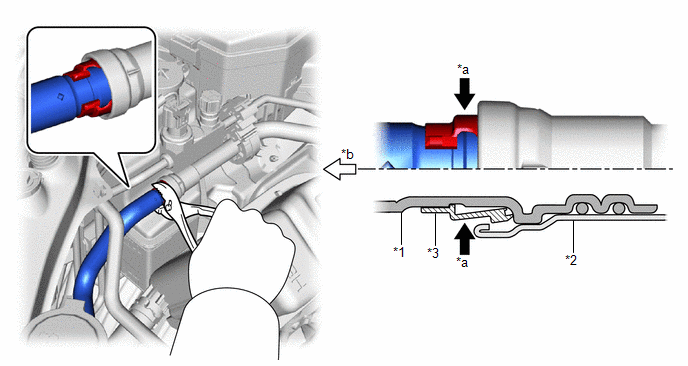
|
*1 |
Suction Hose Sub-assembly |
*2 |
No. 2 Air Conditioning Tube and Accessory Assembly |
|
*3 |
Piping Clamp |
- |
- |
|
*a |
Buckle |
*b |
Pull Out |
(b) for TMMC Made:
(1) Press the suction hose sub-assembly to the suction tube sub-assembly B, and then release the piping clamp lock.
NOTICE:
Do not apply excessive force to the suction hose sub-assembly and suction tube sub-assembly B.

|
*1 |
Suction Hose Sub-assembly |
*2 |
Suction Tube Sub-assembly B |
|
*3 |
Piping Clamp |
- |
- |
|
*a |
Press In |
- |
- |
(2) While releasing the piping clamp lock, use pliers or another tool to pinch near the rear end of the piping clamp, and then disconnect the suction hose sub-assembly as you buckle it.
NOTICE:
- If any foreign matter is attached to the connecting parts, brush it off or use compressed air to remove it before disconnecting the parts.
- Make sure that fragments of the piping clamp do not enter the piping.
- When the piping clamp is buckled, cracks form. Therefore, make sure to replace it with a new one.
- Remove any foreign matter from the connecting parts of the suction hose sub-assembly and suction tube sub-assembly B.

|
*1 |
Suction Hose Sub-assembly |
*2 |
Suction Tube Sub-assembly B |
|
*3 |
Piping Clamp |
- |
- |
|
*a |
Buckle |
*b |
Pull Out |
(c) Remove the 2 O-rings from the suction hose sub-assembly.
NOTICE:
Seal the openings of the disconnected parts with vinyl tape to prevent entry of moisture and foreign matter.
(d) Remove the piping clamp.
4. REMOVE PIPING CLAMP (w/ Sub-cool Accelerator)
|
(a) Install SST to the piping clamp as shown in the illustration. 09870-00025 |
|
(b) for TMC Made:
|
(1) Hold the air conditioning tube and accessory assembly and No. 2 air conditioning tube and accessory assembly with each hand and push in SST with both thumbs. NOTICE: Do not apply excessive force to the air conditioning tube and accessory assembly or No. 2 air conditioning tube and accessory assembly as they may bend. |
|
|
(2) Raise the stopper of SST and remove SST and the piping clamp together from the air conditioning tube and accessory assembly and No. 2 air conditioning tube and accessory assembly. |
|
(3) Remove the piping clamp from SST.
(4) Disconnect the No. 2 air conditioning tube and accessory assembly from the air conditioning tube and accessory assembly.
(5) Remove the 2 O-rings from the No. 2 air conditioning tube and accessory assembly.
NOTICE:
Seal the openings of the disconnected parts using vinyl tape to prevent entry of moisture and foreign matter.
(c) for TMMC Made:
|
(1) Hold the air conditioning tube and accessory assembly and suction tube sub-assembly B with each hand and push in SST with both thumbs. NOTICE: Do not apply excessive force to the air conditioning tube and accessory assembly or suction tube sub-assembly B as they may bend. |
|
|
(2) Raise the stopper of SST and remove SST and the piping clamp together from the air conditioning tube and accessory assembly and suction tube sub-assembly B. |
|
(3) Remove the piping clamp from SST.
(4) Disconnect the suction tube sub-assembly B from the air conditioning tube and accessory assembly.
(5) Remove the 2 O-rings from the suction tube sub-assembly B.
NOTICE:
Seal the openings of the disconnected parts using vinyl tape to prevent entry of moisture and foreign matter.
5. REMOVE PIPING CLAMP (for Air Conditioning Tube and Accessory Assembly Side)
|
|
|
![2019 - 2025 MY RAV4 RAV4 HV [02/2019 - ]; HEATING / AIR CONDITIONING: REFRIGERANT (for HFO-1234yf(R1234yf)): REPLACEMENT+](/t3Portal/stylegraphics/info.gif)
